


Blog 
Click here to go back
Time is Money

This is the ninth and final installment in a series of blog posts that specifically examine QuickBooks from an agriculture perspective. There is no “QuickBooks for Ag”. So how can we use some of the features in QuickBooks if we are in the ag business?
For this last post, we are going to look at adding a little more technology to features we’ve already demonstrated. Definitely one of the headaches of all the QuickBooks abilities we’ve looked at is the recording of time. Several steps are involved and several people. The communication between those people is critical and that is often the greatest obstacle in any organization.
So how can we make recording time for employees simpler?
A number of developer solutions exist that will record time and automatically import it into QuickBooks. One of the most popular and best known is an Idaho company named TSheets.
A detailed look at the service is far more than what we could cover here, so let’s just hit the high points and examine how this might help you.
With a TSheets subscription, I have a web site login where I, as the administrator, have access to all my company settings. Employees, customer:jobs, class, and more upload directly from QuickBooks. I don’t have to enter this data.
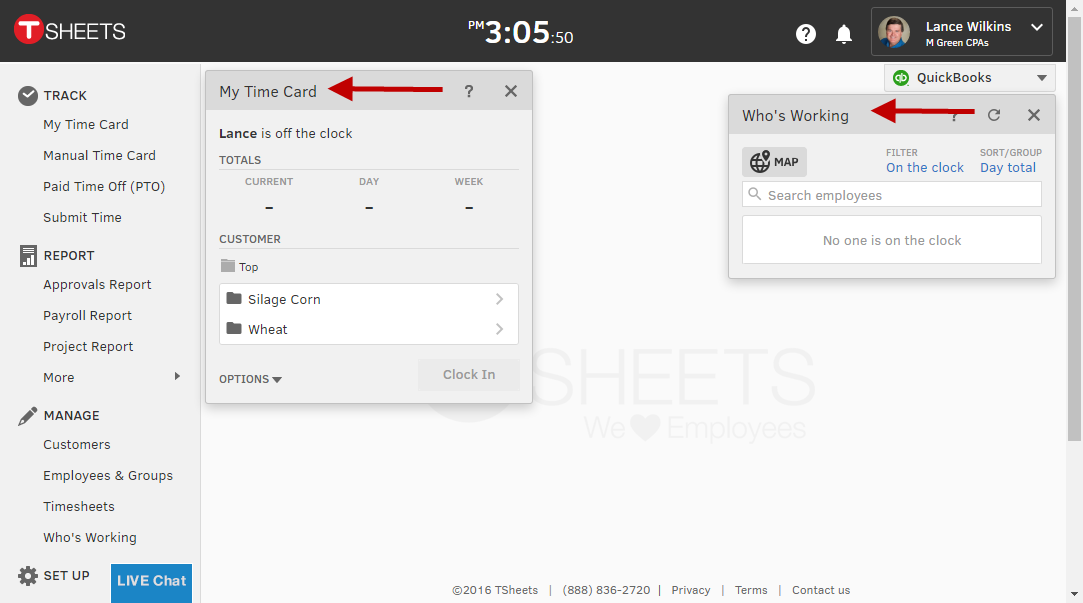
Along the left side of the screenshot above are a number of tools that allow me to setup and mange employees, look at reports of time worked, etc.
There’s a popup window labeled My Time Card which lets me record my own time if necessary. Another window is labeled Who’s Working and would display all employees that were clocked in at that particular moment.
There are several ways the TSheet service can be used. Each employee can clock in and out for themselves as they go through each workday. Or I, as the administrator, can fill in my employee’s time after the fact, although this misses out on some of TSheets’ cool abilities.
TSheets is mobile-friendly. Employees can clock in and out on their mobile device. Or, managers can be setup to be responsible for groups of employees. Anywhere there is a cell phone connection, the manager can clock his/her crew in and out as needed.
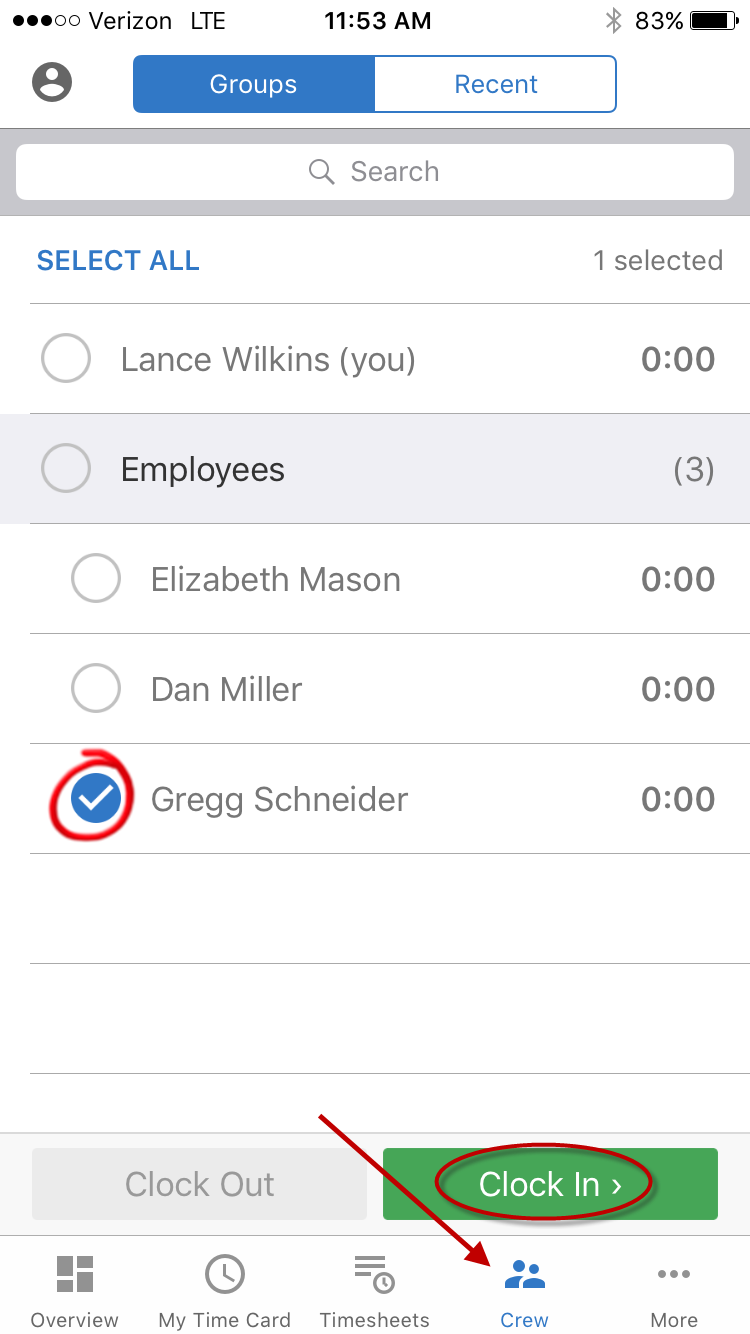
The above screenshot was taken on an iPhone with the TSheets app.
There are approval steps that can be added to the process. The employee can enter time, or it can be entered by a manager. At the end of the pay period, the time is ‘submitted’ with the click of a button.
Depending on the setup you choose, it may be someone else’s responsibility to approve the time. Once your designated approval process is complete, the time will automatically populate the weekly timesheet in QuickBooks for that employee.
The next step is to simply go to the Payroll Center and issue paychecks.
TSheets, and similar services, have much more to offer than only the features described in today’s post. But this gives you an idea of what is available in the way of automating and simplifying time entry.
If you would like more information about TSheets, you can contact us. You can also review the TSheets web site and/or sign up for a free trial subscription by clicking here.
Time as a Crop Expense
This is the eighth in a series of blog posts that will specifically examine QuickBooks from an agriculture perspective. There is no “QuickBooks for Ag”. So how can we use some of the features in QuickBooks if we are in the ag business?
Over the last few weeks we’ve looked at a couple of ways to track crop and/or field costs in very specific ways. We’ve also looked at how to set budgets so we can see how the actual results of a particular crop or field compare to our plan.
The one piece that remains is labor cost. If we are using QuickBooks to process our payroll, how do we make sure those costs flow to the right crop, field, location, or other designation?
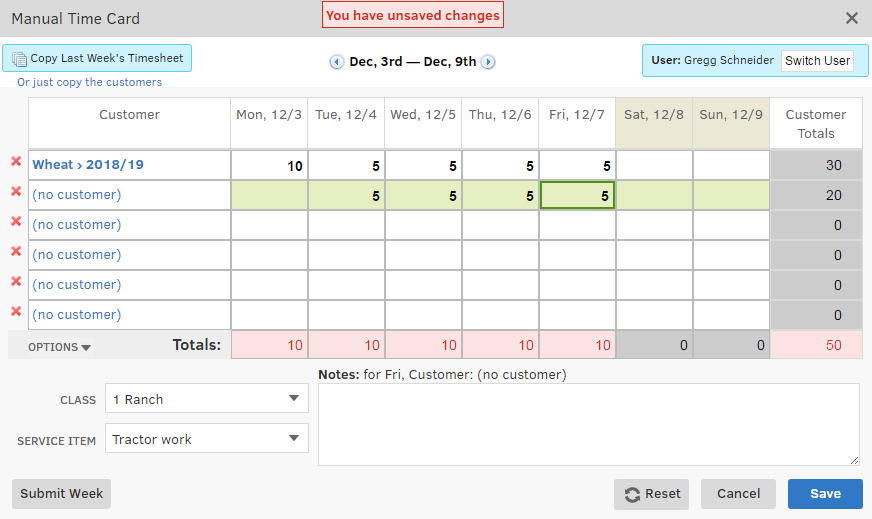
The feature in QuickBooks built to make this possible is the weekly timesheet. There are two time keeping forms. There is a Time/Enter Single Activity option besides the weekly timesheet. This is just a different way of looking at the same information that can be entered on the weekly timesheet. Kind of like looking at a check form in QuickBooks or viewing the same check in the check register.
Generally, entering time in the weekly timesheet is much more efficient.
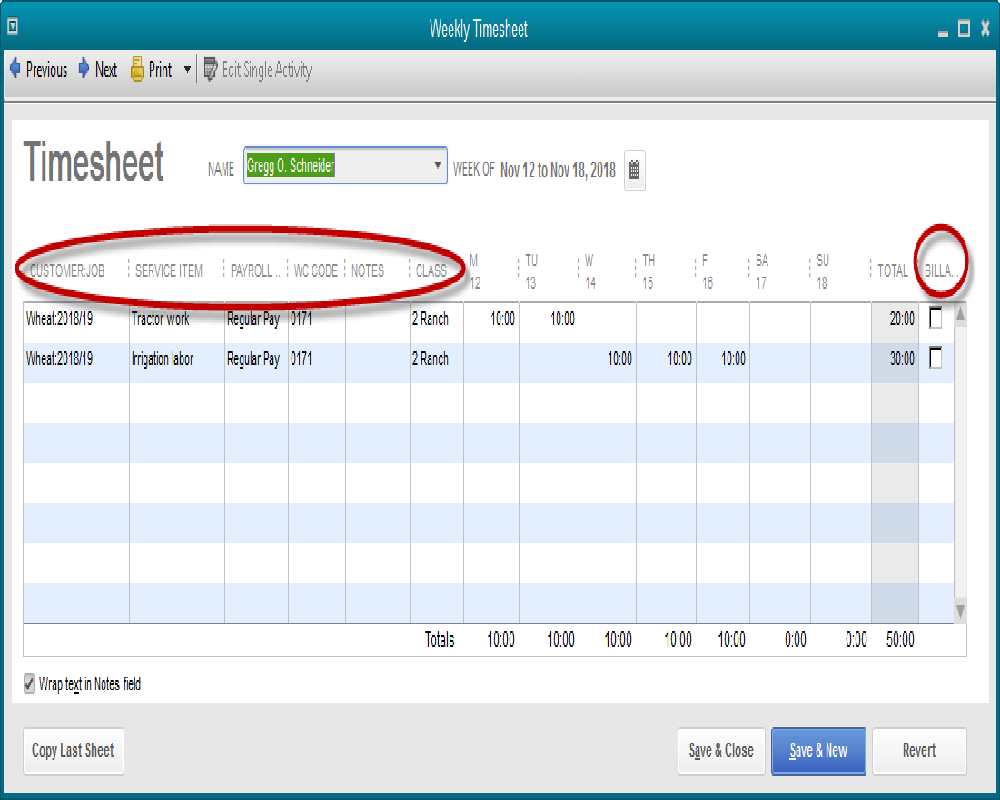
The form for entering time is pretty straightforward. Let’s examine some of the columns though.
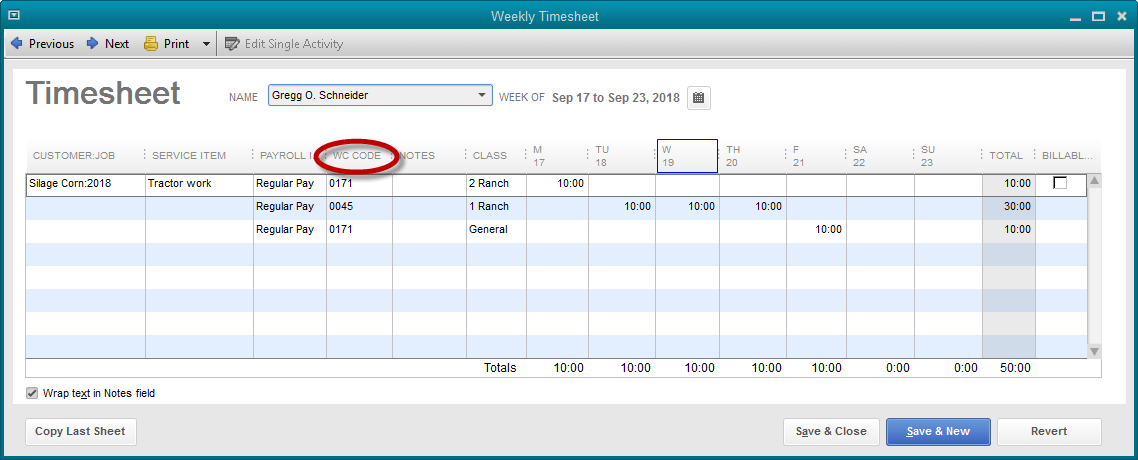
The Customer/Job column allows specifying what crop or project the time should be allocated to. In the above screenshot, Gregg is working on a wheat crop for the 2018/2019 season. This will populate reports for this wheat crop with the expense of Gregg’s time once this payroll is completed.
The service item is from the list of items we created to track various costs we want to record in the process of growing this particular crop. Gregg worked on both irrigation and tractor work this particular week.
The payroll item for Gregg is Regular Pay. If overtime were involved, we could use the overtime pay item for a portion of his time. This designation allows this time to be pulled directly into the payroll part of QuickBooks without re-entering it. If all Gregg’s time is recorded on the timesheet, it’s all there when we open the payroll center to create the paycheck.
The WC Code is the workers’ comp code. We published a post on tracking workers’ comp in QuickBooks on December 12th.
You may not have the Class column. The Ag sample file has three locations and tracks them by using Class. If you don’t have the class feature turned on, you won’t see this column.
The column farthest to the right in the screenshot deserves a mention. You will probably always uncheck the indicator in that column. If the graphic were stretched a little farther to the right, you could see the column header is labeled Billable. This would be used if we wanted to invoice a customer for this time. The way we are recording time, no one is getting invoiced for Gregg’s work.
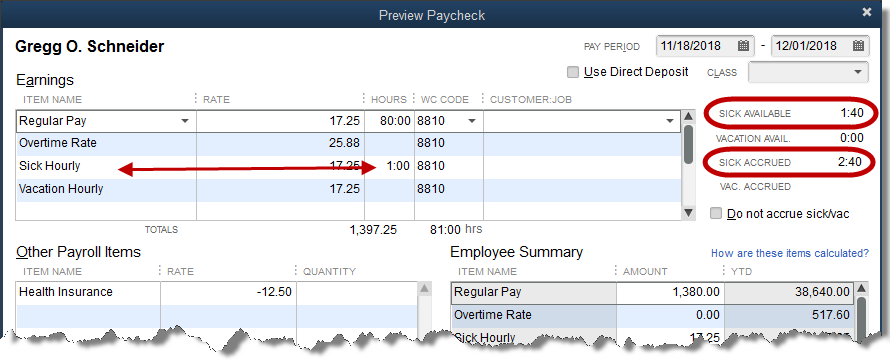
Above is the earnings portion of Gregg’s paycheck. All the hours entered into the timesheet flowed automatically to this point. There was no additional entry needed.
It would be possible to enter all the timesheet information here on the paycheck form, but it’s generally easier on the weekly timesheet, especially where multiple lines are needed to track service items, locations, crops, etc.
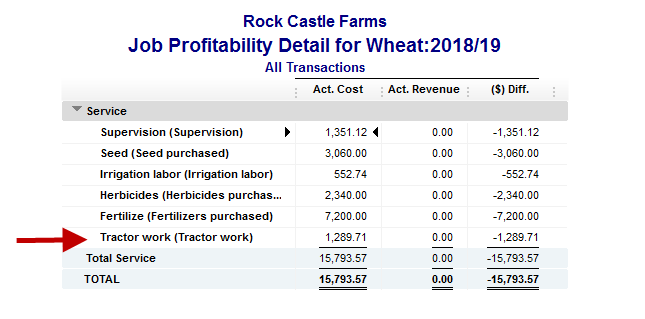
Above is a report showing the progress on the wheat crop which has not been harvested or sold yet. The amount on the Tractor Work line comes solely from paychecks that have been created for employees working this particular crop.
You can watch the video on using the weekly timesheet here.
Crop Budgets, A Creative Alternative
This is the seventh in a series of blog posts that will specifically examine QuickBooks from an agriculture perspective. There is no “QuickBooks for Ag”. So how can we use some of the features in QuickBooks if we are in the ag business?
Remember the post from a couple of weeks ago about using the job/project features in QuickBooks to track crop costs? Today’s post is an offshoot from that. More specifically, if we track a crop or field as we would a project, what’s the easiest way to plan or set a budget for that crop/project?
It may sound unusual, but the easiest, most effective way to do this would be by using an estimate in QuickBooks. Stay with us a couple of minutes here as we work through this. See if this can’t work for you as well.
One of the steps in tracking crops/fields as projects was to use items rather than accounts when recording income and expense. The reason for that was that the job/project reports in QuickBooks work with items, not accounts.
Forms like estimates also need items to populate them rather than accounts. Let’s look at how we might create an estimate to budget for a planned crop year.
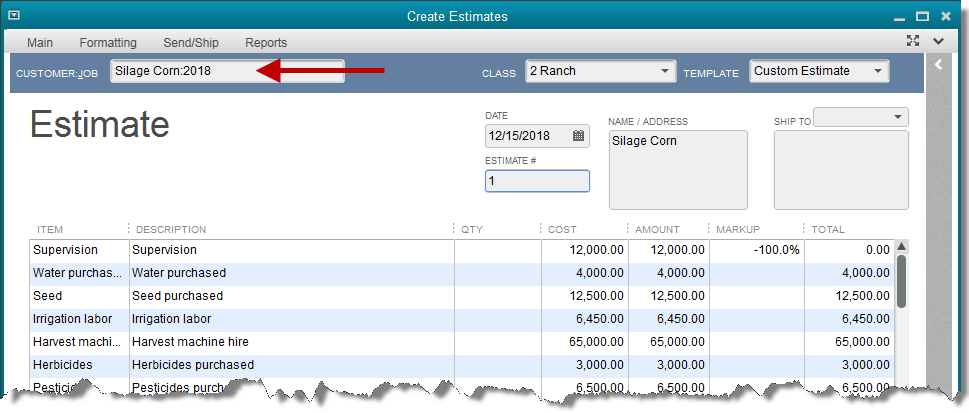
Create the items that will reflect the major costs of a particular crop/project. This can be a subjective process to a degree. That is, the items may be different from one QuickBooks user to another depending on the costs that are important to each. One may combine herbicide and pesticide costs into one line. Someone else may want to see a line for each.
In the screenshot above, the cost has been entered for each. There are no revenue amounts for these since we will not receive income. These are costs only.
The markup column is usually left blank. But, in an experiment we’ve added a negative 100% to result in a zero for the revenue column. QuickBooks considers the total column to be total revenue.
This hasn’t been ‘field-tested’ yet, but it’s an intriguing idea. It works fine in a sample file. If you try this, let us know how it works for you. You’ll see the difference in the report screenshot below.
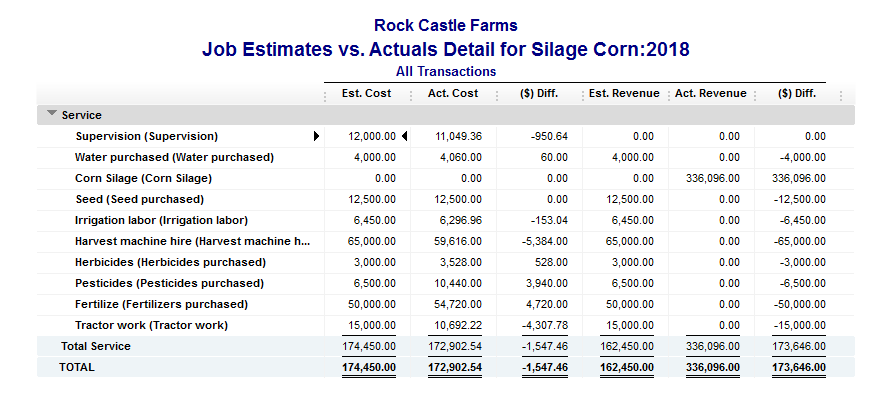
Above is the screenshot of the report from this simple example. The income (or revenue) for the crop shows on line three. There is no estimated number for this as it was not included on the estimate form. We only planned or budgeted for costs. We could easily have added the item for the sale of the crop as well.
You can see that all of the lines for cost items, except for the first line, include estimated revenue. That’s because QuickBooks assumes, if we enter no other amounts, the cost will also be the revenue.
In the past we’ve just ignored the revenue column for cost items. The main purpose of using the estimate was to be able to compare the estimated cost to the actual cost. If we didn’t make as much on the crop as we planned, what cost items were the culprits?
The first line though is where we added the -100% markup. It makes for a little cleaner report. Try that if you like and let us know how it works for you.
You can see a video of this topic here.
QuickBooks classes
We are partnering with the Visalia Chamber of Commerce to teach a QuickBooks class on February 22nd. You can find more info here.
We are also partnering with the Tulare Chamber of Commerce to teach a QuickBooks class on March 1st. You can find more info here.
Crop Budgets
This is the sixth in a series of blog posts that will specifically examine QuickBooks from an agriculture perspective. There is no “QuickBooks for Ag”. So how can we use some of the features in QuickBooks if we are in the ag business?
Usually, there is some kind of budget for each particular crop. This may be as simple as a few figures memorized in your head. It may be a more detailed Excel worksheet. A third possibility is QuickBooks.
This week and next, we will examine the tools in QuickBooks that can help with budgets. There’s more than one. And there’s more than one budget. A budget, even if mental, can be for the entire operation. A budget could be for each location if there is more than one. A budget for each crop or animal purchase is a third option.
Let’s start with the highest level budget tool in QuickBooks.
On the Company drop down menu is a section labeled Planning & Budgeting. In this section, choose Set Up Budgets.
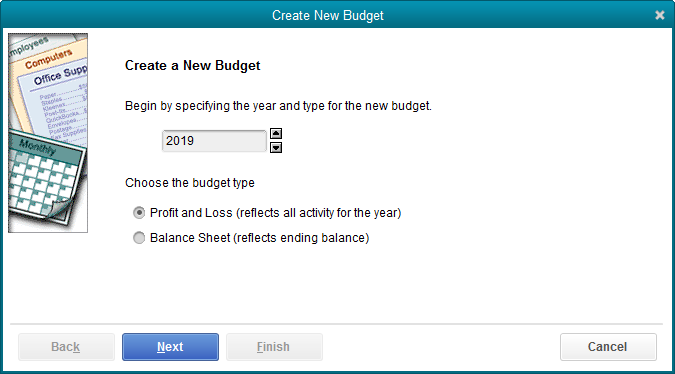
The wizard for creating a budget in QuickBooks will walk you through a couple of steps, asking pertinent questions along the way. Above is the first step. What year is this budget for? Do we want a budget for Profit and Loss or Balance Sheet?
Profit and Loss is by far the usual choice and we’ll use that today.
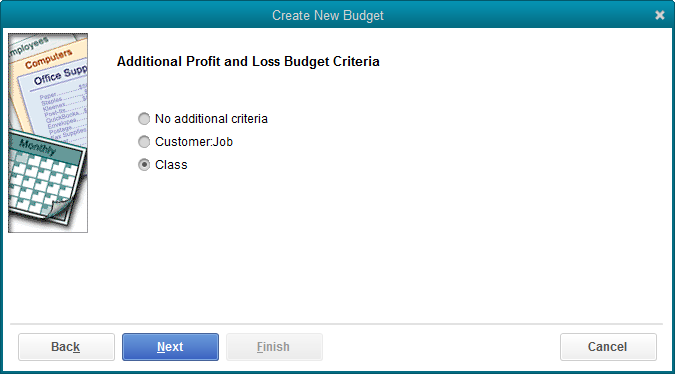
The second screen gives us several options, from high-level budgets to very specific.
The ‘No additional criteria’ option allows us to create one budget for the entire operation. The option ‘Customer:job’ will create a budget for one particular customer or project. Think back to last week’s post about setting up crops as customers and projects. The option in this budget setup window would allow a budget to be created for a specific crop or field.
The third option is only available if we are using the class feature in QuickBooks. The ag sample file has three locations and uses the class feature to breakdown the income and expense for each. Using the class option allows us to create a budget for each location.
For today’s example, that is the option we will choose.
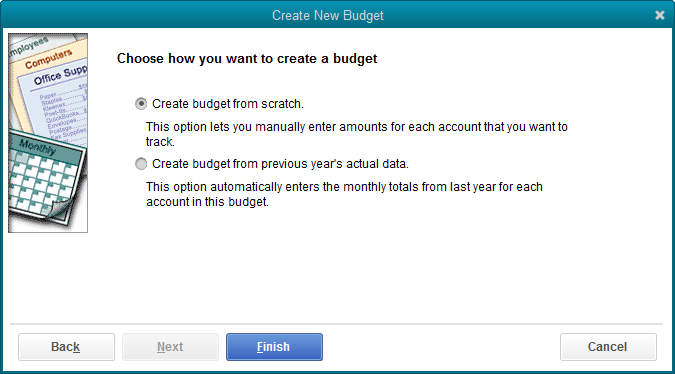
The final step is to tell QuickBooks if we want to create a budget by manually entering estimated income and expense, or base those numbers on the prior year. We will manually add the numbers for our budget.
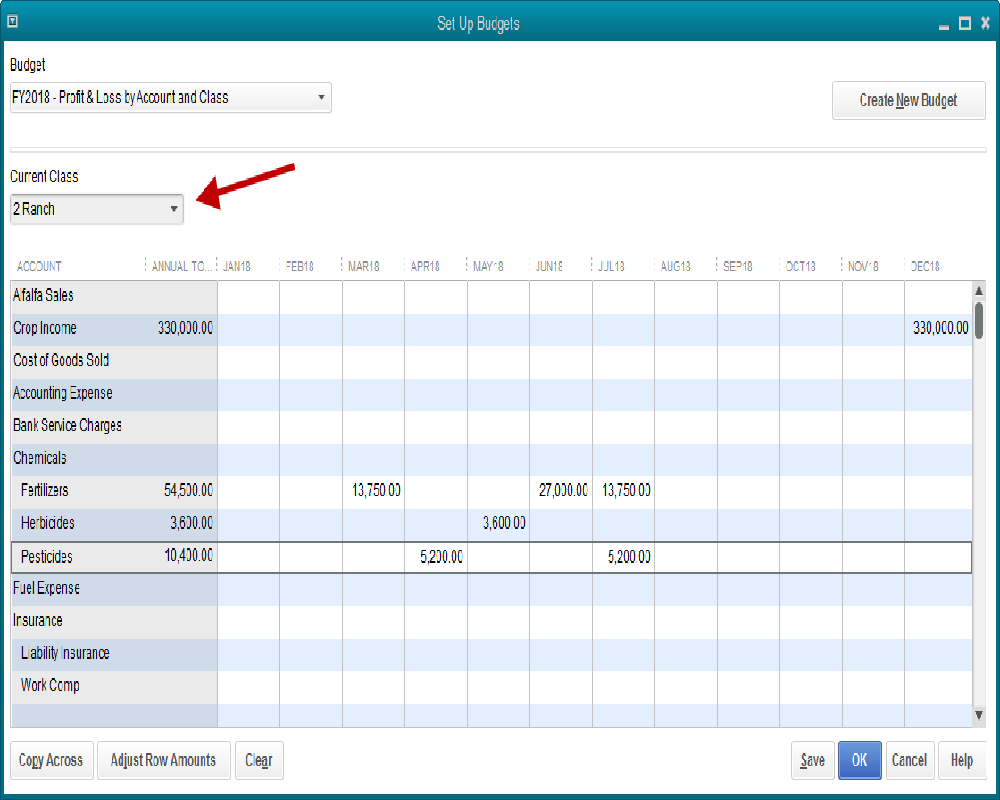
Since we selected the budget by class option, we have a drop-down list in the set up budget window. The arrow in the screenshot points to that. We’ve chosen ranch #2 for the class.
At this point it’s a matter of entering the estimated income and expense into the appropriate fields. The income and expense accounts form the rows of the budget form, the months of the year, the columns.
There are two buttons in the lower left that provide tools if you are able to automate part of this process. You could automatically copy a single number across all months for a particular expense for example. Or increase it by a set percentage each month.
Once a budget is complete and saved, there are a couple of budget comparison reports at Reports->Budgets & Forecasts.
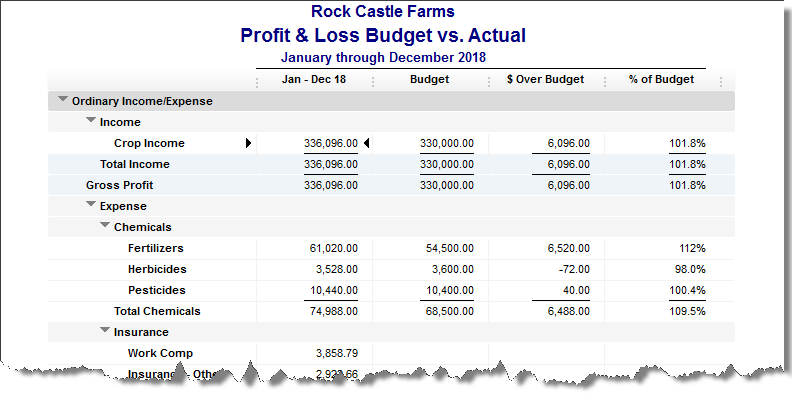
Above is a Budget vs Actual report. Normally this report shows the account totals by month. We reduced the columns to just one for the total year in order to show more of the report results in the screenshot.
In my opinion, this budgeting tool works best on an overall company budget, or a location budget. It will certainly work for crops and fields as well. But it’s a little time consuming.
We have another idea for budgeting at the crop or field level. More on that next time.
You can watch a video of this QuickBooks feature here.
An Innovative Way to Track Crop Costs in QuickBooks

This is the fifth in a series of blog posts that will specifically examine QuickBooks from an agriculture perspective. There is no “QuickBooks for Ag”. So how can we use some of the features in QuickBooks if we are in the ag business?
Determining the profit and/or loss for individual projects is critical for businesses like contracting, architecture, engineering, and others. Agriculture bears some similarity to these other types of businesses. That is, the profitability of the enterprise depends on the financial performance of individual crops grown.
With that established, we can look at features in QuickBooks meant to aid in the management accounting of project-based businesses and see if they might have application in agriculture.
Basically, our desired outcome is the same. To isolate the income and expense for individual projects or crops in order to examine how profitable they actually are.
Let’s try this out in an agriculture setting.
Crops as Customer/Jobs
Some of these steps are going to sound strange. Just be patient, work through the entire solution, and you’ll see where all this takes us in the end.
Setup you crops and/or fields as customers. You don’t need much information, just a name. It may help if you use the Customer-Job hierarchy in QuickBooks.
In the above screenshot, the customers shown are Wheat and Corn. The indented entries 2018/19 and 2018 are jobs created under those customers. Over time, one can keep the original customers and just add jobs to designate each crop year. As those crop years come to a close, they can be made inactive to keep the length of the customer list as short as possible.
Items Not Accounts
Our next challenge is to think in terms of items rather than accounts. The simple reason is that job or project type reports in QuickBooks gather numerical information from items rather than accounts.
It’s a simple process. A few minutes setting up a few basic items and you’ll be up and running.
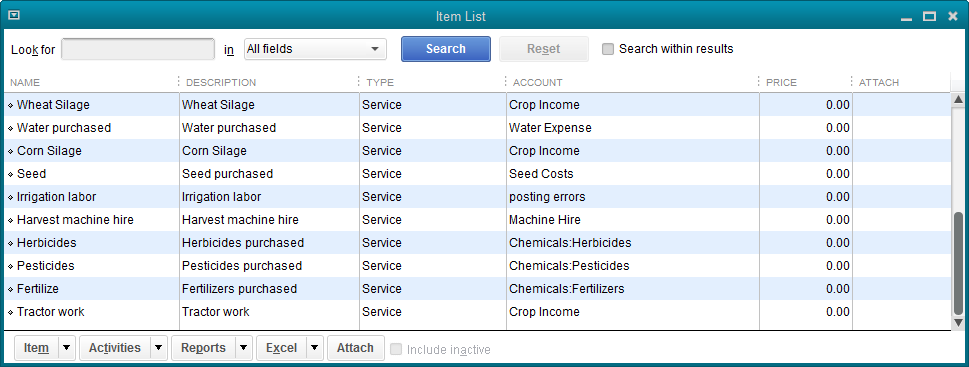
Above is a simple item list setup for an agriculture sample QuickBooks company. Let’s examine the setup of an individual item.
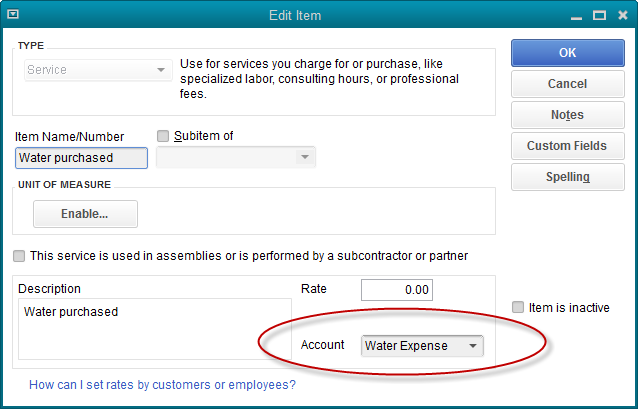
We’ve used ‘Service’ as the type of item in the upper left-hand field of the setup window. The name of the item only needs to be something recognizable to you the user. The description is completely up to your discretion.
The account is the most important setting. In this example, Water Expense is used. Normally QuickBooks expects income type of accounts to be used in items like this and you may get a message telling you that. It’s okay. We’re making QuickBooks features created for a purpose work for us in a different way.
Set up items like this for the different major expenses you would want to track as part of a review of the profitability of a certain crop and/or field. You can see a few more examples two graphics ago, in the item list.
Don’t sweat it too much at the initial setup phase. You can add items as you go along. As you use this method, undoubtedly you will make additional alterations as you gain experience and find the right mix of items for your liking.
One last item you will need is for the sale of the crop. The only difference with this item will be the account. The sale will create income and an income type of account should be used in the item setup.
Recording The Transactions
Now that we have customer:jobs(crops:years) and items, the next important step is using these them on transactions.
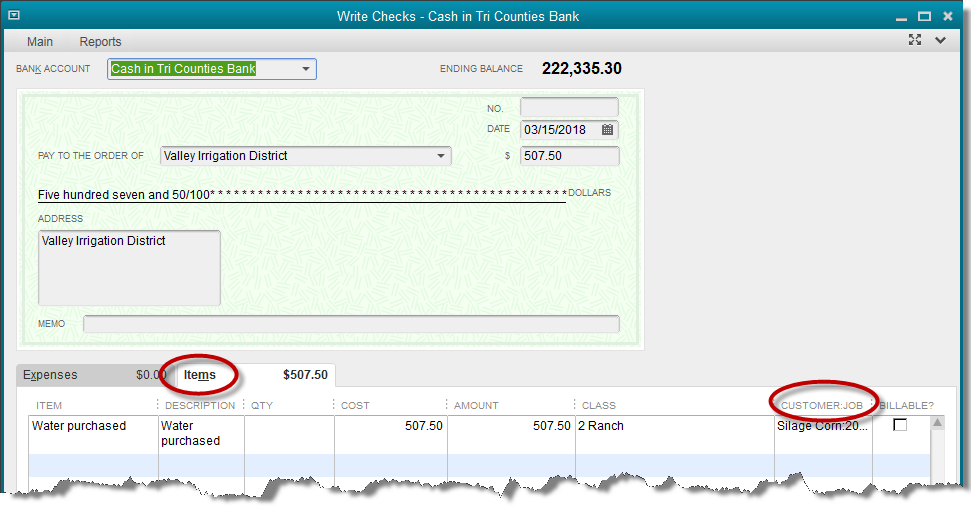
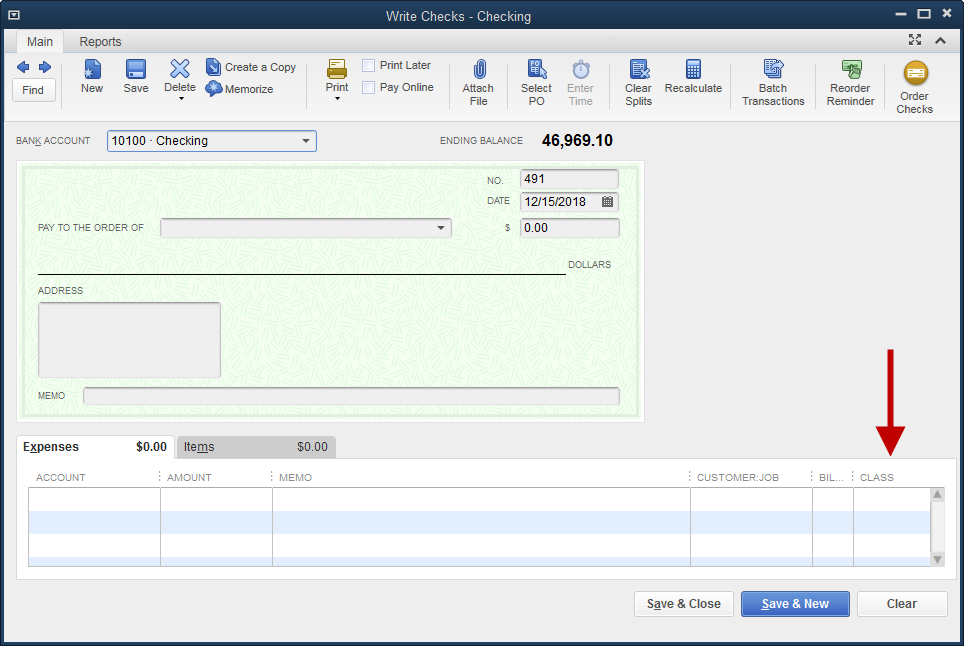
There are two things somewhat unique about the check above. One, the Items tab is used rather than the Expense tab. This allows us to use the items created in the last step, like Water Purchased.
Second, we’ve used the Customer/Job column on the stub portion of the check. This column is only used for tracking jobs or projects. That’s the process we’re imitating. We are thinking of one crop or field as a project. Since we’ve already setup our crops and/or fields as customers, insert that name in this column.
Recording The Sale of The Crop
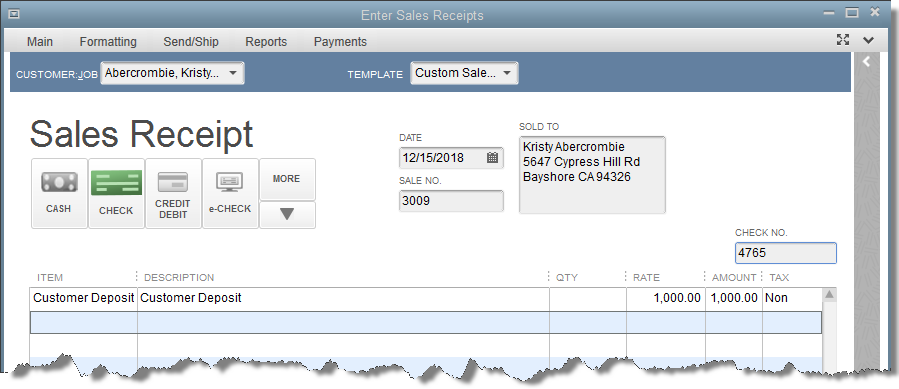
When the crop is sold, use a sales receipt to record the sale, using the item created for that purpose. This item was discussed a few paragraphs ago when we covered creation of items.
The Result
That’s the procedure for adding the income and expense to QuickBooks. The result is a report showing the financial performance of a particular project, or as we are using these features here, a particular crop or field.
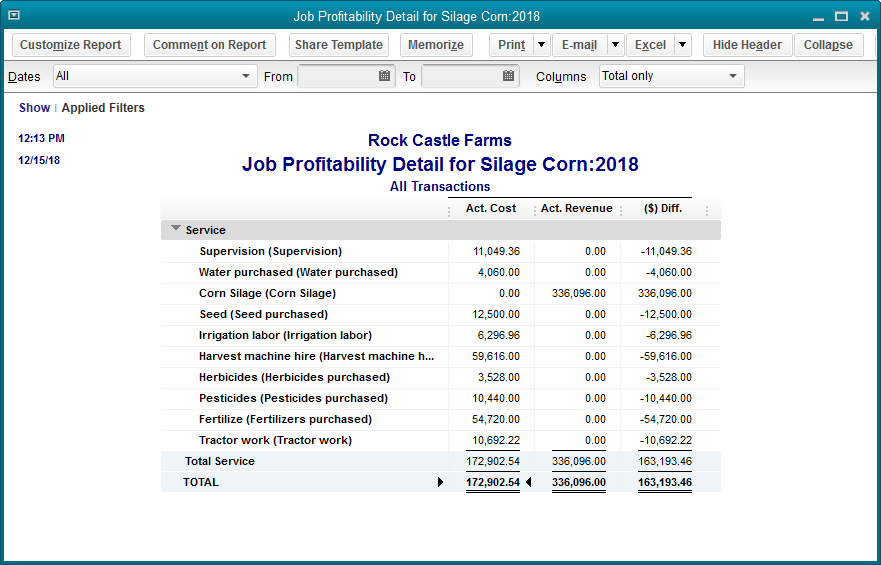
The above report is a Job Profitability Report. It can be accessed in QuickBooks by navigating to: Reports->Jobs,Time,& Mileage->Job Profitability Detail report.
You can watch a video of the above procedure here.
Which Crops/Fields/Locations Made Money?

Using QuickBooks Class for locations, fields, and crops
This is the fourth in a series of blog posts that will specifically examine QuickBooks from an agriculture perspective. There is no “QuickBooks for Ag”. So how can we use some of the features in QuickBooks if we are in the ag business?
QuickBooks has a feature called Class. It provides another “bucket” besides accounts in which to collect transactions.
This is often used in an organization where the same or similar income and expenses need to be tracked for different departments, locations, funds, etc.
For instance, a non=profit organization might track donations as income, but also want to know if those donations are for general use, building fund, or other special purposes, class might be your solution.
A business might have more than one department for which income and expenses are tracked. Or, it could have more than one location and want to track the financial performance of each location.
Turn on the class feature in preferences.
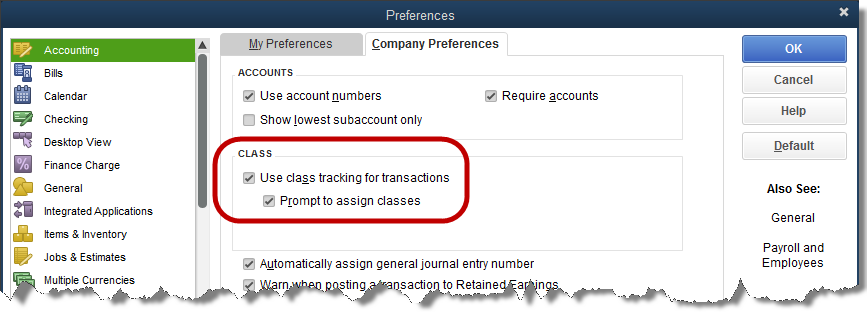
Once the option is turned on, transaction forms contain an added column for this information.
Classes can be added ‘on-the-fly’ by typing in the name in the class column and selecting Add when QuickBooks does not recognize the name. Or, you can navigate to Lists->Class List and enter your desired classes there.
Using class designations on your transactions results in a profit and loss report that can be analyzed based on whatever criteria you are tracking with the class feature.
Keep the following in mind:
* Use only one criteria. Using both location and department for classes will create a confusing report.
* Create a general or administrative class for transactions that do not fit into any of the special class categories. That way, when unclassified transactions show up on the Profit and Loss by Class, you know they need to be corrected.
* Class is for income and expense, not for assets and liabilities. While QuickBooks offers a balance sheet by class, it is cumbersome and difficult to use and requires stringent guidelines on entering transactions.
What about Agriculture?
This feature can be used in a couple of ways for ag QuickBooks users.
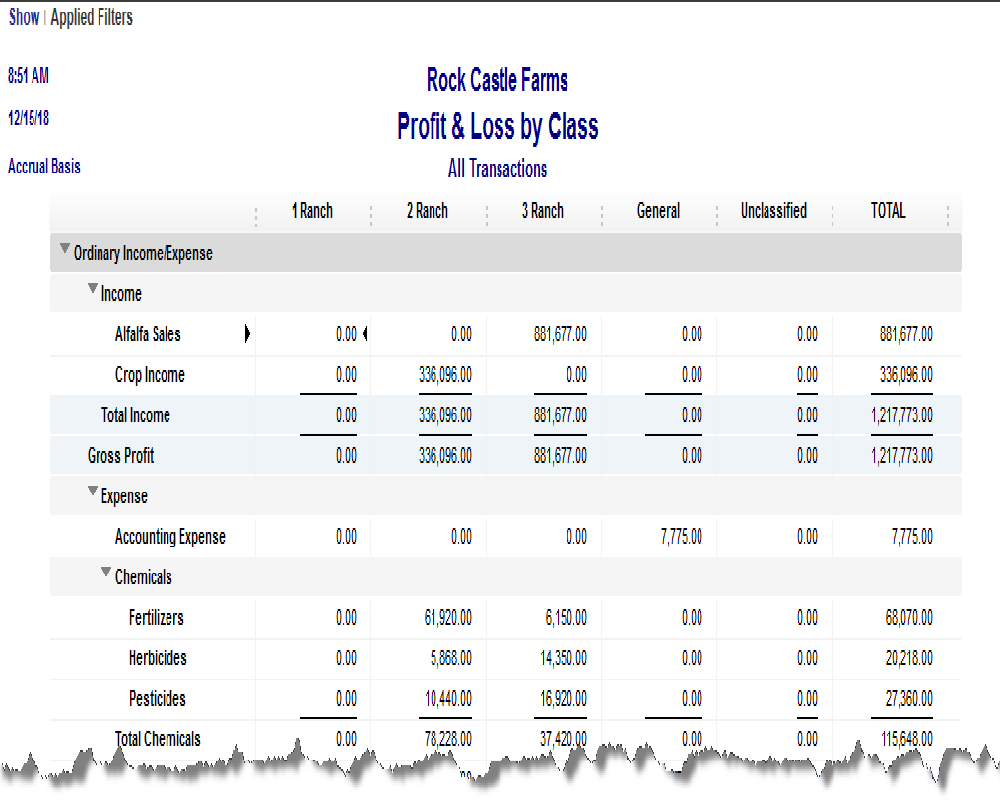
If there is more than one location, locations for which income and expense amounts can be determined, this would be a good use for class.
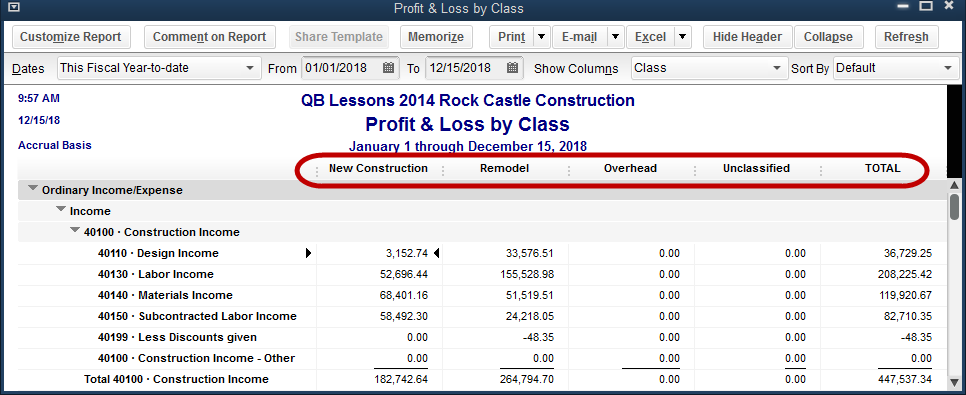
Here is an example of a profit and loss report for an agriculture-based sample company using this method.
Another use for the Class feature is for field, crop, and/or year. For instance classes might be created for “Field 3 Corn 2018”. And then a new class “Field 3 Corn 2019” would be created the next year.
The reason for making the class names so specific is to prevent crop income or expense showing on a report and being allocated to the wrong crop year. An expense might be billed late by a supplier, or income is received late, after the new year has already been started.
There’s always that possibility, that if there is only one class for Field 3, some transaction for the year 2018 gets recorded in 2019, thus compromising the accuracy of the report for both years.
Using class in this way will work fine for some. It could create a very long class list over time. There’s another solution that you should consider.
More on that in the next post.
You can watch a video demonstration using Quickbooks Class here.
Quicker and Easier Workers’ Comp Reporting

This is the third in a series of blog posts that will specifically examine QuickBooks from an agriculture perspective. There is no “QuickBooks for Ag”. So how can we use some of the features in QuickBooks if we are in the ag business?
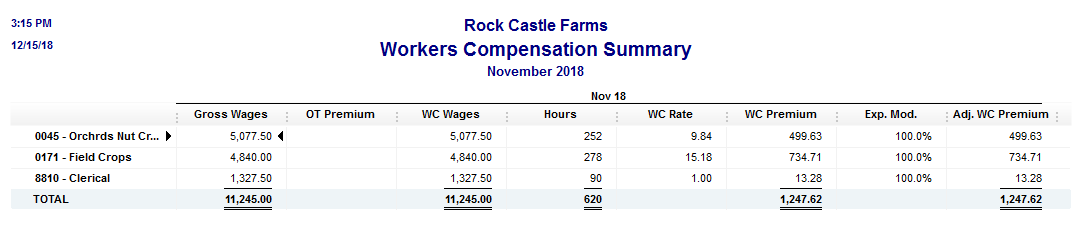
QuickBooks has a feature that will allow the cost of workers’ compensation to be tracked in the system. This will accrue the expense so it appears in the correct period on financial reports. It also results in the ability to run reports that will show wages subject to workers’ compensation, the rates and classifications, and the amount of premium due for a specific time period.
Tracking this expense as it accrues rather than when it is paid also allows it to be associated with various jobs and/or classes.
The first step to tracking workers’ compensation costs is to set the preference.
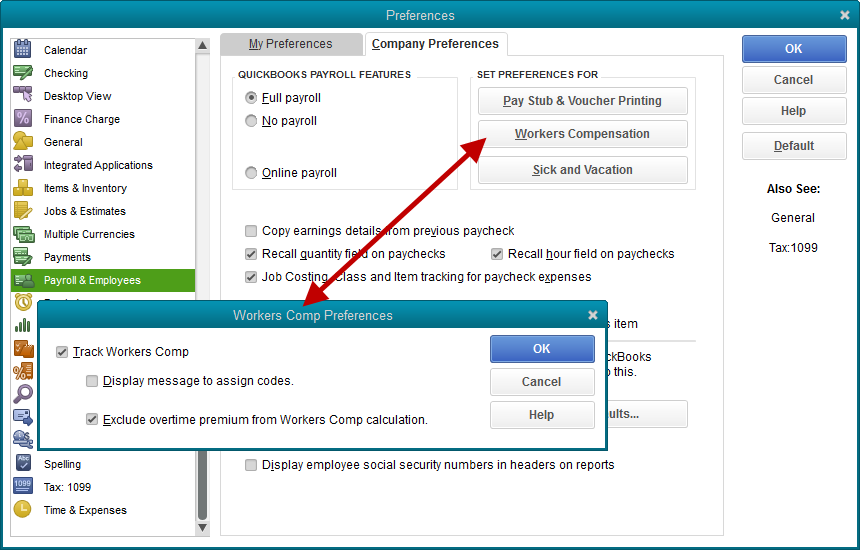
Once the preference is set, a wizard is available under the Employees dropdown menu to help you complete the setup. Employees->Workers’ Compensation->Manually Track Existing Workers’ Comp Policy.
The wizard will take you through a number of steps setting up the workers’ comp accrual. You will need information like:
• The name of your workers’ comp insurance carrier.
• Job classifications and rates.
• Experience modification factor.
• Policy Number (optional, but good to have).
You may assign each employee the appropriate workers’ comp code. Often, in agriculture, a worker may be subject to various workers’ comp codes depending on various required functions on the farm or ranch. It’s possible to leave employees unassigned. Alternatively, if an employee can be classified under more than one code, but commonly fall under one specific designation, Make that most-common selection in this window.
You will need to enter your Experience Modification as this affects your premium.

Enter the rates for each workers’ comp code.
If you pay overtime wages, a screen will allow you to specify whether or not the overtime premium is included for insurance premium calculations.
Let’s say a worker earned $10 per hour for regular time and $15 per overtime hour. Excluding the overtime premium would cause QuickBooks to calculate the premium for every hour as though it were paid at $10. The additional $5 paid for overtime hours would be ignored.
Using multiple workers’ compensation categories for employees means that their hours worked must be broken down into those categories. That can be acconplised in two ways.
When creating payroll checks, the paycheck detail screen will need to be opened for each employee. Here, the workers’ compensation information can be entered.

Some QuickBooks users will prefer entering time on the weekly timesheet from which it will automatically flow to payroll. There is a column for workers’ comp rates here as well.
The result of all this tracking work in QuickBooks is a report detailing the wages paid, under which categories, and the premium that will be owed.
A little more work up front saves a lot of time at the end.
Call us if you would like to try this feature but need help with the implementation. You may view this feature setup as a video here.
An Easy File and Repair Record QuickBooks Solution

This is the second in a series of blog posts that will specifically examine QuickBooks from an agriculture perspective. There is no “QuickBooks for Ag”. So how can we use some of the features in QuickBooks if we are in the ag business?
QuickBooks has the ability to keep electronic copies of documents and files of various sorts. It stores them with a link to transactions or list elements like customers or employees.
This is not a specific agriculture problem. But it can be useful both on a general business level, and as a specific solution for ag users. We’ll examine the feature first, then look at a unique ag application.
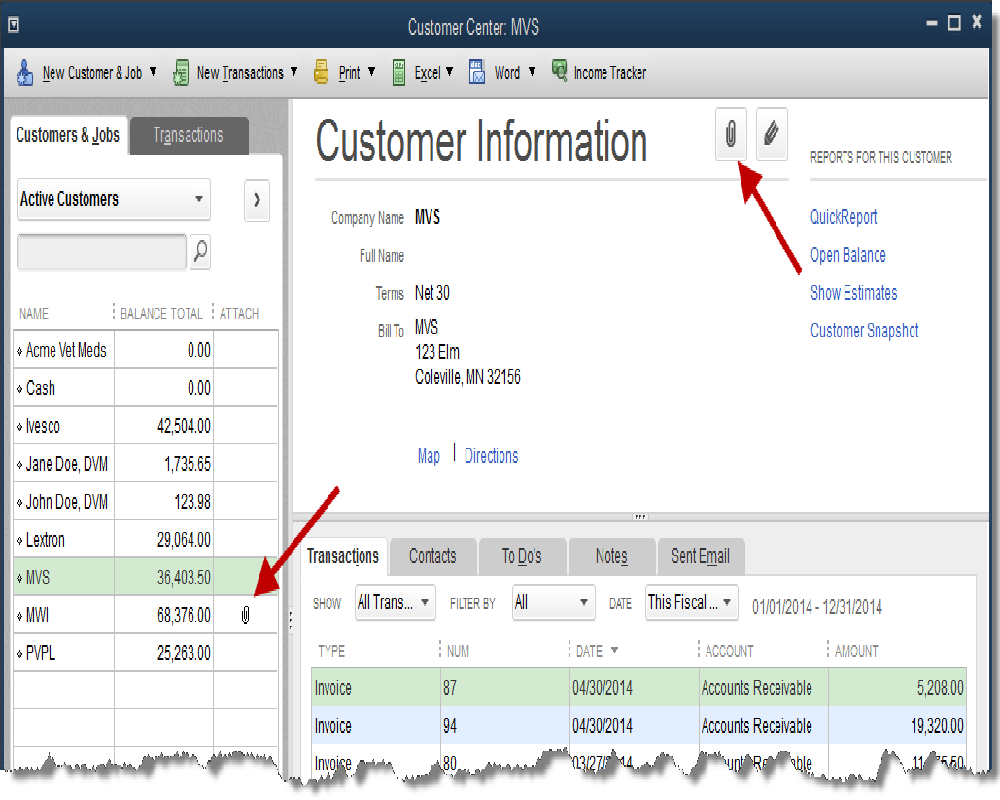
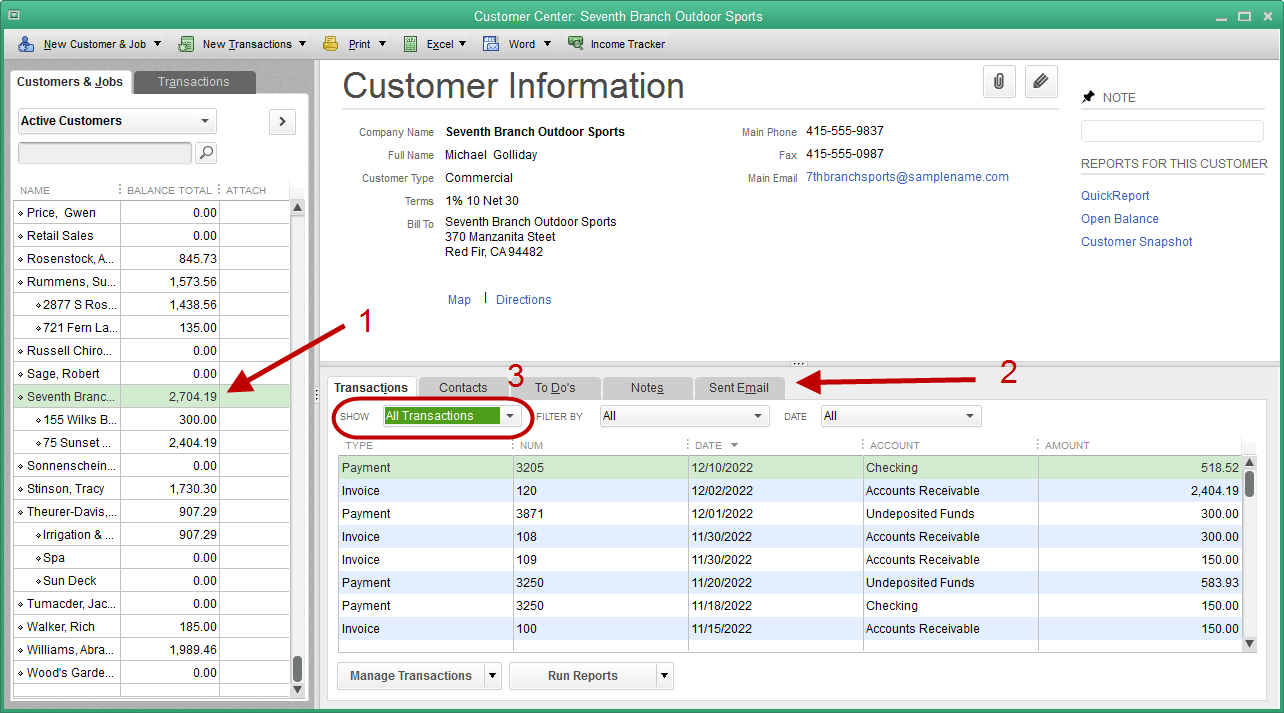
You may not have noticed before, but inside various windows in QuickBooks are found small paperclip icons and, in the case of one of the centers like the customer center, an entire column with the header “Attach”.
These are both indicators of the Attached Documents feature. The paper clip graphic in the ATTACH column of the customer list indicates that a document is attached to this customer.
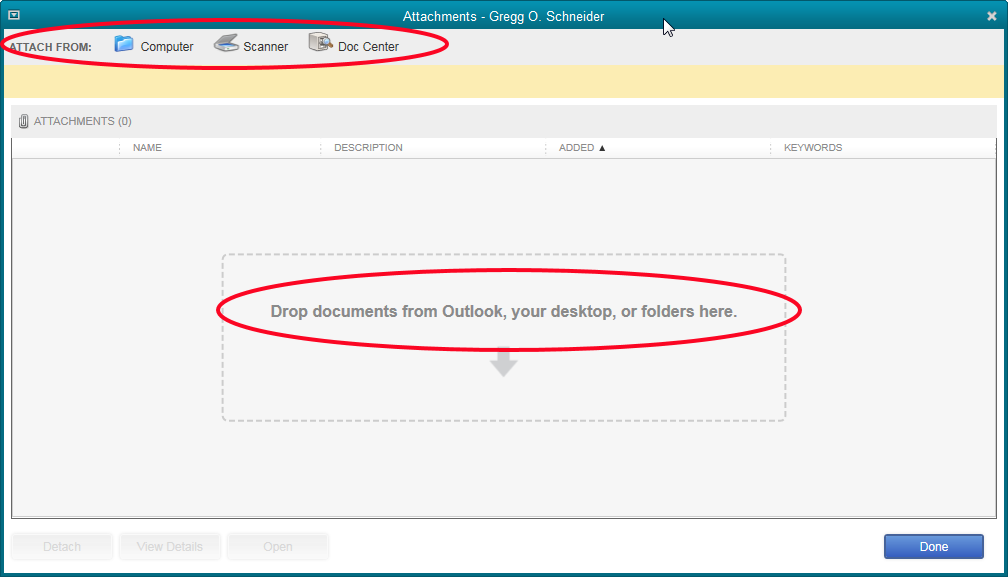
The paper clip icon at the top of the screen opens the Attach Documents function.
A click on the paper clip next to the customer name, in this case MWI, opens a list of one or more documents linked to this customer. See the following graphic.
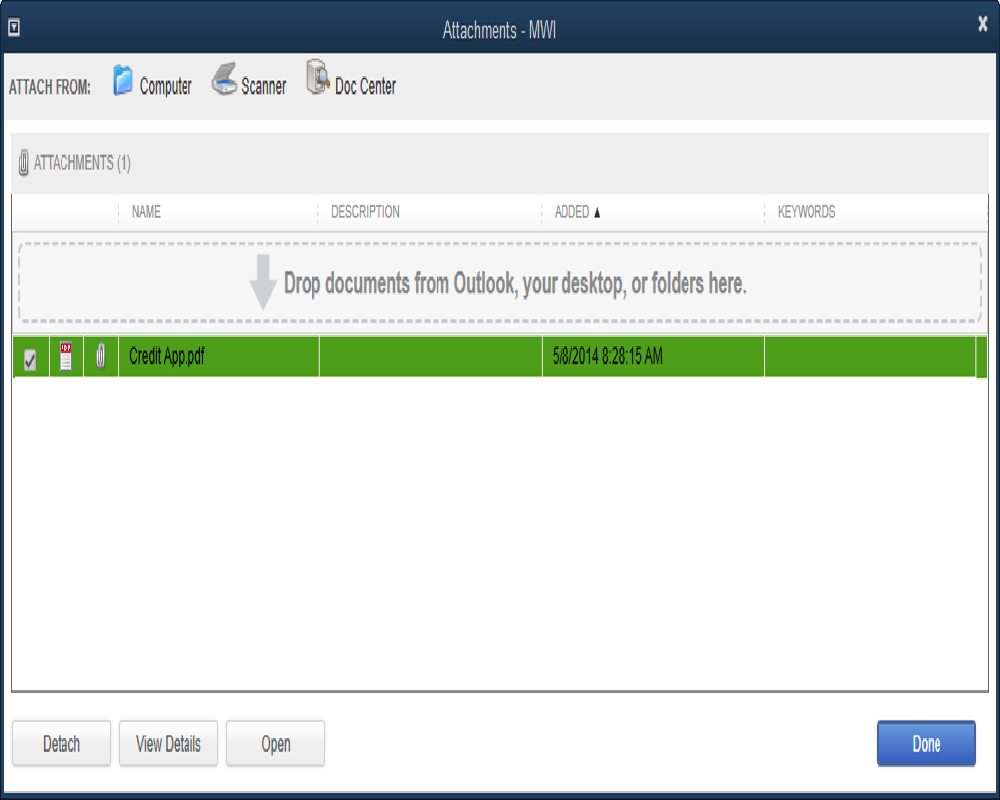
From this window, the pdf document can be selected and opened.
The icons along the top of the Attachments window show the variety of ways QuickBooks will accept a document for attachment.
It could be scanned in from a paper copy.
If the document is already on the computer, the computer icon could be selected. The user would then navigate to the correct location and select the file to be attached.
Other documents like Word docs and Excel worksheets can also be attached.
The Doc Center can be opened with the third icon, or is available from Company->Documents.
Four documents are shown in the Doc Center screenshot. It is easy just to drag the files from other locations and drop them here.
The arrows point to the indicators that signify the last doc of the list is attached. It is attached to the customer MWI as shown in an earlier screenshot.
The other three are not attached to anything.
It is possible to select documents anywhere on the computer or to scan them into the computer while a transaction or list is open. This action attaches them to the open transaction or list element.
It is also possible to drag them into the Doc Center and then find the place in QuickBooks where you want them attached.
Documents can be attached to transactions just as they can to name lists. Simply click on the paperclip icon.
![]()
There are limitations to the Attached Documents feature in QuickBooks.
When the QuickBooks company file is backed up, the documents are not. They have to be included in a separate backup.
Another shortcoming of the feature is security.
The documents are stored in a folder labeled ‘Attach’ in the location of the company file. There are no security precautions that prevent anyone from browsing through that folder and finding, deleting, or altering those individual documents.
So how about Ag? What special application does this have to the ag industry?
Documents can be attached to Fixed Asset Items. From the Fixed Asset Item list, highlight the item you want to attach to and click the Attach button at the bottom of the list window.
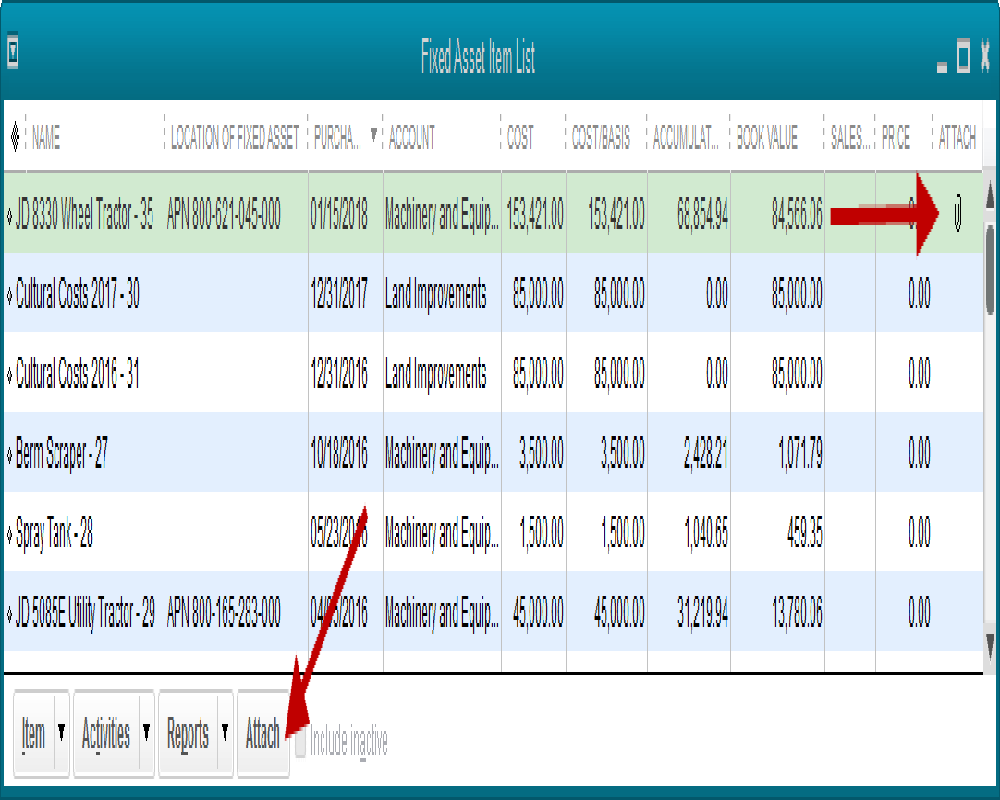
If we click on the paperclip icon belonging to the JD 8330 tractor item, the attachment will open. The attachment is an Excel spreadsheet, created earlier and attached to this Fixed Asset item. On that spreadsheet is a record of repair and maintenance costs of this particular piece of equipment.
It is an Excel worksheet which many farmers use now to track these costs. The difference is it resides with QuickBooks. I access it from my list of equipment within QuickBooks. I don’t have to maintain a separate folder with Excel worksheets, carefully naming each one so I am sure to record the repair costs on the correct one.
It’s a small thing. But small things that ease workload and save even a little time add up. This is one worth considering.
You can view this in a video here. It’s the same video as last week, we combined both procedures into one video.
Next week: attacking those pesky workers comp rates for employees with multiple classifications.
Lance Wilkins, QuickBooks Advanced Certified ProAdvisor
M Green and Company LLP