


Blog 
Click here to go back
We Got Paid!

Receiving payments and recording deposits in QuickBooks Desktop
The process of receiving customer payments and recording bank deposits in QuickBooks may seem pretty straightforward, but there are a few lesser known situations we’ll cover in today’s post. The process of receiving customer payments and recording bank deposits in QuickBooks may seem pretty straightforward, but there are a few lesser known situations we’ll cover in today’s post.
Posting payments to customers and jobs

When tracking jobs or projects in QuickBooks we are used to specifying not only the applicable customer in job expenses, but the particular project as well. As we have covered before, the jobs show in the Customer Center as indented entries. So, in the above screenshot, Kristy Abercrombie has three jobs in Rock Castle Construction. Family Room, Kitchen, and Bathroom Remodel.
Normally, when receiving a payment from a customer, we would receive it as a transaction specific to the project it was for. What about when a customer sends a payment that covers more than one project?

By using the customer name, not any of the individual projects (see arrow), QuickBooks will populate the Receive Payments window with all open invoices for that customer, not just the ones from a certain job. At this point, you have the option to apply the payment in any way you want regardless of project or job.
Giving customers discounts for speedy payment
Sometimes, offering a discount for early payment is a strategy you may want to use. That starts by setting the terms in the customer file and making sure the correct terms are entered on the invoice when it is created and saved.
If the customer pays within the discount period, how do you give the discount?
In this example, we’ve given Kristy a 2% discount if she will pay her invoice within 10 days. Those terms in QuickBooks would look like this: 2% 10 Net 30.

Kristy pays $1372.00 on a $1400.00 invoice. Clicking on the Discounts and Credits button opens the Discounts and Credits window seen in the lower right part of the screenshot.
QuickBooks knows the terms that are on the invoice. It does the math, both date and amount, and fills in all the pertinent information seen in the Discounts and Credits window. Two percent of $1400 is $28. If you think the amount should be slightly different, or if the customer rounded slightly differently to come up with a different amount, you can specify in this screen what the amount should be.
The Discount Account is specified by you, the QuickBooks user. Once you select the account for one discount, QuickBooks will continue to suggest that same account on future discounts. In this case, Rock Castle has a special account setup just for discount amounts.
What if the customer has a credit?
Sometimes, a customer can have a credit that needs to be applied to a current invoice. This could be the result of an overpayment from the past, or a credit memo, or other similar event.

In the above screenshot, the same button, Discounts and Credits, was selected to use the customer’s credit on this invoice. This time, we are looking at the Credits side of that window.
The customer had a $1000 credit, probably from a down payment before work started, in the system. They make a $400 payment on the $1400 invoice. Now, when we accept the payment and apply the existing credit, the invoice will be paid in full.
Speaking of advance payments…
While there are different ways to account for prepayments from customers, following is by far the easiest and most common method used.

If you look close, you can see the gray text in the screenshot that reads, “There are no unpaid invoices for this customer”.
That’s okay. We can still save the payment. Just be sure the selection in the lower left (see arrow) is Leave the credit to be used later.
When receiving payment on an actual invoice, you would use the payment and the credit created by this payment transaction to pay the invoice just as we did in the last section when we had the $1000 credit.
How many payments will you deposit?
By default, QuickBooks posts payments to an account called Undeposited Funds. This allows QuickBooks to accumulate the payments you record on one list. Then, when creating the deposit, you select multiple payments to create a bank deposit in QuickBooks that will match the amount of the same deposit that appears on your bank statement. It makes reconciliation much easier.
Sometimes, a QuickBooks user only receives a few payments a month and they all go directly to the bank. There’s really no need for Undeposited Funds. It only adds another step.
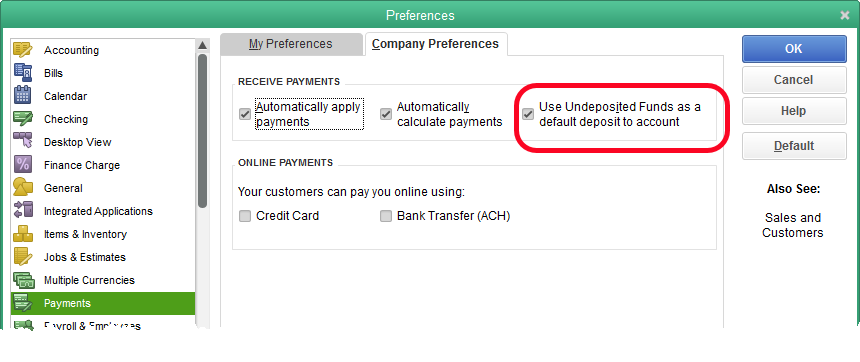
By unchecking the box with the label ‘Use Undeposited Funds as a default deposit to account’, you can change this behavior.
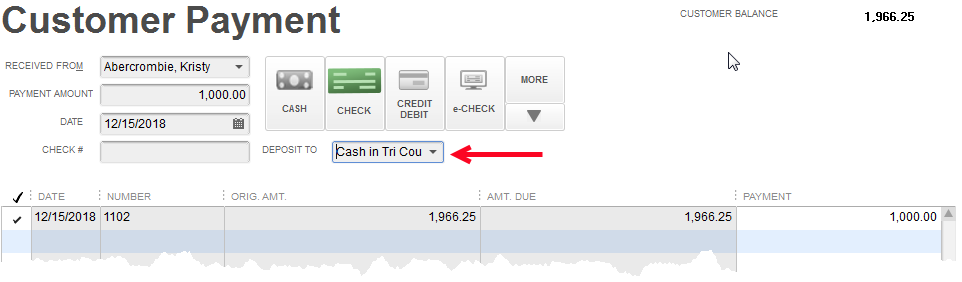
Now, with the preference changed, we can decide to deposit this payment to a bank account rather than Undeposited Funds. This means we won’t have to use a Record Deposit transaction in QuickBooks to get this into our bank balance. Once we save the payment, it’s already there.