Blog 
Click here to go back
Add a Logo to Your QuickBooks Invoices

Forms like invoices can be customized in QuickBooks to a much greater degree than many realize. One of the many customization options available is adding a company logo.
A logo can be added to invoices, sales orders, credit memos, purchase orders, reminder statements, estimates, and sales orders.
When customizing forms in QuickBooks we are working with templates. There is a list of templates available at Lists->Templates. This list will show all the saved templates in your company file. You can edit some of them. Some, the defaults that come with QuickBooks, can be easily copied and then edited.
Another way to edit an existing template is to open it. Then, from the format tab of the ribbon, select Customize Data Layout.

After either selecting a template from the list and choosing edit, or clicking the customize icon from the form itself, a screen opens with many options. Along the bottom of the screen are several buttons. One is labeled Basic Customization. Choose this button.
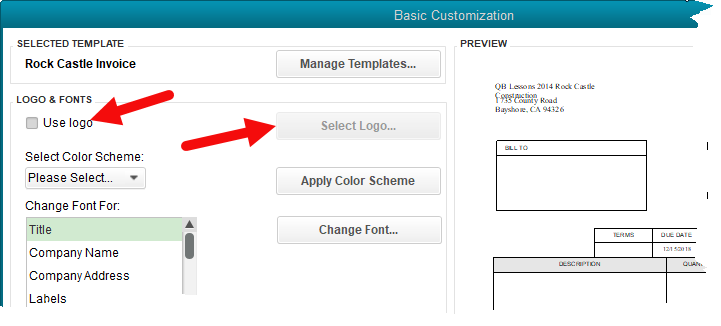
You can see in the screenshot the checkbox that tells QuickBooks you want to use a logo. Once that is selected, click the Select Logo button to navigate to the location on your computer where the graphic file of the logo exists.
![]()
Once the logo is selected, QuickBooks copies it into the folder where the company file resides. The name of the graphic file now shows next to the Use logo checkbox.
QuickBooks has also placed the logo on the invoice template. You can see that in the Preview panel where the arrow is pointing.
We may not be happy with the placement. To change that, we would click on the Layout Designer button.
In Layout Designer we can drag text and data boxes to the locations we desire. We can also change the way some of the information shows.
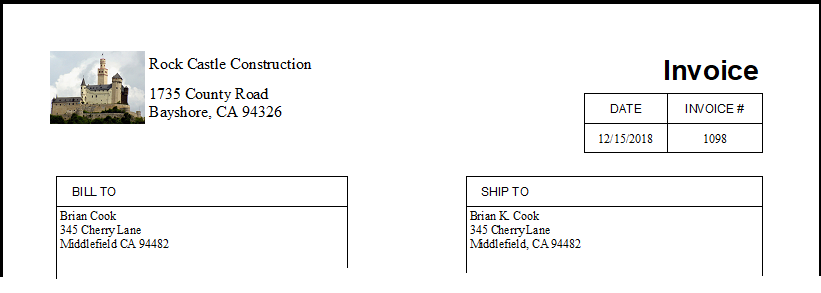
In the end, we can create something that looks more like this: