


Blog 
Click here to go back
Using QuickBooks’ Inventory Features

Keeping track of inventory in QuickBooks generates more questions than just about any other section of the program, payroll excepted. Today, we’ll make a quick overview of using the tools QuickBooks has provided.
First, make sure the Preference to make Inventory features active is set. See the screenshot below.
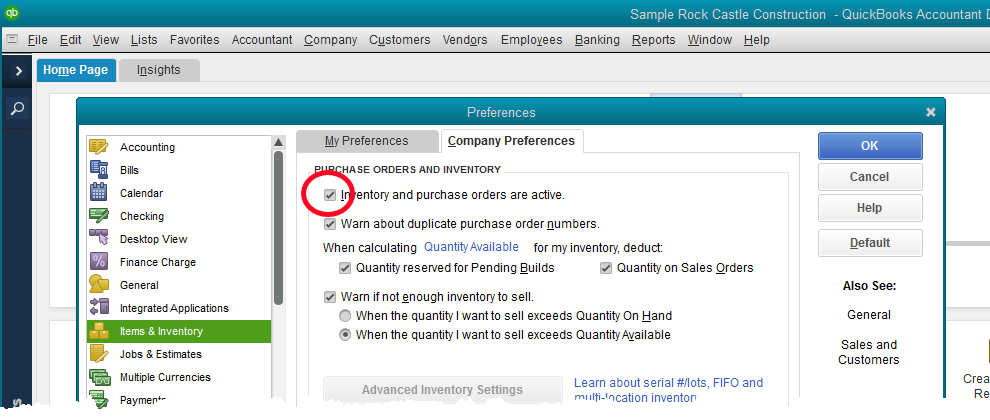
Without the preference setting, you will be unable to even create an inventory type item.
The next step is to create inventory part type items for the things you want to sell.

Above is the window for creating a new inventory item. Note that the item type is set in the upper left field. If a different type of item is selected, QuickBooks will not track the quantity or value that you have on hand. You can sell as many as you want, whether you actually have the items on the shelf or not. QuickBooks won’t care.
2 This area of the setup window defines the purchase parameters for the item. In QuickBooks (as opposed to QuickBooks Enterprise), the cost field does little more than fill in a default value on forms. The real cost is the average cost which QuickBooks computes and we’ll discuss later.
The COGS Account is where QuickBooks will post the cost of reduced inventory when an item is sold. The Preferred Vendor field is optional.
3 This area holds the sales information for this item. What is the sales price? Is it taxable or not for sales tax purposes? When a sale of this item is recorded in QuickBooks, what income account should the program post to?
4 The bottom line is important. The Asset Account will be the account in which QuickBooks tracks the value of your inventory on hand. By default, QuickBooks will choose Inventory Asset for this selection. You can change that if you wish.
Reorder points can be set to aid in knowing when to re-order inventory.
Notice the numbers for On Hand and Average Cost. Nothing can be entered in these spaces. These are values QuickBooks calculates as you purchase and sell inventory.
Keeping things simple, the basic forms for purchasing inventory would be bills or checks. The part of that process that is vital is using the Items tab, not the Expense tab. See below.

In the above screenshot, Rock Castle Construction is purchasing 5 Door Frames. Because the QuickBooks user is creating the transaction with an item, and that item is setup as an inventory type item, QuickBooks will add 12 more to the on hand quantity once this bill is saved.
Selling inventory differs little from selling services or anything else. Use the correct item on the sales form you choose, and QuickBooks will take care of the rest.
As for reports, Stock Status reports and Inventory Valuation Summary are used frequently. You’ll find these in the Inventory section of the Reports menu.