


Blog 
Click here to go back
Still Waiting for Customer Payments?

QuickBooks 2020 has added some useful features. If you need to remind customers from time to time that you’re still waiting on a payment, QuickBooks can help with that.
QuickBooks has always had the ability to customize letters using data, like customer names, balances, etc., in your company file. What QuickBooks 2020 does is add a layer of automation that may save you time.
This feature is called Automated Customer Payment Reminders. Let’s see how it works.
Navigate to Customers->Payment Reminders->Manage Mailing List.

There’s actually more than one step, but the wizard for creating your mailing list is pretty straightforward and easy to follow. The reason you may want more than one mailing list is that you may not treat all your customers the same. You might choose wording in a reminder for one group of customers different from the wording you would like to use with another, perhaps less trusted, group of customers.
You don’t have to have multiple mailing lists though. You can have one and all (or most) of your customers can be included.

Once at least one mailing list has been selected, it’s time to create the schedule.

In the screenshot above, you can see the steps in the reminder setup process. We have created a reminder, 1 day after due date, in the first window. The second window (to the right), allows us to edit the text that should be included in the message emailed to the customer.
Note the circled “[Name-First-Last]” text. Bracketed test like this indicates data that will come from QuickBooks. The customer’s name will appear here. Invoice number is filled in a couple of lines above. In the body of the message you can see where QuickBooks will pull information from the company file like invoice total, company information, etc.
You can include additional fields of custom info by clicking on the Insert Field button in the lower right, selecting the data field you want, and placing it in the message.

There are some new preferences that control how the feature works. As you can see from the above screenshot, we can turn Payment Reminders on or off. We can tell QuickBooks when to remind us and how often to look for customers that meet our mail list criteria.
So, with our setup so far, here’s what QuickBooks will do.
Each day QuickBooks scans our customers and the status of their open invoices. If it finds a customer that is on the mailing list we specified at the beginning of this process AND that customer has an invoice that is unpaid, but was due yesterday, QuickBooks will notify us at 10:00 the day the invoice becomes delinquent.
If we decide to send the reminder, we are presented with the following screen. If we have set everything up the way we would like this feature to function, we should only have to click Send Now and the message is sent, hopefully to generate some action on the part of our customer.

QuickBooks also keeps a record of the emails we’ve sent. See the screenshot below. In the Customer Center, Sent Forms tab, is a record of all emails transmitted to this customer including the reminders we’ve sent.

Price Levels

Using discounts on a more regular basis or as the normal price for certain customers, Price Levels will offer an easier solution.
Price Levels are found on the Lists drop down menu. Different types of Price Levels are available in the Pro and Premier levels of QuickBooks.
In QuickBooks Pro, only Fixed % price levels are available.
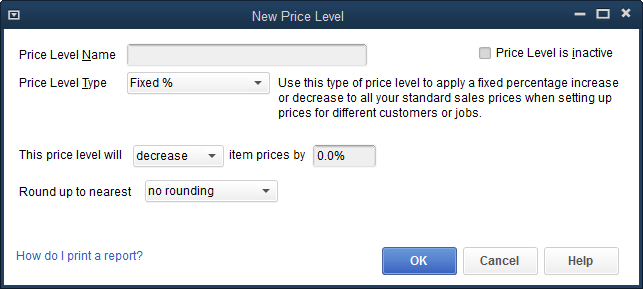
Navigate to Lists->Price Levels and select New from the menu that pops up with a right mouse click. You will see the above window.
Name the price level so it can easily be identified. Set whether the price level is an increase or a decrease over the price set in the Item List.
Then round in a way you wish prices to appear on your customer invoices.
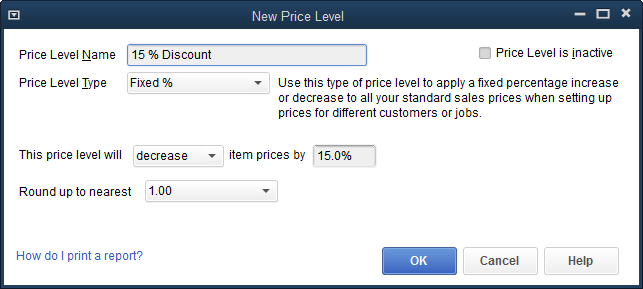
The completed Price Level is shown in the above graphic. We’ve named our new price level “15% Discount.” The price level will decrease item prices by 15%.
The rounding has been set so discounted prices will show as whole dollars. There are many options for rounding. Prices can be specified to end in .25, .50, .49, .89, .99 and many others.
A powerful feature in the use of price levels is assigning a certain price level to a certain customer. Then QuickBooks will always use a that price for that customer without any ‘reminding.’
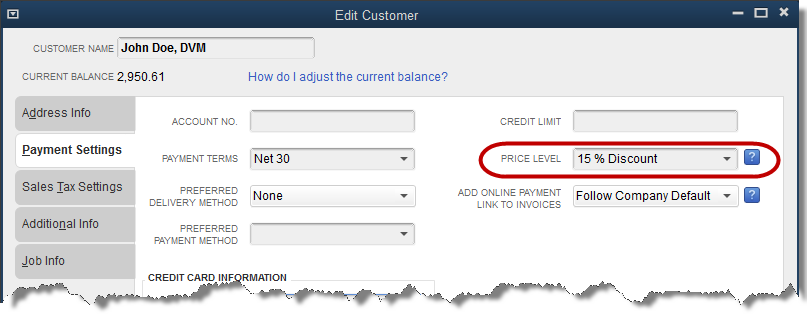
To specify that a certain customer should receive a certain price level, access the Payment Settings tab in the customer edit window.
Now, without the need for a discount item, the lower price comes up automatically for this customer.
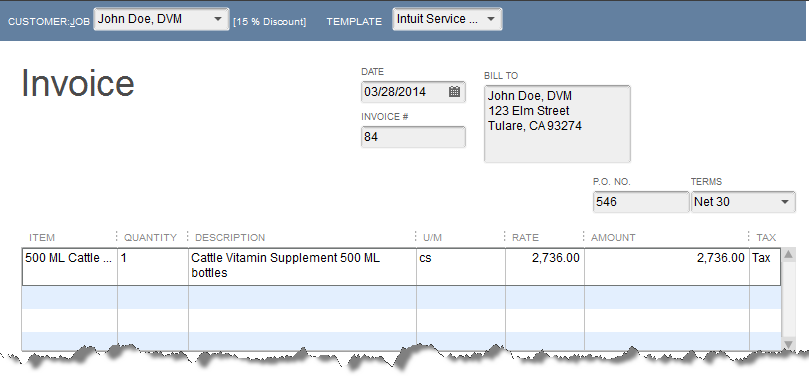
After using a 15% discount item in the first invoicing example, the price of a case of 500 ML mineral supplement for cattle was $2713.20. Now, with our same customer, QuickBooks automatically charges $2736.
Why the difference?
Well, in the first example QuickBooks began with the total price of $3192 and deducted 15% (478.80) to arrive at a discounted price of $2713.40.
A case however, is 24 bottles priced at $133 each.
So in the second example, QuickBooks starts with $133, discounts by 15% (19.95) to arrive at a price of 113.05.
Per our rounding instructions, it then sets the price at $114, rounding up to the nearest whole dollar. The last part of the calculation is to multiply the each price times 24 to reach a case price of $2736.
You could alter the pricing or units of measure to make these two examples come out the same. But, this is a good illustration of how using different methods can yield different results.
The Premier level of QuickBooks offers an additional option to price levels. Per Item price levels.

Many of the same calculation and rounding parameters found in Fixed % type price levels are available options for Per Item price levels as well. But, a Per Item price level can apply to specific items rather than all items.
In addition, the calculation can be based on the price, as with Fixed % price levels, or cost.
Just like Fixed % price levels, the Per Item price levels can be applied to one or more specific customers.
Unfortunately, only one price level can be applied to a customer.
Sales Tax Code - Sales Tax Item - Which to Use?

Sometimes people are confused about sales tax items vs. sales tax codes. A simple way to think of it is this: the sales tax item computes how much sales tax, the sales tax code tells QuickBooks whether something is taxable or not.
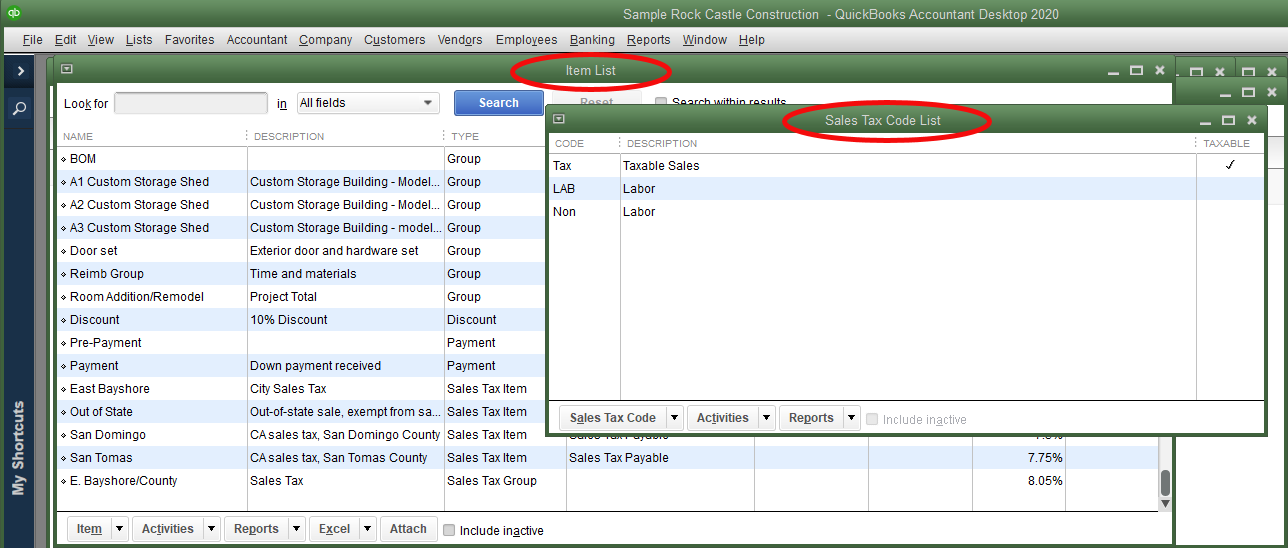
There are two different lists. Sales Tax Items are on the Item List. They usually show near the bottom of the list if you haven’t changed the sort order. So, sorted by item type (most common), you will scroll to the bottom of the list to find sales tax items.
Sales Tax Codes have their own list. Lists->Sales Tax Code List.
Sales Tax Codes appear on sales forms like invoices in the right-hand column.

While the tax code can be set on the sales form by changing what appears in that tax column, the field auto-fills from other settings in QuickBooks. It depends on what customers and what items may be taxable.
If a company sold on a Resale basis to other retailers, they would set such customers like this:

Determining an item’s taxable status is also part of the item’s setup in QuickBooks.

The above item, Light Pine Cabinets, is set as a taxable item. QuickBooks will normally compute sales tax on it when sold. That is, unless it is sold to a non-taxable customer like Kristy Abercrombie who we used to demo sales tax setup for customers. In that case, QuickBooks will follow the customer setup and make the item non-taxable.
So, the sales tax codes serve two very useful functions. First, they tell QuickBooks whether or not something is taxable.
If set up to do so, sales tax codes will also tell QuickBooks why something is not taxable. To accomplish that, one needs to create a non-taxable sales tax code for every reason a product might be exempt from sale tax.
Some examples would be Labor, Resale, Out of State, Sales to Federal Government, etc. By setting up the sales tax codes needed in your business and using them, more information is available to you at the time of creating the sales tax return.
The Sales Tax Revenue Summary report, will show sales for the period by sales tax code. The report will then show the amount of sales for taxable, how much for labor, how much for resale, and so on.
If you have multiple reason a sale might not be taxable, this report will give you that information which is usually required for completing a sales tax return.
How to Sell Stuff in QuickBooks

Sales forms
Let’s take a brief tour of sales forms in QuickBooks. How many are there.
Very few get this, but there’s actually three. Invoice, Sales Receipt and Credit Memo.

The difference between an invoice and a sales receipt is that in invoice creates a sale and a receivable. That is, the customer owes you for the sale. No money has changed hands.
A sales receipt assumes payment is received at the time of sale. So, no customer balance due is created with a sales receipt.
A Credit memo is a refund. Either it’s a refund that offsets the balance a customer owes, or QuickBooks allows you to create a check to give a cash refund back to the customer. QuickBooks does a really fine job of walking you through that process either way.
Credit memos are more important than a lot of people realize. Sometimes they should be used when an invoice has existed for a while waiting for the customer to pay. Finally, we realize… we’re not going to get paid.
It’s often a mistake to simply go back and void or delete the original invoice. The credit memo form exists just for this purpose. Use that instead.
Items
We sell customers either products or services. This is accomplished in QuickBooks by using items. See the screenshot below.

It’s important to select the right item type. While there are several to choose from, only three are commonly used to sell a company’s products or services. Service is self-explanatory. It’s for selling services.
Inventory Part is for tracking inventory on hand and you won’t have this option unless inventory tracking is turned on in your QuickBooks file.
The third is Non-Inventory Part. That’s just a word QuickBooks made up to describe an item we would create to sell products that we don’t wish to track as inventory on hand.
Entering a description that will commonly be used and setting the correct taxable status as far as sales tax will speed data entry when sales forms are created. The account field is almost always an income type of account from the chart of accounts and will make accounting entries that will show as revenue on your profit and loss statements.
Estimates and Sales Orders

It’s important to note that QuickBooks has the ability to track proposals for you so you have a record, along with all the details, and can easily turn those proposals into invoices, without entering all that information a second (or third, or…) time.
The Sales Order form is found only n the Premier level of QuickBooks or higher. It allows the business to record a customer’s order, then fill it later. Multiple invoices can be created from one sales order. It’s great for keeping track of special orders or back orders.
Estimates are available in Pro as well as the higher levels of QuickBooks. Most often, this form is used to record the details of a proposed job or project. Multiple invoices can be created from one Estimate. QuickBooks will track what has been invoiced and what hasn’t. There are also terrific report that compare what you expected the various components of a project to cost, and what they cost in reality.
Both sales orders and estimates are non-posting. That is, you can create and delete (if you wanted) at will and your accounting numbers are unaffected.
Tips for QuickBooks Bank Reconciliation

Today’s post discusses several tips to make reconciling the bank account in QuickBooks easier.
First, navigate to the bank reconciliation screen from the Reconcile icon on the Home Page.
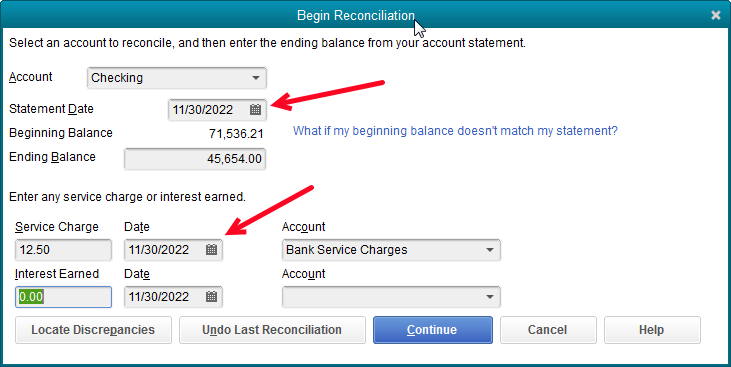
First tip, make sure your statement date and the date of any service charges or interest earned, agree.
Often these dates can become out-of-sync. Many QuickBooks users will click through this screen without even checking, unacquainted with what effects this may have on their QuickBooks file.
When the transaction date for the service charge is later than the statement date, the bank reconciliation report will not agree with the actual check register. While overall numbers are still correct, any accountant working on your numbers for reporting purposes will be sent looking for the cause of the discrepancy. For you, it’s needless billable time spent over a very small error.

One of the improvements in the bank reconciliation window from a few years back is the ability to sort the data from any of the columns. This works for either the check side or the deposit side.
It used to be that checks sorted by number only. With the increasing number of EFT and other type payments that did not align with the numbering sequence of paper checks, finding the checks became more difficult.
Now, the user can select to sort by check number, date (as in this example) or any of the other columns.
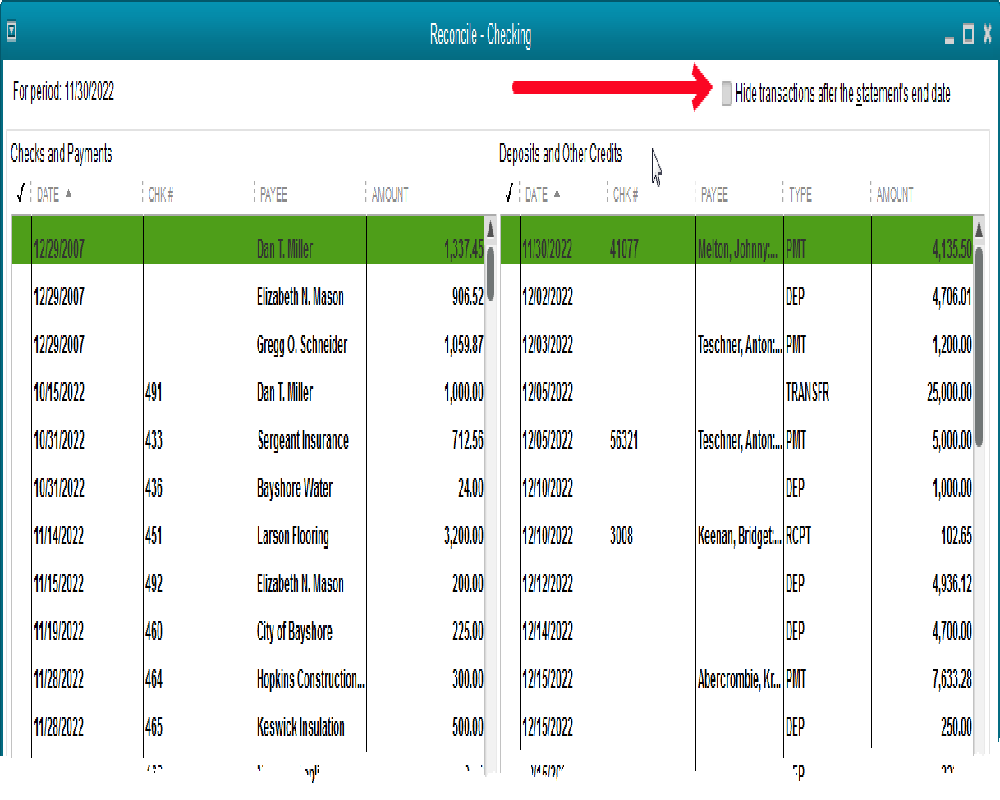
This one we’ve had for awhile. The checkbox to eliminate all transactions dated after the statement date. This results in a much shorter list of transactions to work with while finding items to clear.
Another tip. Especially for those companies that issue debit cards to certain employees. Being in the middle of a reconciliation and finding items that have not been entered into QuickBooks can be frustrating.
The check register can be opened and additional transactions added without closing the reconciliation window. It will automatically update. When you close the register, the new transactions will show in your list to be cleared.
Another frustration is items with small differences from the amount that cleared on the bank statement. From within the reconciliation window, items can be brought up in their original detail window with a double-click of the mouse.
This works best with regular checks. The amount can be edited. It will update immediately in the reconciliation window and be ready to mark as cleared.
In either of these last two cases, if the reconciliation needs to be put on hold for such an amount of time that the window needs to be closed, no worries.
You can click the Leave button. When you next return to the reconciliation window, all your work has been saved.

One last tip. Remember to continue correcting and reconciling till the Difference line is zero.
Refresher Course W2s and 1099s
It's that time of year. Doing your 1099s and/or W2s in QuickBooks? Here are some links you might find useful.
W2s
https://www.youtube.com/watch?v=f1qv7TMA198
https://www.mgreencpas.com/index.jsp?page=blog&postId=22163
1099s
https://www.youtube.com/watch?v=2buq9FGwp8U&t=17s
https://www.mgreencpas.com/index.jsp?page=blog&postId=22008
My Company
Basic QuickBooks, From Step One

Let’s take a few weeks, and examine using QuickBooks much as we would in a class. With a desire to learn the product. Make your life a little easier. Make bookkeeping both simpler and less time-consuming.
We might also find some ways that will correct a few unnoticed errors that have slipped into your accounting procedures. Find some better numbers to tell you how your business is really doing.
Today, a brief look at the My Company section of QuickBooks. It won’t take long and you might learn why certain pieces of information pop up on forms and reports.
First, the My Company window. Navigate to Company->My Company.

Note the pencil-point icon circled in the My Company window. This opens the smaller window shown in front of the screenshot.
Sure, most of this is self-explanatory, but let’s just look at a couple of things for clarity.
Fill out the Contact Information section. I know you know your own address, etc., but QuickBooks will pull from this section when putting your company information on an invoice header, customer statement, etc.
Fill out the Legal Information as well. Again, while QuickBooks may pull from the Contact Information section for things like customer forms, other functions will search the Legal Information area. Payroll forms, 1099s, etc.
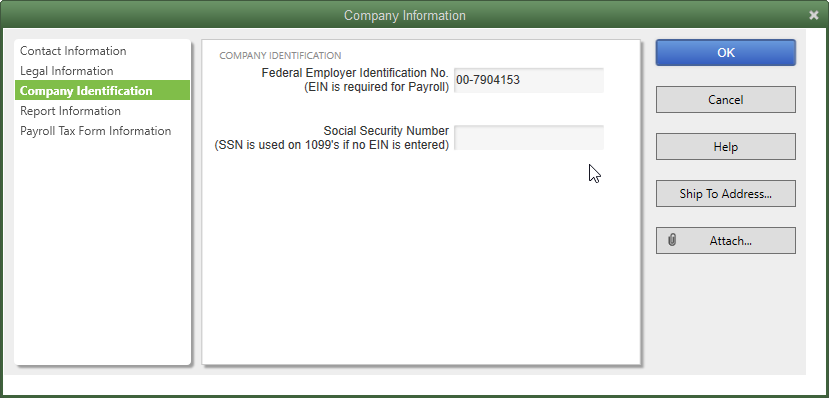
Company Information is short. If you have a Federal Employer Identification number, enter it here. If you don’t, use your Social Security number in the bottom field.
Most people get a Federal ID number when they either start payroll, or when they form a business entity other than sole proprietor. Think Partnership, LLC, S Corp, etc.
You may use your Social Security number if you are a sole proprietor with no payroll.
QuickBooks is going to use one of these numbers (and Needs one of these numbers) when filling out official forms. Filing payroll tax returns? QuickBooks looks here for the Federal ID. Create 1099s? QuickBooks looks here for your number, either Federal ID or Social Security.
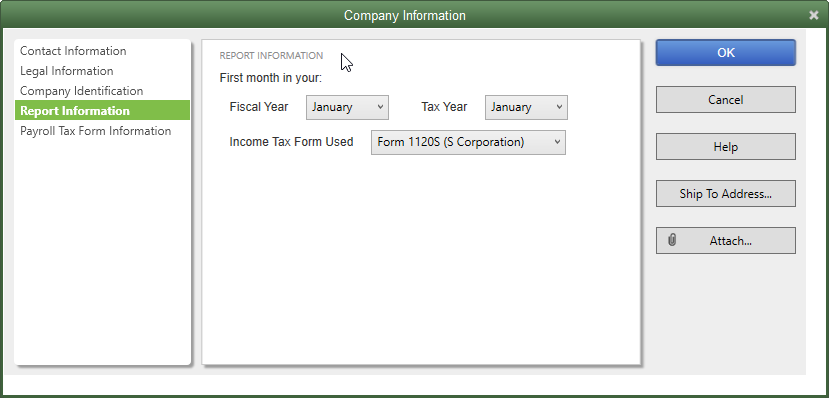
If the Report Information section sounds trivial, pause here a minute and understand how QuickBooks uses it.
This determines your fiscal year. The setting shown above means that reports are going to show on a calendar year basis. You may be non-profit with a year-end of June 30. If your QuickBooks were set as above, and you asked for a Profit and Loss report for this year, you’d get from January 1 forward, not July 1 forward.
It’s not uncommon for this question to come to me. No worries. If the dates are set incorrectly, just change them. Nothing bad will happen and you can change the dates here at will.
In more than twenty years, I have yet to find anyone who wanted their tax year set differently than their fiscal year, but it’s possible.
The Tax Form setting usually only becomes significant if you use income tax software that pulls the data directly from QuickBooks and fills out the return. I have yet to experience that either.

Yeah, the last section, Payroll Tax Form Information, is a little more involved. Of course, you only need to fill it out if you are doing payroll from QuickBooks. Otherwise, it’s irrelevant. The AutoFill Contact Information window only opens if you choose the AutoFill button.
It’s handy if you complete your own payroll tax returns. Fill out the information once here and Quickbooks fills it in each time you create a 941, 940, W2s, or state payroll forms. It’s not required, but it’s a BIG time saver.
There you have it. The My Company section of QuickBooks.
Next time? Lists!
Slice and Dice Data Like a QuickBooks Pro
We’ve done several posts this year on ways you can view your QuickBooks transactions in smaller segments. The benefit of that, is to gain a clearer picture of which parts of your business work, and which don’t.
Projects can be just that, specific customer jobs or projects, or for those that think creatively, may be rentals, grants, scholarships, clubs, or any number of things.
In order for this function to be useful, you should be able to tie all income and expense for the project (or whatever) to the specific customer and/or job.
You do this by including the customer/project name in all the transactions.
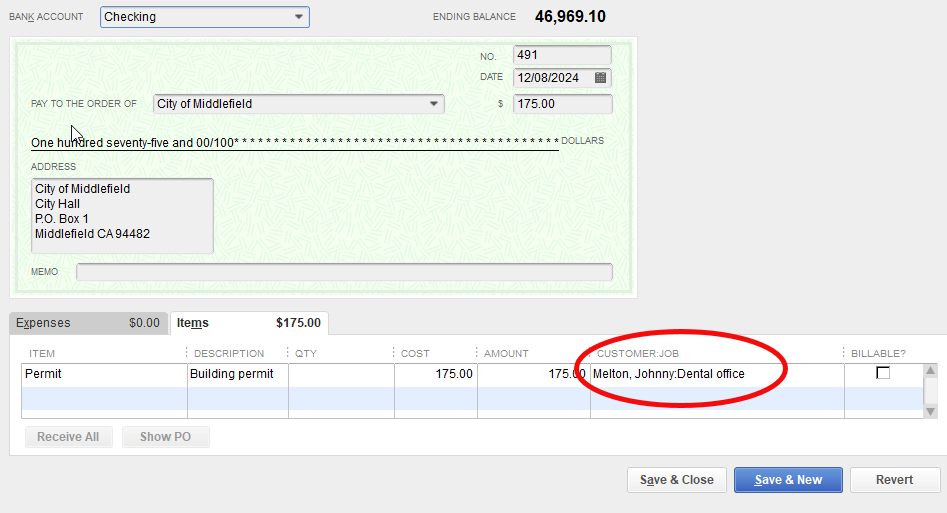
It helps to use the Items tab on checks and bills rather than the Expenses tab. This one tip will give you much better reports. It’s important to create “double-sided items.” That is, items with both an income account and an expense account.

QuickBooks knows when you are using the item in an expense transaction (check, bill, credit card charge…), or an income transaction (invoice, sales receipt…).
The result will be reports like this:

Each of the items, phases or some other definable segment of the project, show as separate lines on the report, breaking down profitability measurements even more.
Measuring smaller and smaller pieces of the business helps profit-minded owners determine which parts of the business to concentrate on and which to improve or cancel.
You can find a video detailing these QuickBooks features here:
https://www.facebook.com/mgreenandcompany/videos/584909585382528/
Top Icon Bar? Left Icon Bar?
Those of us who have used QuickBooks for a couple decades are familiar with seeing the Account Balances list in this way; on the right side of the Home Page.

While a good idea, the most frustrating thing about the Account Balances list was that no customization was possible.
You could not determine which accounts were listed, or the order in which they appeared. The accounts listed the same way they do everywhere else in QuickBooks. They were either in alphabetical order (account numbers turned off), or numerical order (account numbers turned on).
QuickBooks 2013 moved the Account Balances to the new Left Icon Bar by default. The old view is still available in QuickBooks with a change of settings. Either way, the feature retained the old weakness, no customization.
If the left-hand icon bar is not already showing in your QuickBooks, navigate to the View drop down menu and select it. Click on View Balances from the shortcuts in the center of the icon bar. From the View Balances panel, select Customize view balances.
As you can see from the screenshot below, the Account Balances section is very customizable now.

The above customization window is available when selecting the link, “Customize view balances”, at the bottom of the View Balances list (not shown). As you can see, the QuickBooks user can select which accounts are shown in the list and in what order they should appear.
In addition, the list of available accounts, the field label at which the arrow points, seems to include all accounts. Note the accounts listed in the right-hand column titled “Selected Accounts”. Construction Income and Payroll Expenses have been added.
Important accounts for tracking, including income and expense, can be selected to show the current balance at a glance.

Who Remembers When We Bought The…?

This is the first in a planned series of nine blog posts that will specifically examine QuickBooks from an agriculture perspective. There is no “QuickBooks for Ag”. So how can we use some of the features in QuickBooks if we are in the ag business?
The Fixed Item List is a relatively unknown feature in the product. Its intention is to provide a place for businesses to track large asset purchases like vehicles, equipment, and buildings.
It’s not a feature that has really caught on. That may be because it has not generated much excitement in the accountant community. When accountants aren’t encouraging their clients to use it, there’s little motivation to do the extra work.
Often though, a feature can be used in a related, but different way than it was originally intended.
One thing most farmers and ranchers have is lots of equipment. That equipment must be tracked, not just for income tax purposes, but county property tax purposes as well. We’re talking about the dreaded 571 property tax report that is mailed to you at the first of each year.
That report requires some very specific information. Year after year. How can we make that job easier?

Access the Fixed Asset Item List from the menu as shown above. When you select this option, a window similar to the following appears.

The fixed item list in this sample company has many items on it. Yours may have none. New items can easily be added by clicking the Item button in the lower left part of the window.
The window that opens for the setup of a new Fixed Asset Item can be daunting. You’re staring at a screen full of blank spaces waiting to be filled. Don’t fear. You don’t need to fill all those empty fields. Let’s just track a few pieces of information that we find useful.

Above is the setup window for one of the fixed asset items shown on the list. We could fill in information like a description, where and when we purchased the asset, and so forth. Most of those fields are optional, but they could prove handy for providing information to our accountant at year-end.
In this example, we’ve used an APN number, that is the number on our 571 property tax report, in the Location field. This can be useful if we have multiple locations where we keep equipment. The county will ask for a report on each.
Serial number might be a good piece of information to have, and keeping it in QuickBooks leaves us with one less list or file to keep. There is a lot of room for notes. Keeping repair notes here is one idea. It’s not optimal though as there is only one note field, it must be edited each time we want to add new information, there’s no pattern to the information we put in, and there doesn’t seem to be any way to access this field for reports.
We actually have some other ideas about tracking repair and maintenance data. We’ll look at that in the next blog post.
Watch the video here.