


Blog 
Click here to go back
We Got Paid
Receiving payments and recording deposits in QuickBooks Desktop
The process of receiving customer payments and recording bank deposits in QuickBooks may seem pretty straightforward, but there are a few lesser known situations we’ll cover in today’s post.
Posting payments to customers and jobs

When tracking jobs or projects in QuickBooks we are used to specifying not only the applicable customer in job expenses, but the particular project as well. As we have covered before, the jobs show in the Customer Center as indented entries. So, in the above screenshot, Kristy Abercrombie has three jobs in Rock Castle Construction. Family Room, Kitchen, and Bathroom Remodel.
Normally, when receiving a payment from a customer, we would receive it as a transaction specific to the project it was for. What about when a customer sends a payment that covers more than one project?

By using the customer name, not any of the individual projects (see arrow), QuickBooks will populate the Receive Payments window with all open invoices for that customer, not just the ones from a certain job. At this point, you have the option to apply the payment in any way you want regardless of project or job.
Giving customers discounts for speedy payment
Sometimes, offering a discount for early payment is a strategy you may want to use. That starts by setting the terms in the customer file and making sure the correct terms are entered on the invoice when it is created and saved.
If the customer pays within the discount period, how do you give the discount?
In this example, we’ve given Kristy a 2% discount if she will pay her invoice within 10 days. Those terms in QuickBooks would look like this: 2% 10 Net 30.

Kristy pays $1372.00 on a $1400.00 invoice. Clicking on the Discounts and Credits button opens the Discounts and Credits window seen in the lower right part of the screenshot.
QuickBooks knows the terms that are on the invoice. It does the math, both date and amount, and fills in all the pertinent information seen in the Discounts and Credits window. Two percent of $1400 is $28. If you think the amount should be slightly different, or if the customer rounded slightly differently to come up with a different amount, you can specify in this screen what the amount should be.
The Discount Account is specified by you, the QuickBooks user. Once you select the account for one discount, QuickBooks will continue to suggest that same account on future discounts. In this case, Rock Castle has a special account setup just for discount amounts.
What if the customer has a credit?
Sometimes, a customer can have a credit that needs to be applied to a current invoice. This could be the result of an overpayment from the past, or a credit memo, or other similar event.

In the above screenshot, the same button, Discounts and Credits, was selected to use the customer’s credit on this invoice. This time, we are looking at the Credits side of that window.
The customer had a $1000 credit, probably from a down payment before work started, in the system. They make a $400 payment on the $1400 invoice. Now, when we accept the payment and apply the existing credit, the invoice will be paid in full.
Speaking of advance payments…
While there are different ways to account for prepayments from customers, following is by far the easiest and most common method used.

If you look close, you can see the gray text in the screenshot that reads, “There are no unpaid invoices for this customer”.
That’s okay. We can still save the payment. Just be sure the selection in the lower left (see arrow) is Leave the credit to be used later.
When receiving payment on an actual invoice, you would use the payment and the credit created by this payment transaction to pay the invoice just as we did in the last section when we had the $1000 credit.
How many payments will you deposit?
By default, QuickBooks posts payments to an account called Undeposited Funds. This allows QuickBooks to accumulate the payments you record on one list. Then, when creating the deposit, you select multiple payments to create a bank deposit in QuickBooks that will match the amount of the same deposit that appears on your bank statement. It makes reconciliation much easier.
Sometimes, a QuickBooks user only receives a few payments a month and they all go directly to the bank. There’s really no need for Undeposited Funds. It only adds another step.
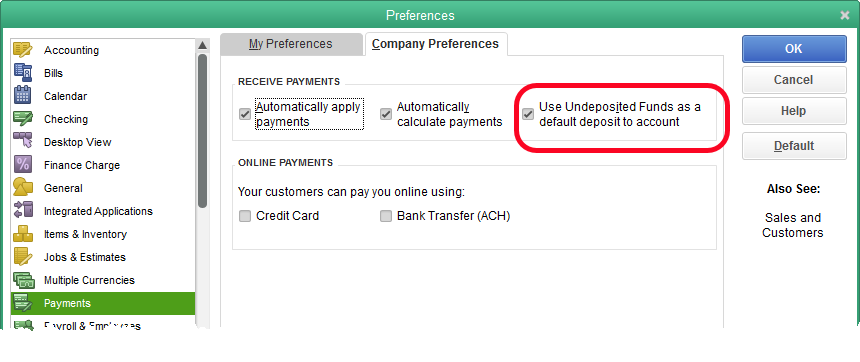
By unchecking the box with the label ‘Use Undeposited Funds as a default deposit to account’, you can change this behavior.
Now, with the preference changed, we can decide to deposit this payment to a bank account rather than Undeposited Funds. This means we won’t have to use a Record Deposit transaction in QuickBooks to get this into our bank balance. Once we save the payment, it’s already there.
Is It Billable? Or Not?
A common QuickBooks question is, what’s that column on checks and bills that says Billable?

QuickBooks users unfamiliar with it either ignore it or use it for another purpose. Whatever purpose they use it for however, isn’t helping since its designed to accomplish a specific task.
The Billable column ties in with tracking expenses by project or job. You cannot mark the Billable column unless a Customer:Job is selected in the Name column.
If a Customer:Job name is selected, marking the Billable column is optional.

The purpose of the column is to make time and expense entries in QuickBooks easily accessible when invoicing the customer for which the expense was incurred. This works best with those businesses that sell services or a combination of products and services to customers, then invoice that customer based on the time and expense of the project.
In the case of the above example, once we have saved the bill, we can invoice the customer and have a list of the time and expenses incurred working for them.

As you can see in the screenshot above, once the customer is selected to create an invoice, the bill for the window is available on the list. Since we used an item, Window, to purchase the product, we choose the Items tab in the Choose Billable Time Costs window.
Once the blue OK button is clicked, the item will transfer to the customer invoice. Since this is a somewhat generic item, that is, it is a non-inventory part type item used for any window we might purchase for a customer, there is no Price in QuickBooks for the item. Once on the invoice, we can edit the price to reflect the amount we want to charge.
If the item were more specific and had a price entered in QuickBooks, that price would be the default amount for the invoice, not the cost.
This is a terrific feature for those businesses selling even small individual projects to customers. Billable Time Costs can be configured to track additional items, including payroll. It can be quite sophisticated if needed. Even in its simplest form though, it can be quite a time saver.
Using QuickBooks’ Inventory Features
Keeping track of inventory in QuickBooks generates more questions than just about any other section of the program, payroll excepted. Today, we’ll make a quick overview of using the tools QuickBooks has provided.
First, make sure the Preference to make Inventory features active is set. See the screenshot below.
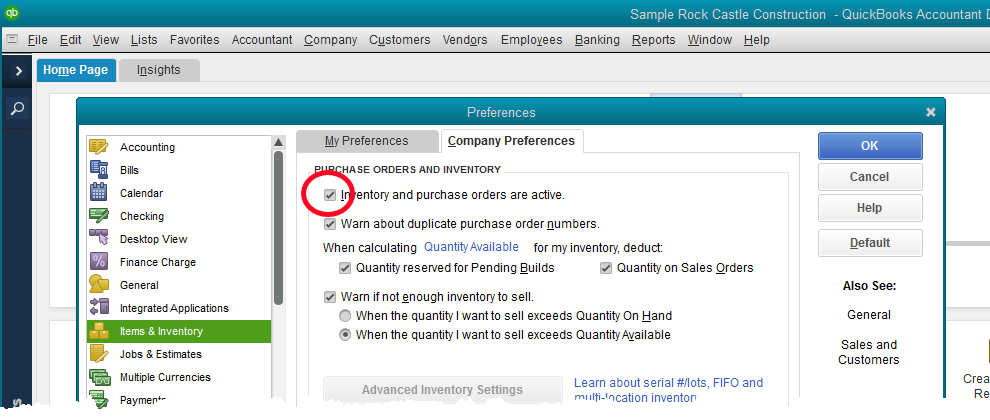
Without the preference setting, you will be unable to even create an inventory type item.
The next step is to create inventory part type items for the things you want to sell.

Above is the window for creating a new inventory item. Note that the item type is set in the upper left field. If a different type of item is selected, QuickBooks will not track the quantity or value that you have on hand. You can sell as many as you want, whether you actually have the items on the shelf or not. QuickBooks won’t care.
2 - This area of the setup window defines the purchase parameters for the item. In QuickBooks (as opposed to QuickBooks Enterprise), the cost field does little more than fill in a default value on forms. The real cost is the average cost which QuickBooks computes and we’ll discuss later.
The COGS Account is where QuickBooks will post the cost of reduced inventory when an item is sold. The Preferred Vendor field is optional.
3 - This area holds the sales information for this item. What is the sales price? Is it taxable or not for sales tax purposes? When a sale of this item is recorded in QuickBooks, what income account should the program post to?
4 - The bottom line is important. The Asset Account will be the account in which QuickBooks tracks the value of your inventory on hand. By default, QuickBooks will choose Inventory Asset for this selection. You can change that if you wish.
Reorder points can be set to aid in knowing when to re-order inventory.
Notice the numbers for On Hand and Average Cost. Nothing can be entered in these spaces. These are values QuickBooks calculates as you purchase and sell inventory.
Keeping things simple, the basic forms for purchasing inventory would be bills or checks. The part of that process that is vital is using the Items tab, not the Expense tab. See below.

In the above screenshot, Rock Castle Construction is purchasing 5 Door Frames. Because the QuickBooks user is creating the transaction with an item, and that item is setup as an inventory type item, QuickBooks will add 12 more to the on hand quantity once this bill is saved.
Selling inventory differs little from selling services or anything else. Use the correct item on the sales form you choose, and QuickBooks will take care of the rest.
As for reports, Stock Status reports and Inventory Valuation Summary are used frequently. You’ll find these in the Inventory section of the Reports menu.
Easy Customer Refunds in QuickBooks
For many businesses, customer refunds are a fact of life. Defective products, services that didn’t work, or just to pacify an unhappy customer, occasionally a refund will need to be processed.
As common as this situation is, it is surprising how few QuickBooks users are familiar with the process.
Refunds are created using credit memos. Customer -> Create Credit Memos/Refunds.

In this example, Rock Castle Construction refunds their customer, Kristy Abercrombie, for two hours of labor that resulted from the breakdown of their air compressor.
When saving the credit memo, QuickBooks uses a popup screen to ask the following question.
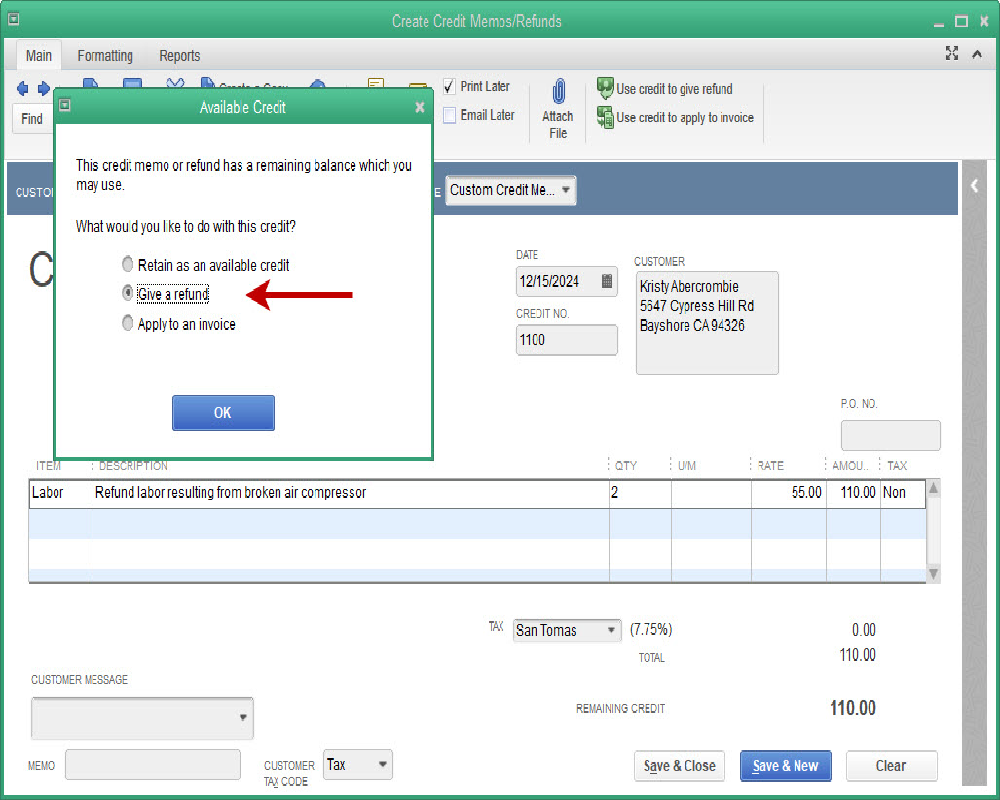
Selecting “Retain as available credit”, keeps the credit memo as a credit in the customer’s balance. “Apply to invoice”, allows the QuickBooks user to apply the credit against an unpaid invoice for this customer.
In this instance, let’s say the customer had already paid the invoice and we wanted to give them an actual refund check. We would select the middle option, “Give a refund”.

Once the refund option is chosen, QuickBooks displays the above screenshot with all the information filled in. You can change it if necessary.
Usually, you can select OK with the data QuickBooks has used. The refund check is created, ready to be printed.
Have you ever used this feature?
Invoicing from Time and Costs
QuickBooks has the ability to track expense and time transactions recorded by the user and holding those so they can be used on an invoice for a customer.
This can be as simple as postage purchased for a client who will be invoiced for the cost. It can also be as complicated as a major time and materials job requiring details spanning a twenty-five-page invoice.
In either case, those amounts do not need to be kept on any list outside QuickBooks to remember to invoice the customer, QuickBooks becomes that list.

The check in the above screenshot will be available for invoice creation in QuickBooks without additional manual entry.
Note the two arrows. A Customer:Job name has been selected in the appropriate column of the stub portion of the check. Even if jobs are not used in your business, the customer name needs to be entered here in order to use this invoicing feature.
Entering the customer name allows the Billable column to be selected. Placing a checkmark here directs QuickBooks to keep track of this expense. It will be used later to create an invoice for this customer.
The line drawn around the two tabs of the check stub highlights an important method for entering these types of expenses. Note that the Items tab has been used, not the Expenses tab.
The Expense tab requires an account from the Chart of Accounts to be used to identify the expense. The Items tab requires an item.
The benefit to using an item rather than expense is superior reporting. While the item may be created to post to the very same account that might be used on the Expense tab, using the item will improve reports in QuickBooks that use these types of transactions.
Now it is time to invoice the customer for the blueprint changes and see how our job is made easier by using the above method for creating the check.

What you see when creating an invoice for this customer depends upon how the above preference is set. Should QuickBooks give you a list of available time/costs to add? Should it do nothing? Should it popup a message asking the user what should be displayed.
![]()
This screenshot shows the popup message that will ask if the user wishes to add billable costs to this invoice. Even if Exclude is selected, or the preference is set for this popup not to appear (“Don’t add any”), the option is still available. The Add Time/Costs icon on the invoice ribbon will allow using that list to create the invoice.
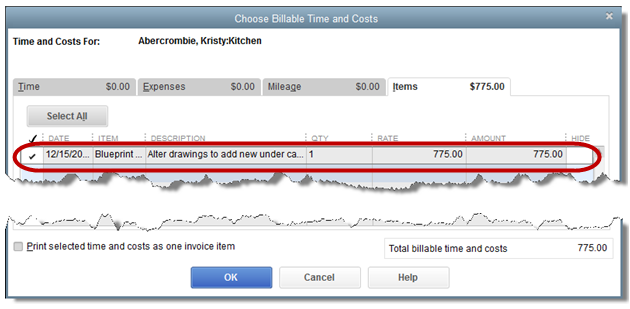
However you access it, this is the Choose Billable Time and Costs window. Note that the check we created using an item is listed here on the Items tab. Other tabs exist for time, expenses, and mileage.
The memo used in the on-screen check stub is shown here as the default description for the invoice. It can be overridden. Since there is no price entered on this particular service item (Blueprint Changes), the cost is suggested. A different price could be entered on the invoice.

The invoice has been created without any alterations from the check we used to pay the expense. It only took seconds.
Sales Tax in QuickBooks Part 2
Part 2 - Testing Our Setup
Let’s create a couple of invoices to test our setup.
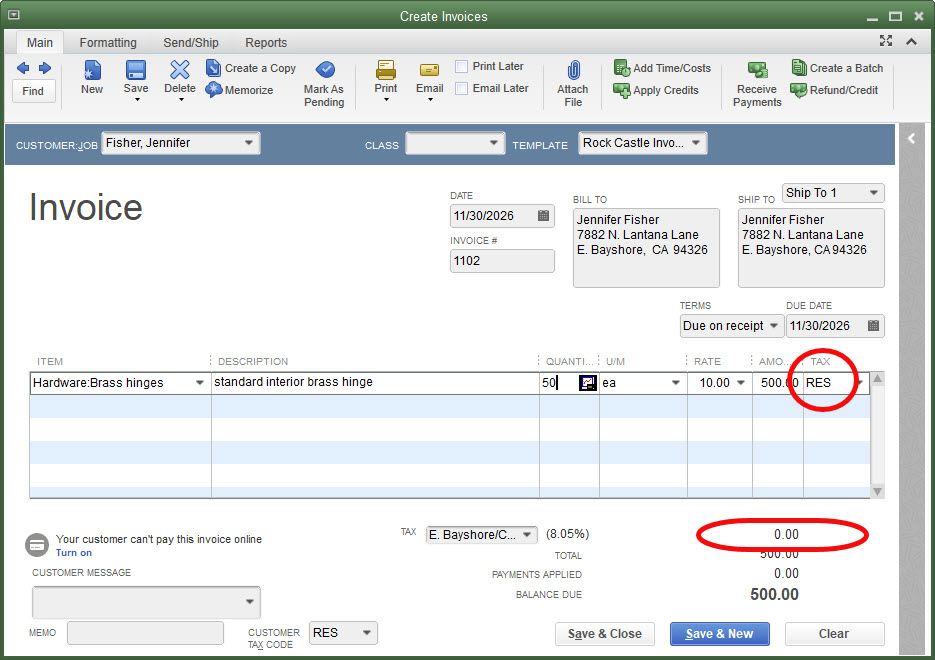
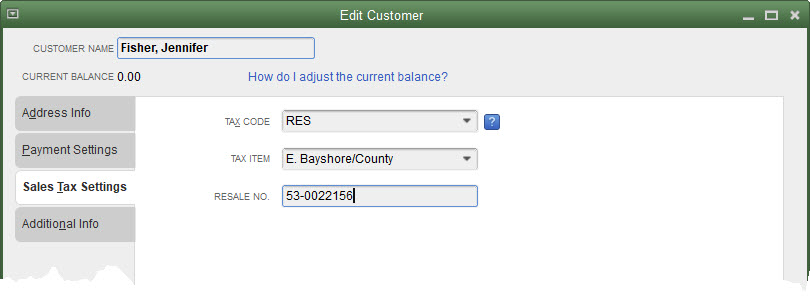
Jennifer Fisher is the customer we edited, telling QuickBooks she was ordinarily a resale customer so should not be charged sales tax. As a result, when we choose Jennifer as the customer on an invoice, QuickBooks automatically marks the sale with the RES (Resale) sales tax code and makes the sales tax amount zero.
Here is an invoice you will never create. It’s done this way to demonstrate the sales tax feature.
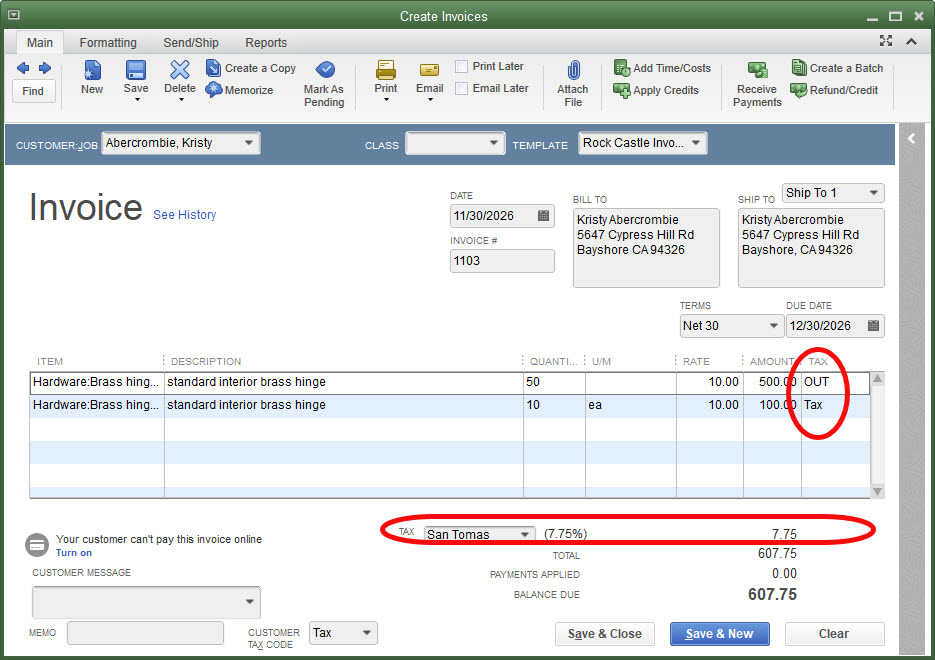
The first line of the invoice is a sale of $500. The sales tax code has been changed, that can be done manually on each line of the invoice if desired, to OUT, designating this as a nontaxable out of state sale.
The send line of the invoice is a $100 sale marked Taxable. The sales tax line shows sales tax of $7.75, which is the tax amount for line two of the invoice. No tax is generated from the first line.
Sales Tax Reports
The Sales Tax Liability report is the most common report used for reporting sales tax. Reports->Vendors & Payables->Sales Tax Liability.
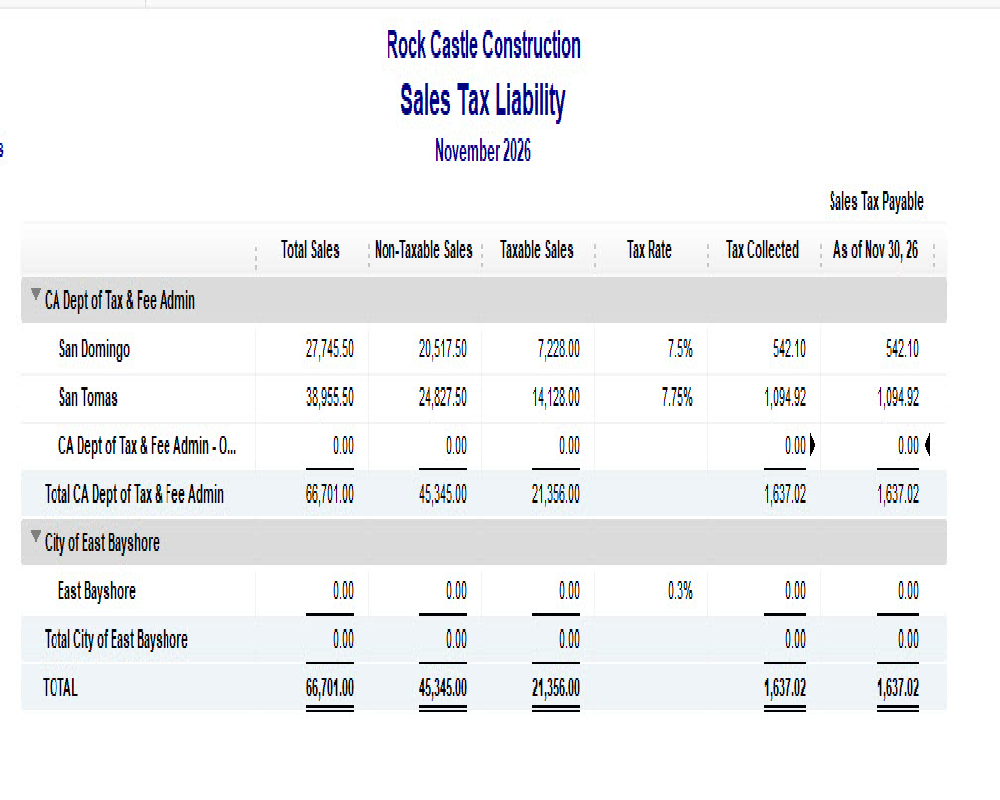
The report is pretty straightforward. It shows sales taxable and non-taxable and in which sales tax jurisdiction the sale was made.
Anyone who has ever completed a sales tax return knows one must report not only how many dollars in sales were nontaxable, but why those sales were not taxable. This is where the multiple sales tax codes come in.
The next screenshot is the Sales Tax Revenue Summary report.
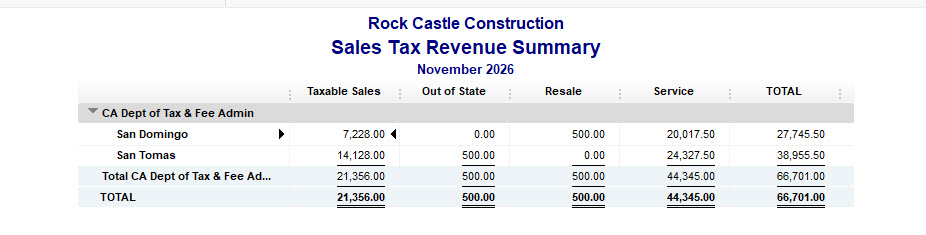
If you do the math, you will find nontaxable sales of $45,345. Same as the sales tax liability report. Only now we know that $500 is for out of state customers, $500 is for a resale customer, and the remaining $44,345 is for nontaxable services.
That’s the value of the multiple sales tax codes and the sales tax revenue summary report.
Pay Sales Tax
Similar to the way payroll taxes should always be paid using the Payroll Center, QuickBooks provides a way to pay sales taxes. This is less critical than payroll taxes but does help the program keep track of what is owed. Especially if the tax must be paid to different vendors.
Navigate to Vendors->Sales Tax->Pay Sales Tax and you can use the following window to pay sales tax. Make sure the proper dates are selected. Check the tax being paid, often this will be all the lines in the window, then click OK to create the check.
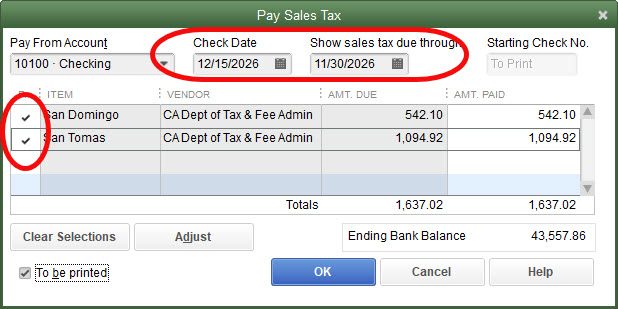
Armed with this information, you should be ready to tackle sales tax with QuickBooks.
Sales Tax in QuickBooks
Part 1 – Setup
The sales tax feature in QuickBooks desktop uses several steps for setup. It also requires knowledge of multiple components of the program. Once setup is complete though, it functions as well or better than any program we know. Compare it to sales tax in QuickBooks Online where things get very challenging very quickly.
Sales Tax Items
Setting up sales tax in QuickBooks starts with an item.
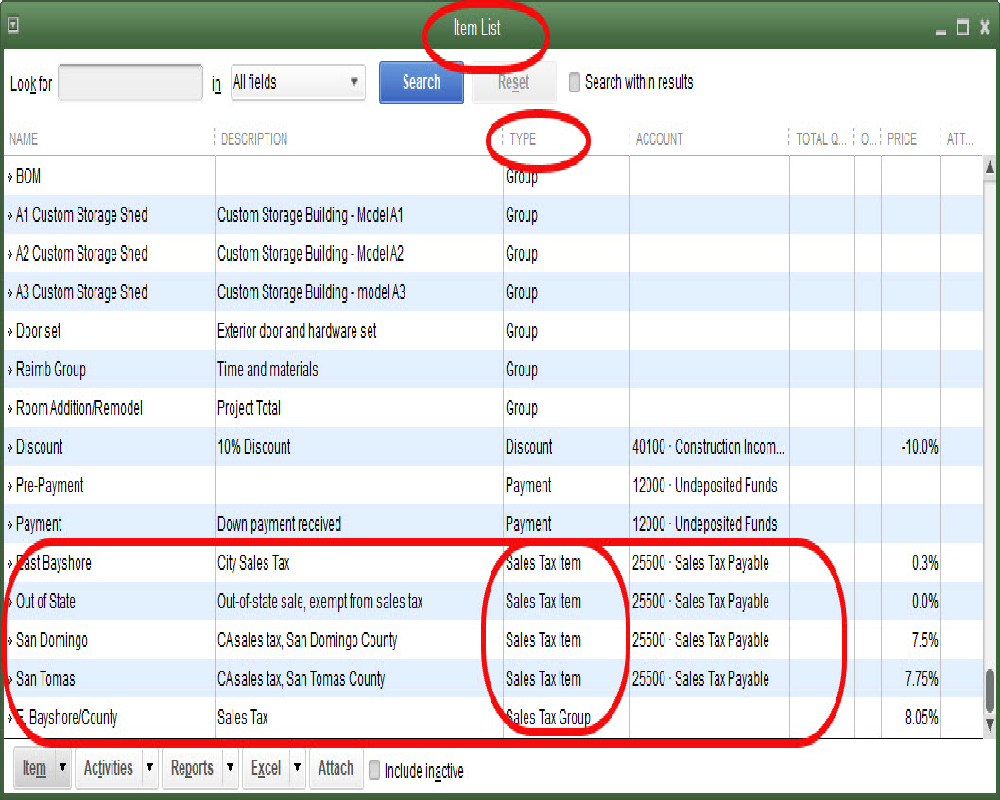
Typically, if the item list is in default order, the sales tax items will appear at the bottom of the list.
Creating or editing a sales tax item is straightforward. See the screenshot below.
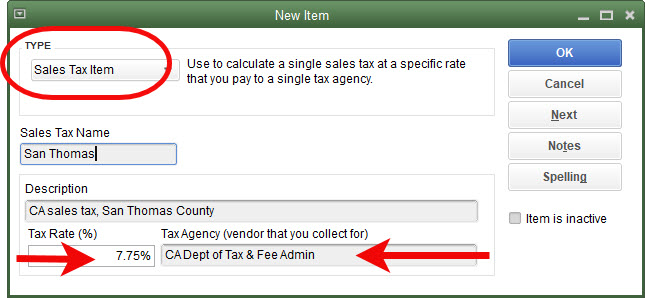
The item must be created as a sales tax item. The name and description can be your choice but use something that helps describe what this particular sales tax item is for. The sample file used in the screenshot is a good example.
Be sure the rate is correct as this obviously determines how much tax is charged the customer. Using the correct vendor is also important. Using an incorrect vendor will give you headaches when it comes time to pay the tax.
You may only need one sales tax item if all your customers are charged the same. Some will need multiple sales tax items as they may be delivering or working for customers in different sales tax jurisdictions with different rates.
Sales Tax Groups
If you have a sharp eye, you may have noticed that in the first graphic showing the item list is an item with the type, Sales Tax Group.
Sales taxes are usually made up of several components. In California, the largest portion goes to the state, another part to the county, some to the city, and in some cases, another small portion to a special district created by the voters.
Other states may have some, all, or none of these splits. If they have some, there are places where at least one of the components of the total tax rate must be paid to a different vendor. The purpose of groups is to allow each component piece of the tax to be created, selecting the vendor it should be paid to. Then, the components can be grouped to be used on customer invoices as one tax rate, which is all QuickBooks can use on a single invoice.
In California, we are fortunate that all components of the sales tax amount are payable to the state. So, with one vendor, we only need one sales tax items for the entire amount.
Sales Tax Codes
This can sound confusing to someone new to setting up sales tax in QuickBooks, but the software has both sales tax items and sales tax codes. As we saw in the earlier section, sales tax items tell QuickBooks, among other things, what the sales tax rate is and who (the vendor) to pay that sales tax to.
Sales tax codes tell QuickBooks if something is taxable or not. Expanding on this feature, it will tell us why something is not taxable as well.
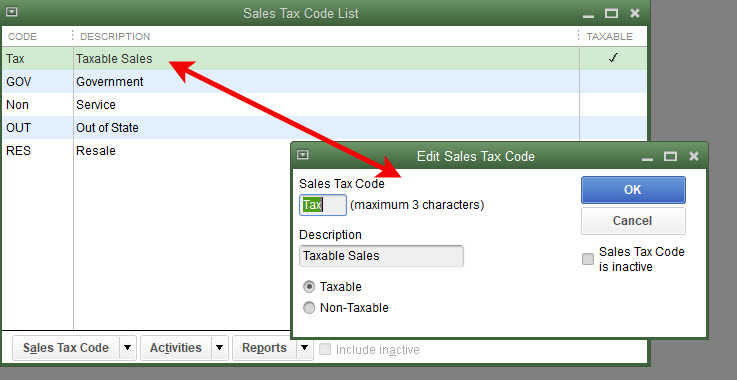
Navigating to Lists->Sales Tax Code List will access the list of sales tax codes. In the above graphic, the edit window for Tax has been opened by double-clicking on the list entry.
The codes GOV, RES, and OUT were added to the sample file. The description for Non was changed from Nontaxable to Service. All these additions and changes will be better understood later as we use them in transactions and reports.
Preferences
There are several preference settings for sales taxes. Note that, if you have sales tax ‘turned on’, QuickBooks wants a ‘most common’ sales tax item selected. Some QuickBooks users may only have one sales tax item, so this is an easy choice for them. Even if you have more than one sales tax item, QuickBooks will not do much with this preference once you tell it what sales tax items should be used with each customer.
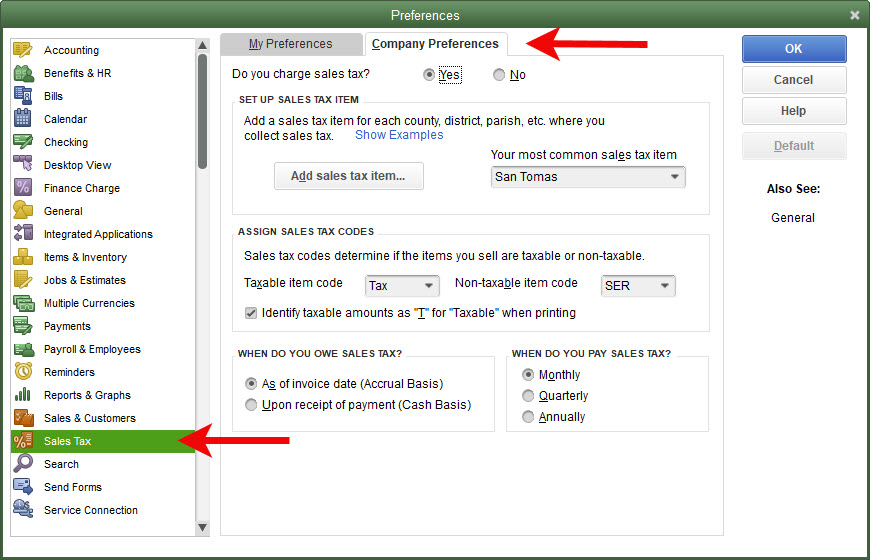
The “When do you owe sales tax” is an important question. Most states will regulate this so check with the appropriate agency in your state.
In California, the “As of invoice date (Accrual Basis)” is mandated. You must pay sales tax to the state based on the date of the sale, regardless of when you receive payment from the customer.
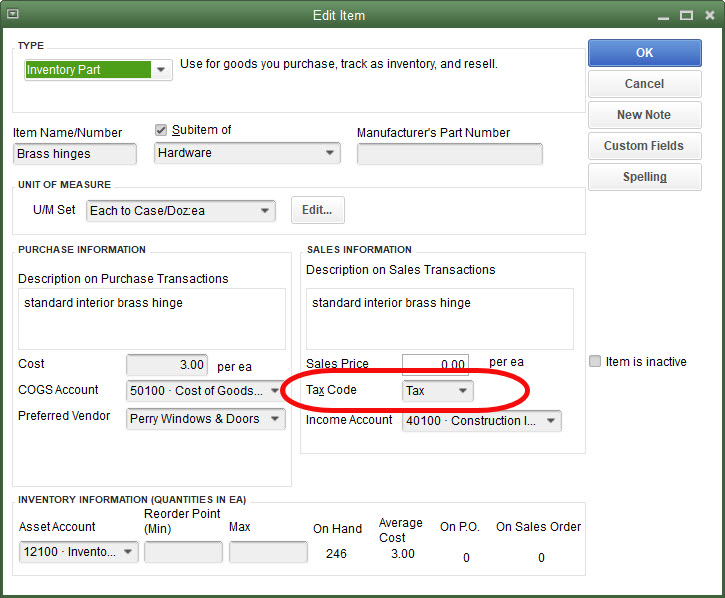
What About Nontaxable Sales?
We need to tell QuickBooks what is taxable and what is not.
Brass hinges are a taxable item.
Charges for labor, like framing are not.
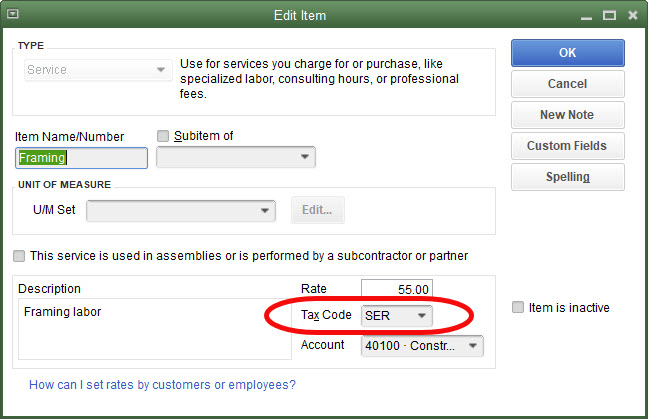
That’s all QuickBooks needs in order to determine whether an item should be charged sales tax or not. That can change in certain situations, like who purchased the brass hinges, but ordinarily brass hinges will be taxable so that’s how we will set them up in QuickBooks.
What About Nontaxable Customers?
Some businesses may have both taxable and nontaxable customers. Retail customers pay sales tax, others registered as re-sellers, may not be charged sales tax.
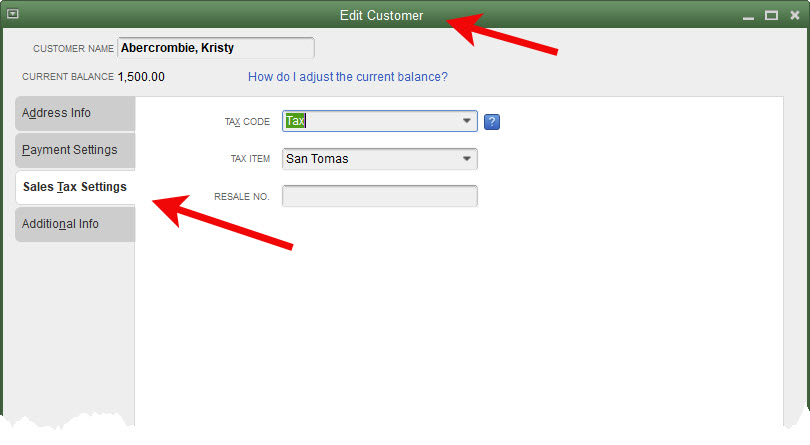
Edit the customer. Choose the Sales Tax Settings tab on the left. Choose the appropriate sales tax code.
Here is where you will use one of those custom sales tax codes shown in the earlier screenshot. If Kristy Abercrombie were a customer that did not pay sales tax because she purchased our products to re-sell later to her customers, I would choose the Resale (RES) sales tax code shown earlier.
Let’s set up a resale customer to use later when we get to reporting.
Next post, we’ll test our setup.
Tips for QuickBooks Bank Reconciliation
Today’s post discusses several tips to make reconciling the bank account in QuickBooks easier.
First, navigate to the bank reconciliation screen from the Reconcile icon on the Home Page.
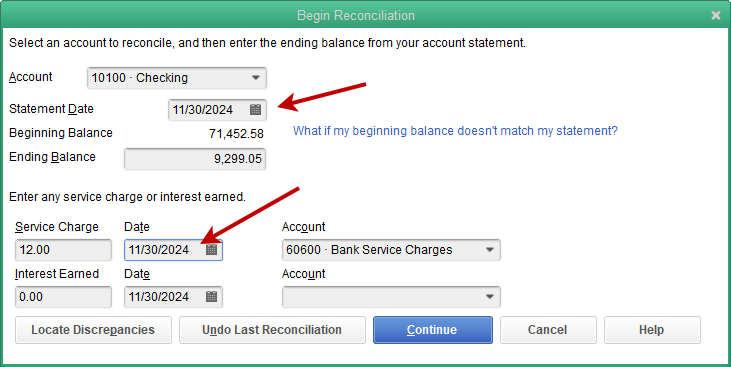
First tip, make sure your statement date and the date of any service charges or interest earned, agree.
Often these dates can become out-of-sync. Many QuickBooks users will click through this screen without even checking, unacquainted with what effects this may have on their QuickBooks file.
When the transaction date for the service charge is later than the statement date, the bank reconciliation report will not agree with the actual check register. While overall numbers are still correct, any accountant working on your numbers for reporting purposes will be sent looking for the cause of the discrepancy. For you, it’s needless billable time spent over a very small error.
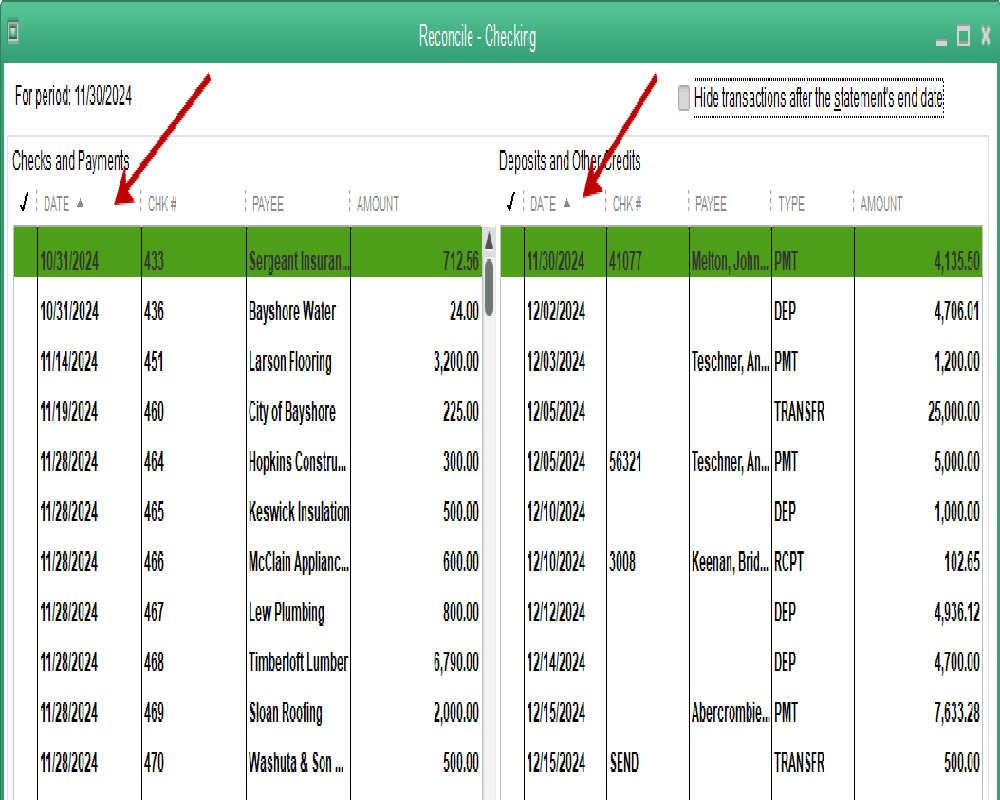
One of the improvements in the bank reconciliation window from a few years back is the ability to sort the data from any of the columns. This works for either the check side or the deposit side.
It used to be that checks sorted by number only. With the increasing number of EFT and other type payments that did not align with the numbering sequence of paper checks, finding the checks became more difficult.
Now, the user can select to sort by check number, date (as in this example) or any of the other columns.
![]()
This one we’ve had for awhile. The checkbox to eliminate all transactions dated after the statement date. This results in a much shorter list of transactions to work with while finding items to clear.
Another tip. Especially for those companies that issue debit cards to certain employees. Being in the middle of a reconciliation and finding items that have not been entered into QuickBooks can be frustrating.
The check register can be opened and additional transactions added without closing the reconciliation window. It will automatically update. When you close the register, the new transactions will show in your list to be cleared.
Another frustration is items with small differences from the amount that cleared on the bank statement. From within the reconciliation window, items can be brought up in their original detail window with a double-click of the mouse.
This works best with regular checks. The amount can be edited. It will update immediately in the reconciliation window and be ready to mark as cleared.
In either of these last two cases, if the reconciliation needs to be put on hold for such an amount of time that the window needs to be closed, no worries.
You can click the Leave button. When you next return to the reconciliation window, all your work has been saved.
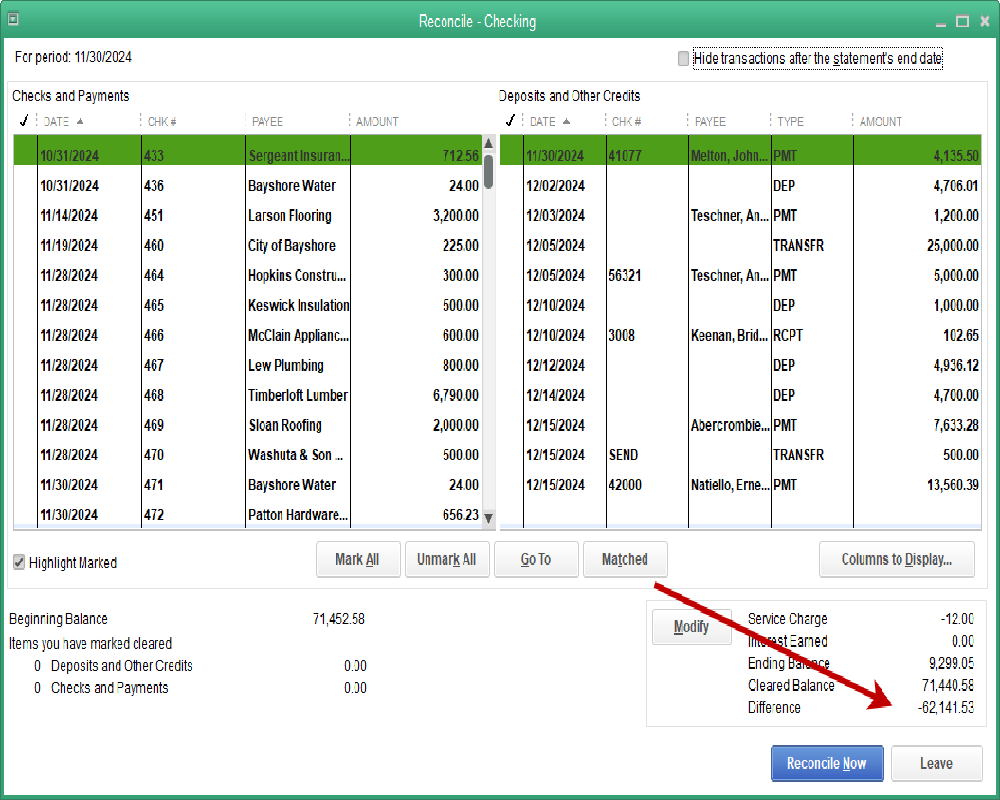
One last tip. Remember to continue correcting and reconciling till the Difference line is zero.
Accruing Sick and Vacation Time
Recently, more questions have been arising about this feature in QuickBooks. We examined this a few years ago when California instituted a requirement in 2015. This law required one hour of paid sick time be accrued for every thirty hours worked. Let’s revisit how to do this. The instruction, of course, can be applied to any sick or vacation benefits you may wish to provide.
We will setup this time off accrual in Employee Defaults, that way it will be the default setting every time we hire a new employee.
Open the Employee Center. From the Manage Employee Information dropdown menu, choose Change New Employee Default Settings. Click on the button, Sick/Vacation.
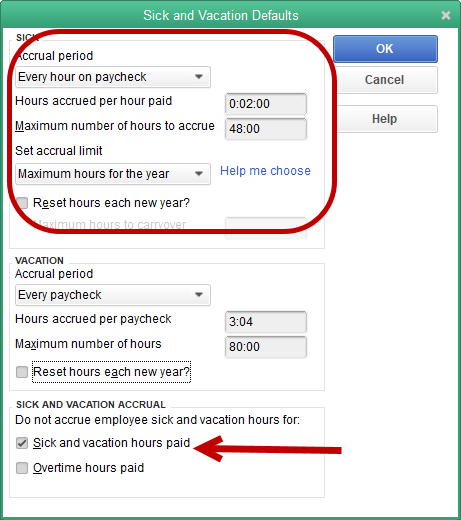
The top portion of the Sick and Vacation window is the portion we will use. It is specifically labeled for sick time, the bottom portion for vacation.
The accrual period is set for “Every hour on paycheck.” In this instance, that’s what we need. A certain fraction of an hour for each hour worked.
The next field tells QuickBooks how much time to accrue for every hour worked. In the sample file for Rock Castle Construction, time is set to show in hours and minutes. This is a setting in preferences. The time could show as a decimal.
In our case, the amount of time to accrue per paid hour is two minutes. 0:02:00. This setting will accrue sixty minutes by the time the employee has worked thirty hours, exactly what we need.
If time showed as a decimal, this amount would show as .03333.
The employee will be allowed to accrue a maximum of forty-eight hours. At that point, time ceases to accrue until some hours are used, bringing the amount available below forty-eight again.
The hours will not reset each year, a setting that is not permissible in many areas.
Note the checkboxes in the bottom portion of the window. We don’t want paid sick to accrue on sick and vacation time used, so we will make that selection here.

Above is a paycheck created for a Rock Castle employee. Note the circled areas on the right. The lower of the two shows that Gregg has accrued 2:40 in sick for the hours on his check. That’s eighty hours times two minutes each, resulting in 160 minutes, or two hours and forty minutes, for this paycheck.
The double headed arrow points out that we have added one hour of sick time to be paid. This lowers the amount of sick time available to 1:40. That is the amount shown by the top circled area, Sick Available.
How to Manage Duplicate Names in QuickBooks
It happens. Baker, Chris has been a customer for a long time. But so has Christine Baker. And they’re the same person.
If you have used QuickBooks long enough, you know that if you try to delete one of those customers, QuickBooks won’t allow you to do it. At least, not if transactions have been recorded under both names.
You could go back and change the customer name on every transaction, leaving one of those duplicate entries with no activity in your QuickBooks company file. Then you could delete it. But there’s an easier way.
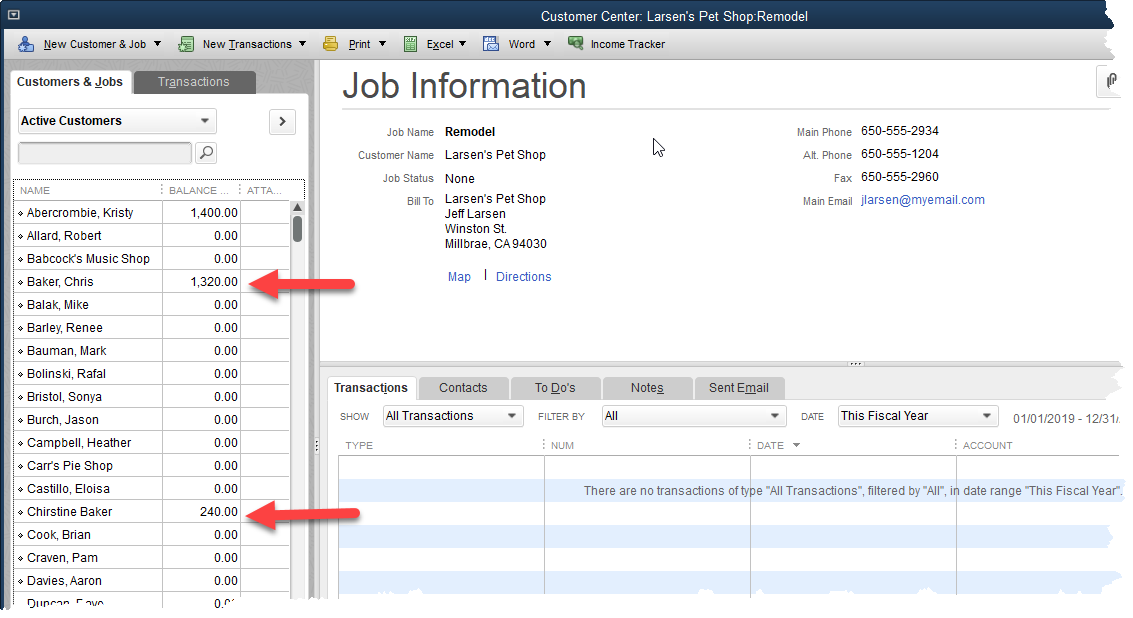
Above is our customer center. You can clearly see the duplicate customers. Both names have a balance due. Both have transactions.
To fix this, we first need to decide which version of the customer name we want to keep. Christine Baker? Okay, let’s do that.
Either click on the Baker, Chris name and choose the Edit icon, or right click on the name and choose Edit from the popup menu.
This is how that edit window appears now:

The very first field of this window is what QuickBooks sees as the customer name. That is Baker, Chris. Edit that to read Christine Baker. Then click okay and if you’ve spelled the new name right, you should get this warning message.
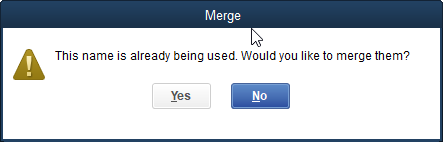
QuickBooks gives you a chance to reconsider since this is a permanent change. There’s no going back. Once you say yes to this message, QuickBooks has no way of recovering the old information.
In this case, it’s a simple change and we know we want to do it, so we’ll choose Yes. As soon as we do, our new customer list looks like this:

There is only one Chris or Christine Baker now. The two customer balances are now one. All transactions in the QuickBooks company file that used to show Baker, Chris as the customer name now show Christine Baker as the customer name.
This works with other lists as well. You can re-vamp your chart of accounts by editing and merging account names. Vendors, classes, items, etc. Just use care and think through your change before implementing it.
If there is some question about the impact on your company file, create a backup, make your change, and see how it works for you. If some surprising result pops up that makes you wish you hadn’t made the change, restore the backup and you’re back to your original company file.
Automated Customer Statements
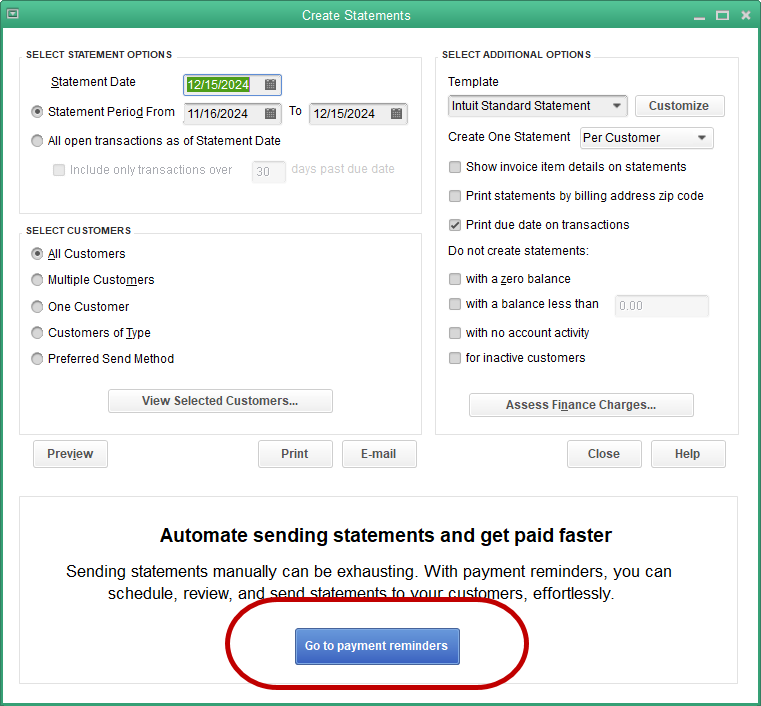
In QuickBooks, it’s possible to automate the process of sending customer statements. We’ve written about customer statements before. They’re an excellent tool to remind customers to pay outstanding balances. In recent years, QuickBooks has enabled this process to be automated.
The screenshot below shows the screen used for creating customer statements. Click the blue ‘Go to payment reminders’ button.
The first step in automating the statement process is to create a schedule. Who is going to get statements and when?
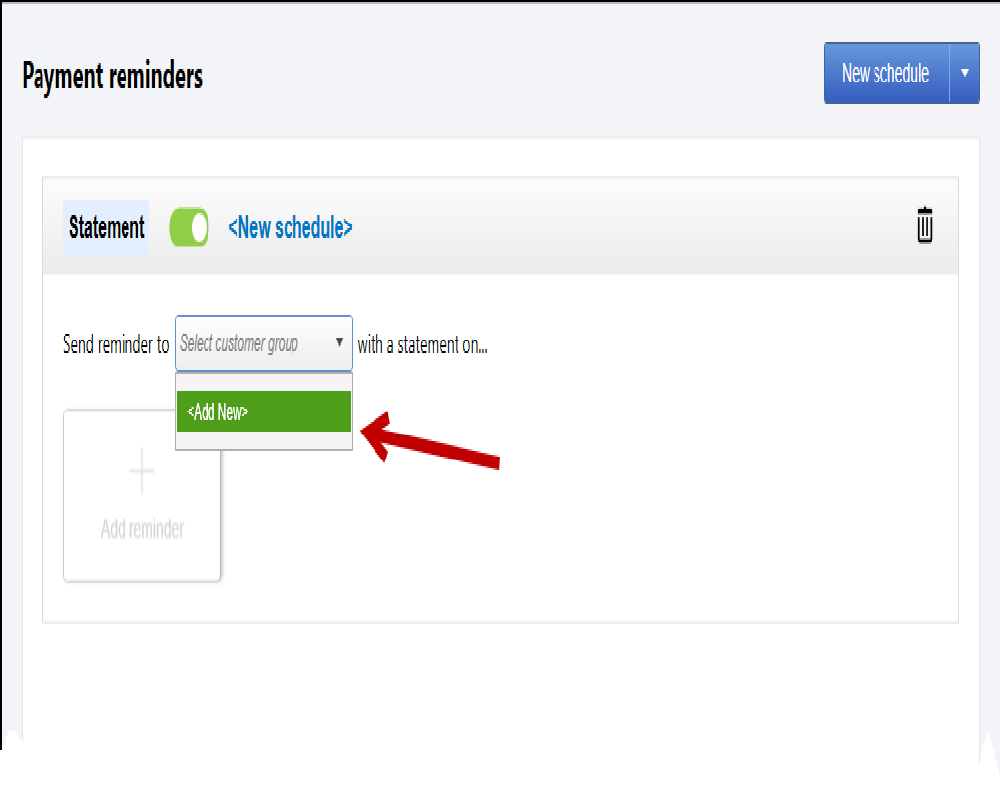
The first thing QuickBooks wants to know is, who? Who gets a statement?
In the screenshot above, the Add New refers to adding a new group of customers so you can instruct QuickBooks on how their statements should be handled.
Once you select the Add New button, QuickBooks will ask you to create a name for this group. So, examples might be Commercial, Retail, over $500 balance, etc.
In the screenshot below, we set the criteria so QuickBooks can determine who should be in this new group.
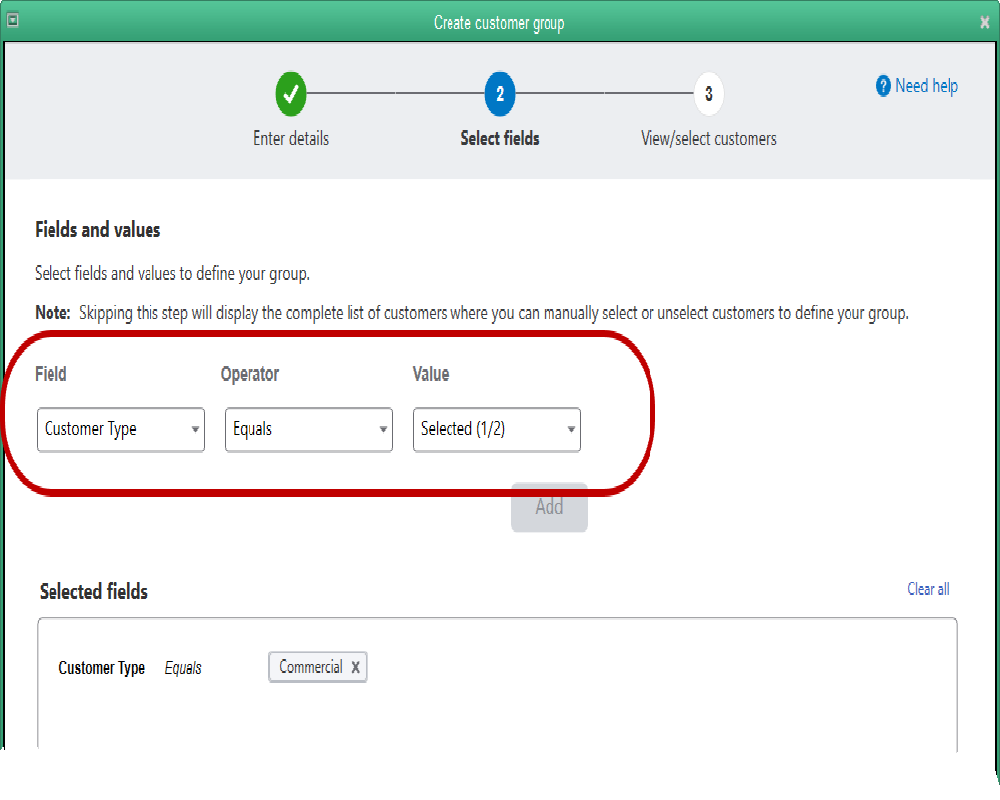
In the example above, Customer type has been selected as the field QuickBooks should look to in order to find the data to decide who should be in this group. There are quite a few other options.
You can choose customer balance, then in the Operator dropdown, choose “Greater Than”. This would enable you to choose all customers with an outstanding balance greater than $XXX.XX. That would become the customer group. It would change as customer balances change. At the appropriate time, QuickBooks will send those statements.
There are other options like all the customers with a certain Sales Rep, in a certain country, state, or using a certain sales tax item.
In our example, we’ll create a group of all the Customer Type = Commercial.
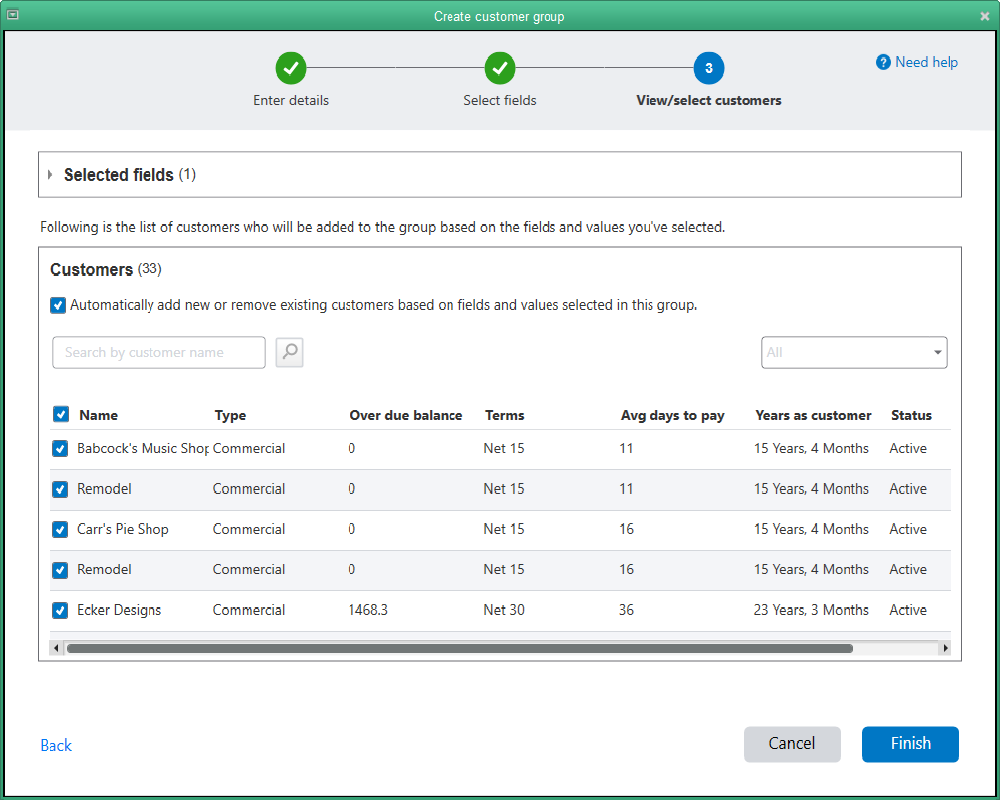
And there we are. All of Rock Castle Construction’s customers of the customer type commercial, are now in this group.
What’s next?
Clicking the Finish button opens a new window with the option to “Add reminder”. Choose that option. When you do, QuickBooks allows you to set a number of options about how your statements should appear.
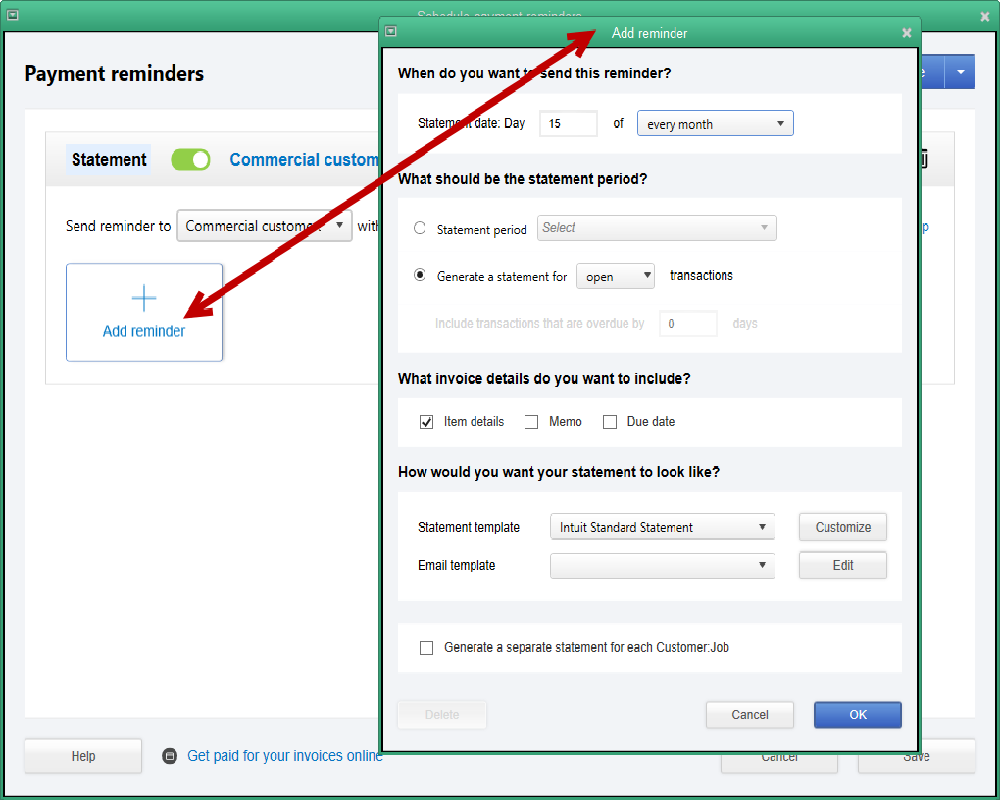
What day should QuickBooks choose? What statement period? Invoice details. What template? And so on.
One of the choices is email template.
Automated Payment Reminders will electronically send customer statements. Be sure you have that setup already with customer email addresses, how you want your email to appear, etc.
Then, on whatever schedule you chose, QuickBooks will automatically send those statements out for you. One less task you will need to spend time on.
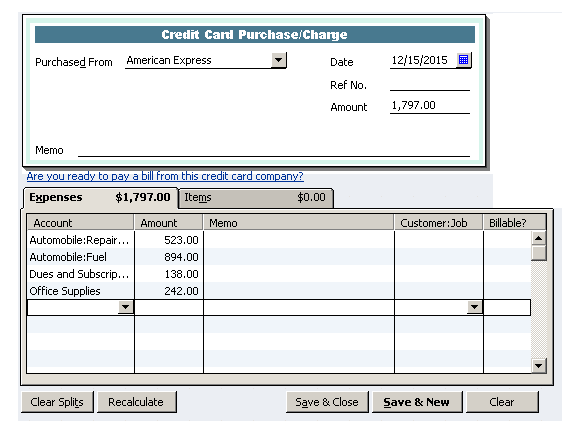
Purchasing With Credit Cards in QuickBooks
This QuickBooks capability is used by some but ignored by many others. Some are not sure how to use it. Others fear using it will be too time consuming and tedious. Let’s examine how the feature is designed to work, then look at some short cuts that might help some of you.
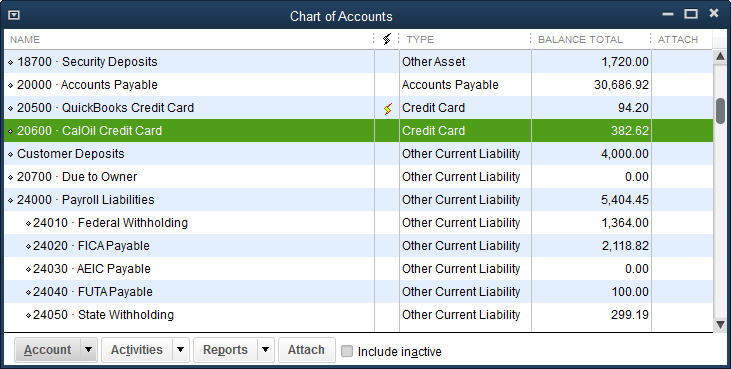
First, to use the credit card feature, you must have setup at least one credit card type of account on the chart of accounts.
See the screenshot below. Setting up an account as Credit Card type, like the CalOil Credit card highlighted, will tell QuickBooks to activate this feature.
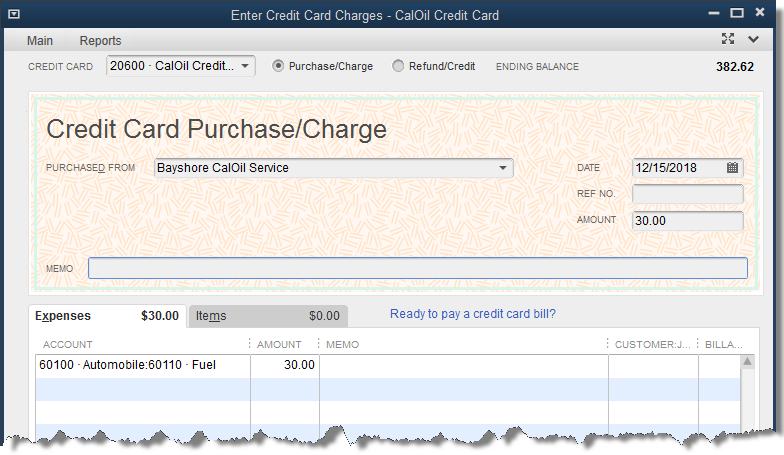
If using the feature as designed, one would fill out a Credit Card Charge form, like the graphic above, for each credit card charge made. It fills out much like a bill or check form in QuickBooks.
When the statement from the credit card company comes, the account in QuickBooks can be reconciled just like a bank account.
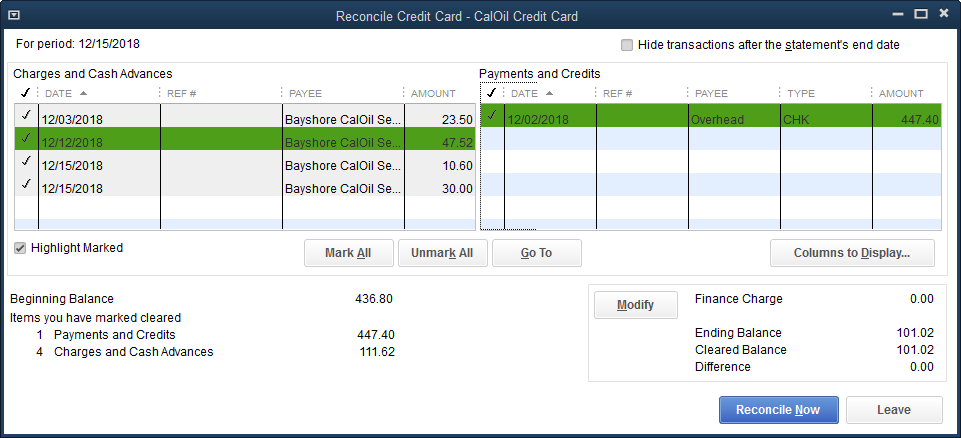
Checking off the appropriate items, again like reconciling a bank account, will complete the process for the month. When the Reconcile Now button is selected, QuickBooks displays the following window.
This allows you to create a payment for the credit balance, or a lesser amount, at this time. That isn’t required though. One could cancel out of this window without affecting the reconciliation work just completed. If choosing this option, later, when a payment is entered for the card, be sure to post it to the credit card account rather than an expense account.
In this case, any check created to pay on this credit card balance would use CalOil Credit Card as the “expense” account on the stub portion of the check form in QuickBooks.
If maintaining a balance on the credit card, that is, the entire balance is not paid each month, this method is best. It helps keep the amount owed to the credit card company accurate in QuickBooks which keeps your reports accurate.
If, however, you need a streamlined process to track credit card expenditures, some people will use the following method successfully.
In this instance, the QuickBooks user will not enter any credit card charges until the monthly statement arrives. Then, they will consolidate the charges by expense account as shown in the screenshot above.
The amount shown on the Credit Card Charge screen should total the credit card charges made for the period on the statement sent by the credit card company.
This can then be easily reconciled with a couple of mouse clicks and the payment created in QuickBooks to pay the balance due.
Reimbursing Employees for Mileage
What could go wrong? She added mileage reimbursement to her employee’s paycheck. No need to write an extra check. Why was it costing her hidden fees and why was the employee upset?
It didn’t happen exactly that way, but close. Actually, working with a client, we discovered her mileage reimbursements were being reported as wages. Subject to withholding, social security, Medicare, and more. It’s actually easy to do. Here’s how to prevent that.
To reimburse an employee for mileage, I can easily add the amount to a paycheck. It’s easier and faster if done right.
The first step is to setup a payroll item. From Lists->Payroll Item List, choose the Payroll Item button, then select New.
I always choose the Custom Setup in the first window. There just isn’t enough flexibility in EZ Setup.

Once we make this selection and click Next, the following window appears.

This is an Addition, right? We are adding an amount to an employee’s paycheck.
In the next step we need to name the payroll item we’re creating. Mileage Reimbursement seems like a good name.
Following that, we’ll need to tell QuickBooks what expense account should be used when this item is added to a paycheck and QuickBooks needs to post the dollars to a specific expense account. I like to create an expense account called Mileage Reimbursement. If you like, you can make it a subaccount of Automobile Expense. See the screenshot below.

The next window is of great importance.

Tax tracking type is always the most important decision when setting up any payroll item. The selection in this window determines whether or not the amounts will be taxed, how the amounts will appear on payroll tax forms, and on W2s. It’s important.
The default when creating an Addition type item, which we are doing here, is Compensation. Compensation is taxable wages. We definitely do not want that. This is a reimbursement to an employee for miles driven for the company, it’s not taxable wages.
Change the Tax tracking type selection to None.
A few windows follow, allowing for additional information. There’s one for Taxes. I’ve never seen an instance where something needed to be changed in this window. If the tax tracking is correct, the Taxes window should already be correct without any input from us.
Our payroll item IS based on quantity, not on hours. So, make that selection. It will be based on the number of miles driven.
It is added to Net Pay, not Gross Pay.
Default rate and limit. Usually the default rate will be the current federal mileage rate. As of this writing, that’s .625 per mile.

There’s no limit, so we’ll leave that blank.
Click Finish and that’s it. Add this to an employee’s paycheck at the time of paycheck creation. Enter the number of miles and QuickBooks will do the rest.
Customer Discounts – Price Levels
There are several ways to offer discounts in QuickBooks. If you use discounts on a regular basis or as the normal price for certain customers, Price Levels will offer an easy solution.
Price Levels are found on the Lists drop down menu. Different types of Price Levels are available in the Pro and Premier levels of QuickBooks.
In QuickBooks Pro, only Fixed % price levels are available.
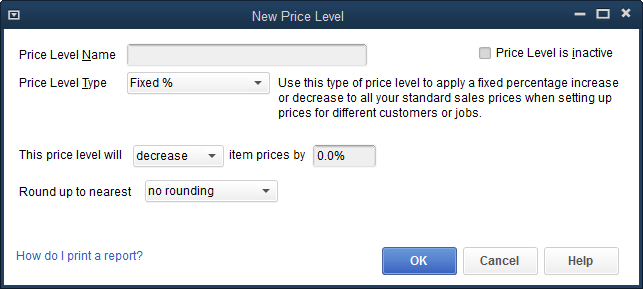
Navigate to Lists->Price Levels and select New from the menu that pops up with a right mouse click. You will see the above window.
Name the price level so it can easily be identified. Set whether the price level is an increase or a decrease over the price set in the Item List.
Then round in a way you wish prices to appear on your customer invoices.
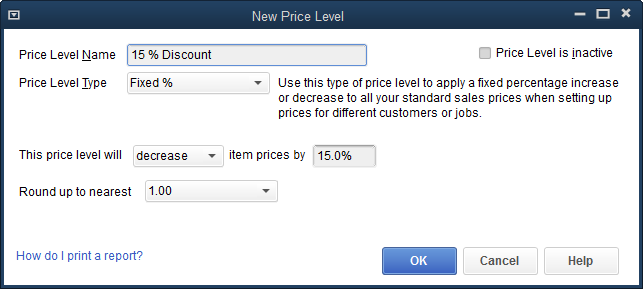
The completed Price Level is shown in the above graphic. We’ve named our new price level “15% Discount.” The price level will decrease item prices by 15%.
The rounding has been set so discounted prices will show as whole dollars. There are many options for rounding. Prices can be specified to end in .25, .50, .49, .89, .99 and many others.
A powerful feature in the use of price levels is assigning a certain price level to a certain customer. Then QuickBooks will always use that price for that customer without any ‘reminding.’
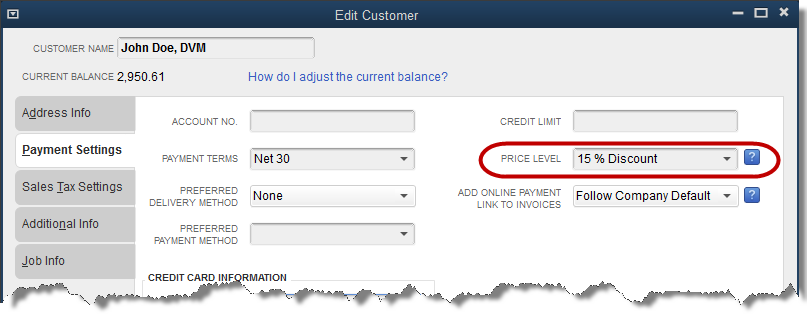
To specify that a certain customer should receive a certain price level, access the Payment Settings tab in the customer edit window.
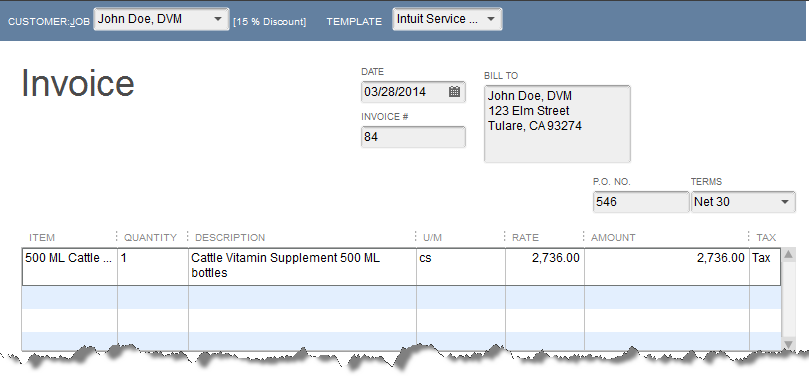
Now, without the need for a discount item, the lower price comes up automatically for this customer.
Using a 15% Discount Item (a different blog post), results in a different customer price than using a 15% Discount Price Level. QuickBooks uses a different calculation for each of the two methods.
Not important, and the difference is small, but the question sometimes arises from someone doing a lot of discounting by customer in their business.
The Premier level of QuickBooks offers an additional option to price levels. Per Item price levels.

Many of the same calculation and rounding parameters found in Fixed % type price levels are available options for Per Item price levels as well. But, a Per Item price level can apply to specific items rather than all items.
In addition, the calculation can be based on the price, as with Fixed % price levels, or cost.
Just like Fixed % price levels, the Per Item price levels can be applied to one or more specific customers.
Unfortunately, only one price level can be applied to a customer.
Create Customized Receipts for Customer Payments
This feature was new with QuickBooks 2021. It allows the QuickBooks user to create a customized form to print a receipt for customers making a payment. Here’s how it works.
The starting point is accessing the Receive Payments screen either from the Home Page icon or the dropdown menu across the top. Once QuickBooks has opened that window, switch to the Formatting tab.
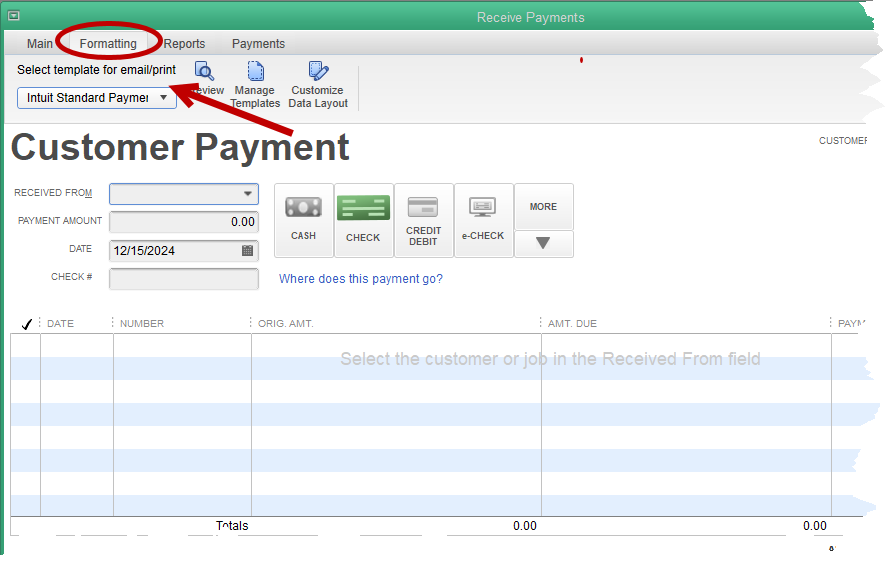
You can see in the above screenshot that the window now has a dropdown making multiple templates available, just like the Create Invoice screen.
On the Formatting tab, choose Manage Templates. You will need to copy the existing Intuit Standard Payment Receipt and then rename it to something you choose. In this demonstration, I chose the name Custom.
Once the name is created, you are taken to the Basic Customization screen.
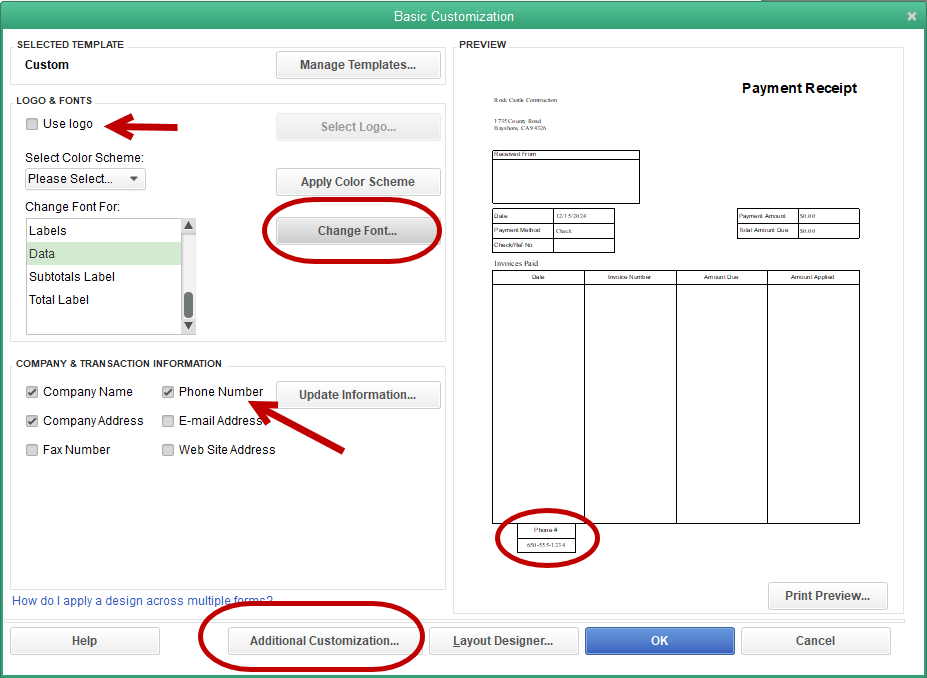
There are a host of available custom choices here. At this point the process becomes almost identical to that of customizing an invoice which we’ve covered in a different blog post.
A company logo can be added. The fonts of the printed form changed. Company information like telephone number included and so on.
In this screenshot, you can see the phone number was added. The addition shows in the lower left of the preview. QuickBooks doesn’t know where we want that piece of information yet. We’ll tell it before we finish this process.
Click on Additional Customization.
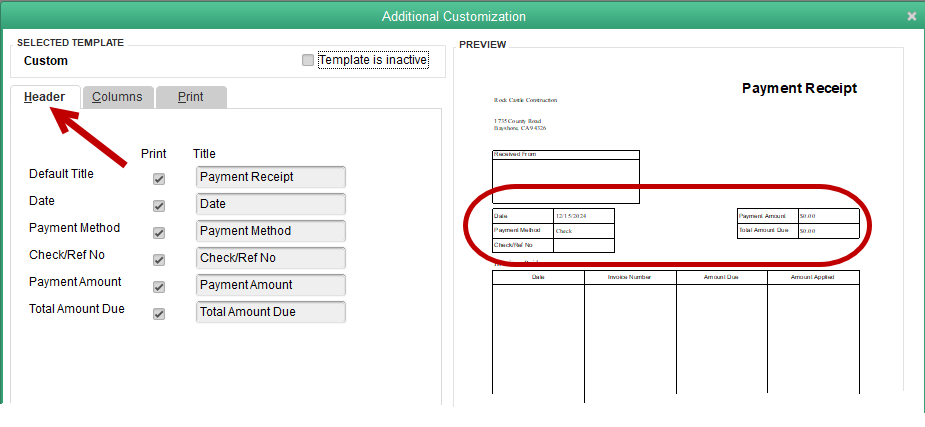
In this screen, you have three sections of the template to work on. The first is Header. You can see the various pieces of information available and the checkboxes telling QuickBooks we want that data on the Payment template.
The highlighted section on the Preview page shows where these selections end up showing on the printed form.
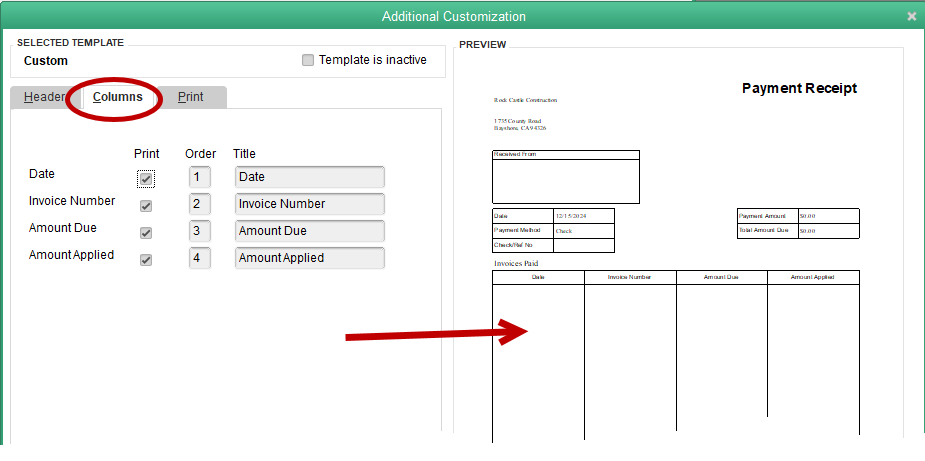
The next tab is Columns. You can change which columns print and in what order they appear on the finished template.
The Print tab isn’t used as often. There are options there to always print multiple copies, print to a special printer, etc.
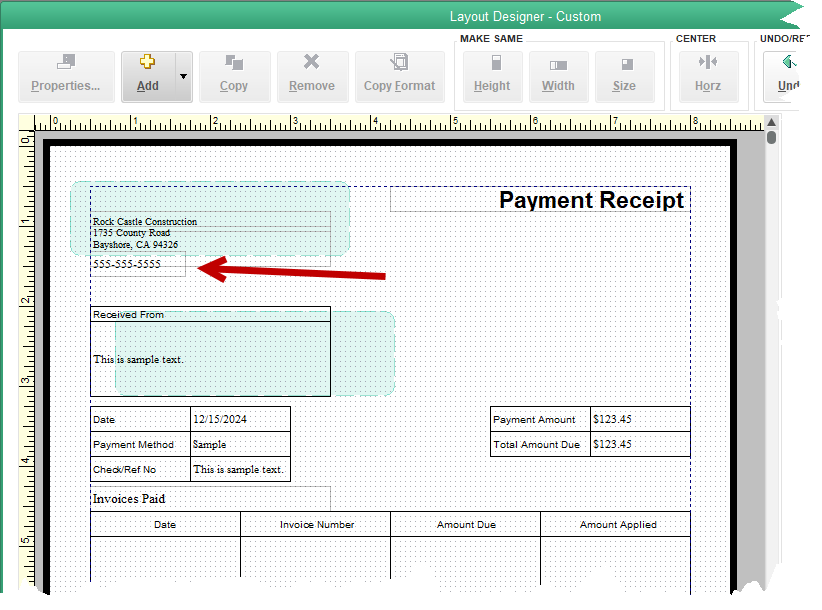
The above graphic shows the Layout Designer view of our custom template. The arrow indicates the phone number that was moved to appear just below the company address. The font was changed to match the rest of the form. Left-justified was selected so the number would line up on the left like the rest of the section. These actions are all available by selecting the Properties button in the upper left of the window.
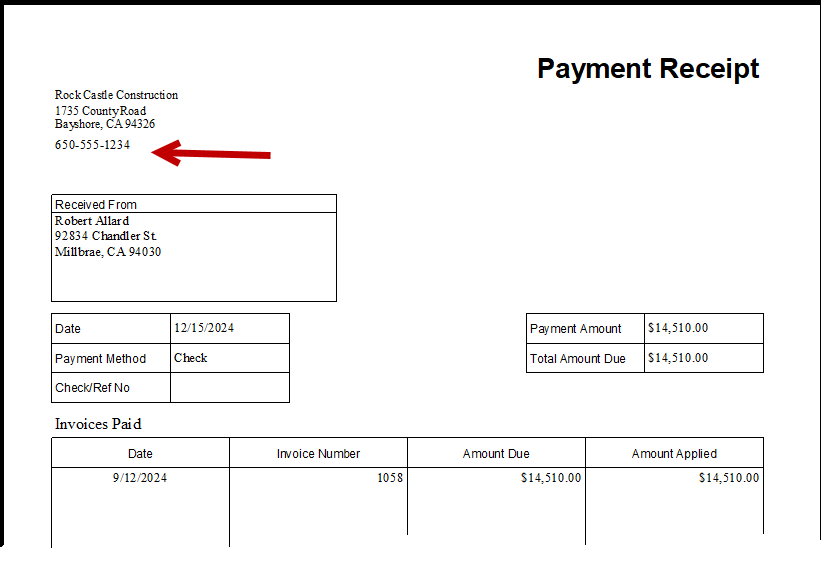
And above is our finished form.
The only change made in this demo was the phone number, but this is just an example. You know how to access this feature now and how it can be changed. Your receipt, should you need one, can look completely custom, unlike that of any other QuickBooks user.
Creating a QuickBooks Backup
First, select Create Backup from the File dropdown menu.
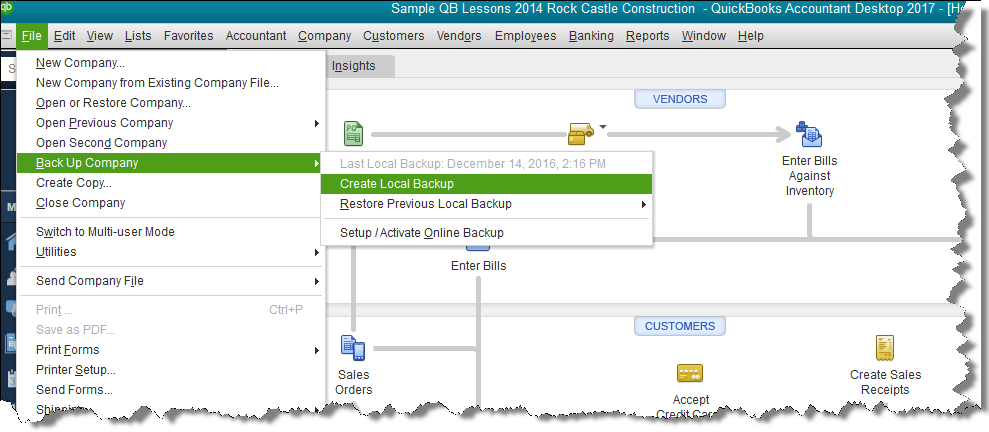
Accept the default selection, Local backup, in the next window.

QuickBooks will want to know where it should save your backup file. Clicking the Browse button as indicated in the above screenshot will open the smaller Browse for Folder window shown.
Select a location for the backup file. You can select one of the drives by letter. The letter designations (yours will certainly be different than this example), indicate some of your options. If you were planning to save the backup to a flash drive, your choices in the above example would be either E or F.
By scrolling up the selection list, you could choose Desktop to save the file on your computer desktop.

Importing Accountant’s Changes Back into Your QuickBooks Company File

All during the time your accountant/bookkeeper has the accountants copy, the header of your QuickBooks company file should display the message. “(Accountant’s Changes Pending)”.
Once the changes are imported, you will no longer see the message in the header.
You will receive the ‘Change File’ back so it can be imported into your QuickBooks. In the example we’ll use, we will have the change file on a flash drive. If you were to receive the change file attached to an email, just save the email attachment to your computer. The procedure will be the same.
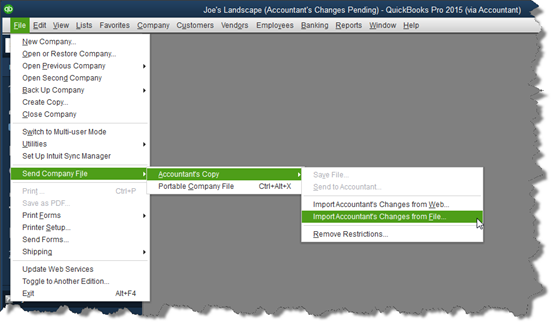
Above is the menu selection to import the change file. Select this and QuickBooks will ask where the change file is located.
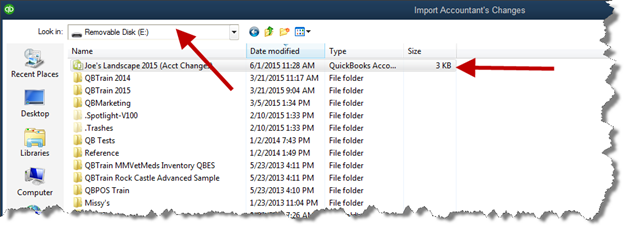
Again, we select the location where the change file is located. In this case, the flash drive designated as Drive E (upper-left arrow).
QuickBooks will find the accountants change type of file. On this drive, there is one file of that type. See the arrow in the right portion of the screenshot.

Above is the bottom portion of the window where we selected which file to import. When we select (click on) the file name in the upper part of the window, QuickBooks fills in the name here. Click the ‘Open’ button in the lower right.
QuickBooks will display a screen listing the changes made by the accountant.
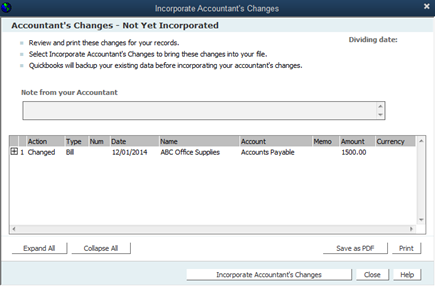
Click the button labeled “Incorporate Accountant’s Changes”.
QuickBooks will require a backup, you only have to tell it where.
As the backup concludes, QuickBooks imports the changes without any more input from you.
The import is complete and you are ready to go.
The video is less than 4 minutes.
How to Create an Accountants Copy in QuickBooks
QuickBooks has a unique type of file copy named Accountants Copy. This file type allows you, the QuickBooks user, to send a copy of your QuickBooks company file to your accountant much like you would a backup.
Once you have created the copy, you are free, with certain limitations, to continue to use your QuickBooks company file for ongoing business needs.
The accountant is able to view the company transactions in the copy sent to them. They can also make changes to the data for financial statement, tax return, or other needs.
The real value of the accountants copy comes when the accountant has completed their work. QuickBooks will create a special file of only the changes the accountant makes. That file can be imported into the original QuickBooks company file.
The original QuickBooks file is updated with all the accountants work. Your transactions and reports now match any statements, returns, etc the accountant has completed. In addition, the accountant will have the correct beginning balances for the next year. When the time comes and another copy is sent, the work for previous periods does not need to be redone to make the new file copy current.
Here’s how to create an accountants copy for your accountant.

Notice that in the graphic ‘Save File’ is selected rather than ‘Send to Accountant’. This will be the more common choice.
Screen 1

Accountants Copy will almost surely be selected already. Just check to be sure it is.
Screen 2

In screen 2, the Dividing Date is the important entry. The dividing date determines what part of the file is open to the accountant. That part is restricted to you, the QuickBooks user.
Ask your bookkeeper/accountant if you are unsure. Several options are available on the dropdown that reads “Custom” in the screenshot. Selecting Custom allows you to set any date in the field below it.
Screen 3
QuickBooks will display a message that it needs to close all windows. Select OK.
Screen 4

In this next screen QuickBooks wants to know where you want to save your accounts copy. Notice arrow 1. From the dropdown, we have selected drive E, a flash drive we have inserted into a USB drive on the computer.
Arrow 2 designates the name of the copy we are creating. Shown is the name QuickBooks inserted and is suggesting. There is rarely a need to change this.
Arrow 3 points to the save button. When you click here, QuickBooks will save the copy in the location you specified in the window.
You’re done!
Give the flash drive to your accountant/bookkeeper. They can now work on your QuickBooks company file in past periods, you continue to work in current and future periods.
A couple of cautions.
In past periods, there is little you can do. If you try to edit, delete, or in some way change these past transactions, QuickBooks will prevent you from proceeding.
It may tell you that you can “Remove Restrictions” and then have full access to your QuickBooks company file. If you do this however, you break the accountants copy and the work your accountant/bookkeeper is doing will not import back into your QuickBooks.
This negates the entire purpose of the accountants copy. It also means, someone will have to manually edit all the transactions affected by the accountant/bookkeeper. This is often a long and tedious process.
It is usually a good idea not to reconcile accounts while an accountants copy is pending. Check with your accountant/bookkeeper if you feel you need to reconcile accounts before they finish their work.
If you prefer to see this process in a video, showing each of the necessary steps, click here:
The video is less than 4 minutes.
Is Your QuickBooks File Slow?
Let’s look at what to do when saving a transaction, or creating a report seems to take minutes instead of seconds.
Pressing the key combination CTRL-1 from within QuickBooks opens the following window.
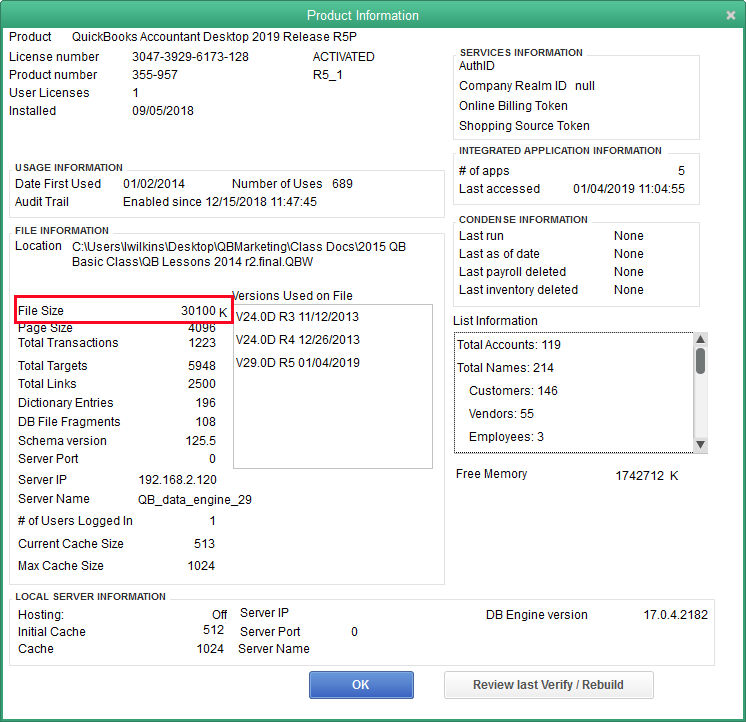
There’s a lot of information here, but what concerns us today is the highlighted line. File size.
There’s actually 1024 kilobytes in a megabyte, but we often round that to an even thousand in order to make quick calculations. So, in this case, we could say this QuickBooks company file is about 30 MB (megabytes).
That’s a small file. It should feel pretty crisp when entering transactions or creating reports. When QuickBooks starts to feel sluggish, it’s a good idea to check this screen. If the size of the company file is 250MB to 300MB, you know the day is not far distant when you will need to do something in order to keep the file at a more usable size.
There’s nothing in QuickBooks that will prevent you from using a larger size file, but performance declines. Too large and errors are more common. You’ll find these whenever Verify Data runs as part of a QuickBooks backup. QuickBooks can almost always fix these small errors itself. Still, it’s annoying and a little scary to know damage exists fairly regularly in your company file.
There are a couple of options when your company file becomes too large. Which you choose can depend on solutions you may have used, if any, to deal with this problem in the past. Let’s start with the easiest.
Condense Data
QuickBooks has an option called Condense Data. It’s been in the program a long time, but has been improved in recent years, including a marked improvement in the 2019 version.
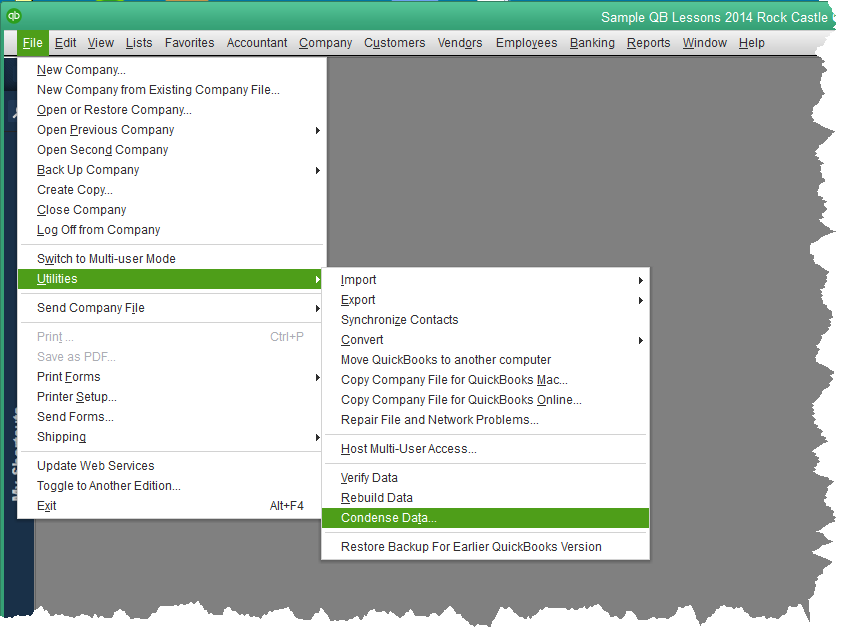
The screen shot above shows you how to access this option. Below is the window that will open once we select it.

The newest option is the one that’s selected in the graphic, “Keep all transactions but remove audit trail info to date.”
QuickBooks has maintained an audit trail since the 2006 version. Even if deleted, a transaction’s history remains in QuickBooks. One can see what the original transaction was, what date and time it was entered, who entered it, all that same information for each time the transaction was changed and/or deleted.
That’s a lot of information. It takes a lot of space. Starting with QuickBooks 2019, one way to make the company file smaller is to remove all that detail up to a specific date selected by the user.
If you choose this option, you want to keep a copy of the existing QuickBooks company file somewhere safe. On the off-chance you would need to go back and research a particular transaction, you would have access to all the details.
Going forward, the audit trail feature still works, it’s just that the history was deleted.
The other option, “Remove transactions you select…”, is similar. It will remove all transactions before last year, as an example. The reason the new QuickBooks 2019 feature is such a great choice is that you can still have all that transaction history in your company file, but it’s faster and responds better because, without all the audit detail, the file is much smaller.
The day may come when these options are no longer sufficient. When this happens, it’s time for a new file.
There are special tools in QuickBooks to deal with that. We’ll cover that in a future post.
Voiding Bill Payment Checks And Paychecks in QuickBooks
Voiding a bill payment check does not reduce any expense in QuickBooks. Payments to vendors are being reduced.
If a bill payment check is voided, the bill originally paid by a voided bill payment check, will now appear on the list of open payables. It is no longer a paid item.
If the bill payment was from a prior period, use the procedure outlined in the blog post for regular checks with two modifications.
The Name column in the Make Deposit window must have the vendor name the original check used. The Account column must be filled in with the account Accounts Payable.
The above transaction causes an increase in the vendor’s balance by the deposit amount.
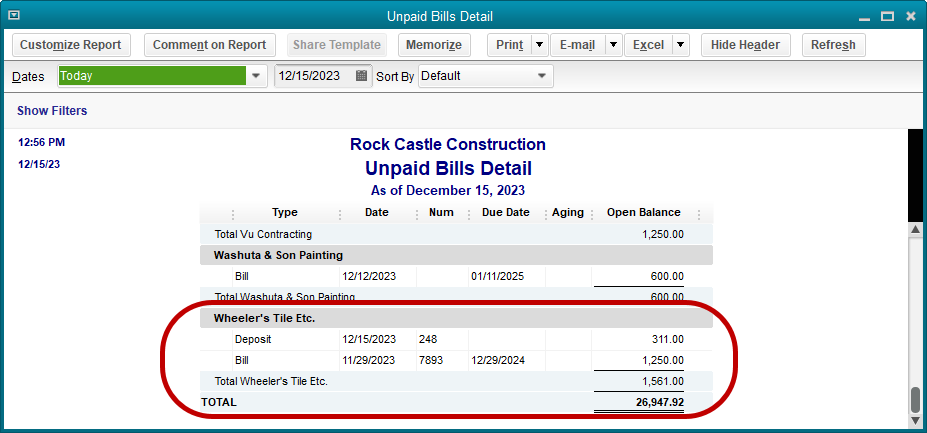
That’s not right. We need the bill associated with the check to be voided as well.
Use the Enter Bills window, but change the radial button setting in the upper left of the window to Credit rather than Bill. Create the transaction just as you would a bill, using the same expenses or items as were on the original bill.
The next step is to access the Pay Bills feature, find the bill for that vendor, and use Set Credits to apply the credit to the bill.

Voiding and Replacing Paychecks
Fortunately, the usual scenario in which a paycheck needs to be voided is when an employee loses a paycheck and it needs to be replaced. Here is an easy way to solve this sticky problem without affecting any other payroll transactions.
If the paycheck to be replaced were check number 287, create a regular check using the same payee (the employee), the date of the lost paycheck, and the same check number.
Use the Payroll Expenses account on the stub portion of the check but leave the amount of the check as zero. Create a memo explaining this is a voided paycheck, then save the check.
QuickBooks will display a warning message that the number already exists, but will allow the check to be saved. Now void the check using the QuickBooks Void command.
This completed step is merely to have a record in QuickBooks that the old paycheck number is a voided transaction.
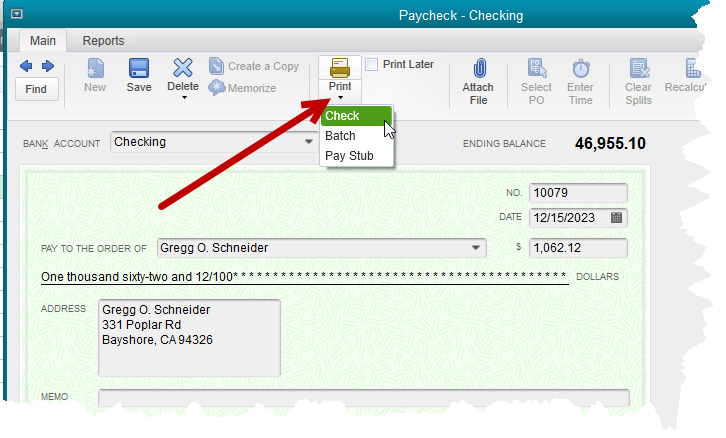
Now display the original paycheck. Click on the Print icon at the top of the transaction ribbon.
Select Print. QuickBooks will suggest a new number for the check. Either accept the suggestion or type in the number of the check form that will be used, if different.
Once the check has printed, Save the paycheck with the new number.
The check register will now show the old check number as a voided check and the replacement check will, of course, have the new number as printed.
How to Correctly Void a Check in QuickBooks
Hint: It’s not on the Edit menu
This is an area of QuickBooks that seems to generate more mistakes than almost any other.
QuickBooks provides a command, located on the Edit menu, to void a transaction. When this command is used, the transaction amount is changed to zero. A memo is added indicating the transaction has been voided.
But it is an edit. That is, the transaction retains its original date. The amount just changes to zero.
The problem with this solution is the impact on older transactions being voided.
Assume a company’s bookkeeping is complete, financial statements have been printed, perhaps given to a bank, and a tax return filed.
Then, it is decided something needs to be done about the old checks that won’t clear the bank. They are listed as outstanding on the bank reconciliations, perhaps the check dates are year or more old.
So, the checks in QuickBooks are voided. The result? Besides voiding the checks, the previously issued financial statements are incorrect and the filed tax return is now incorrect.
Voiding a check in a current period causes few issues. It can be located in the check register or on any report. Double click on the line with the check in order to view it. Then, from the edit menu or the Delete icon of the transaction ribbon, choose Void Check.
It might be a good idea to add a note of explanation in the memo field of the check. Then Save and Close to record the transaction. Since the check was originally written in the current period, prior account balances are not affected.
Voiding Checks From Prior Periods
This is the more common situation and a task that must be handled with more care. The first step is the same. Find the check to be voided either in the account register or on a QuickBooks report.
Double click on the entry to view the check. In the memo field of the check make a note that the check is being voided with a deposit entry as of a current date.
Do not void the check with the QuickBooks Void command. Only note in the memo field that the check will be voided, and on what date.

Using a current date, create a Deposit in QuickBooks. The Name column can be left blank.
In the Account column, use the same expense account as was used on the original check. In the Memo column explain that check #XXX from (original date of the check), is being voided by this deposit. In the Amount column, use the amount of the check being voided.

The next and final step will be when the bank account is next reconciled.
The old check will still be there, but so will the new deposit. Check off both even though they are not on the bank statement. They are the same amount so will net to zero and not affect your bank reconciliation.
Dealing With Delinquent Customers
Statements and finance charges can help small businesses receive more timely payments from their customers.
There is a little setup in order to use finance charges in QuickBooks. Let’s look at that first.
Navigate to Preferences->Finance Charges->Company Preferences.

The first field asks for an annual percentage rate the finance charge computation should use. Keep in mind this is an annual rate. In the sample company, QuickBooks will compute what the annual amount should be, then divide to only charge for the appropriate period, usually one month.
What is the minimum amount QuickBooks should charge? This field should really be filled in. Otherwise, the amount could be very small, making it less than the cost of charging the fee.
A grace period is often a good idea. Where this is most useful is preventing a customer payment and a statement with a finance charge from crossing in the mail.
As an example, say the customer has terms allowing thirty days before payment is due. They pay on the thirtieth day. At the same time, finance charges are computed and statements sent by the business. The customer will receive notification they are late and have been charged a finance charge even though they paid on time.
Finance Charge Account allows the selection from the chart of accounts. Finance Charge income will post to this account. A best practice is to use an Other Income type of account.
Most QuickBooks users will charge from the due date as shown.
Rarely does anyone want to print an invoice for each finance charge created. Most companies will leave the final checkbox unchecked.
To calculate the finance charges, either the menu option on the Customer menu or the icon on the Home Page can be selected. The following window shows the Assess Finance Charges window from the sample company Rock Castle Construction.

Only one customer has overdue invoices as of 12/31/2018 (the date in the sample file).
The overdue balance is $3500. If we looked up the details of this balance, we would find an invoice that was due on 11/14/18. The amount is overdue by several weeks.
Ten percent (the amount of our annual rate) of $3500 is $350. At December 31 the invoice is forty-seven days late. The result of that calculation is a finance charge of $45.07.
Different states may have regulations controlling the amount that can be charged customers for late payments and when those can be assessed. Be sure when you set your preferences you are in compliance with these regulations in your state.
Do you charge your customers finance charges? Does it help you get paid faster?
How to Manage Duplicate Names in QuickBooks
It happens. Baker, Chris has been a customer for a long time. But so has Christine Baker. And they’re the same person.
If you have used QuickBooks long enough, you know that if you try to delete one of those customers, QuickBooks won’t allow you to do it. At least, not if transactions have been recorded under both names.
You could go back and change the customer name on every transaction, leaving one of those duplicate entries with no activity in your QuickBooks company file. Then you could delete it. But there’s an easier way.
Above is our customer center. You can clearly see the duplicate customers. Both names have a balance due. Both have transactions.
To fix this, we first need to decide which version of the customer name we want to keep. Christine Baker? Okay, let’s do that.
Either click on the Baker, Chris name and choose the Edit icon, or right click on the name and choose Edit from the popup menu.
This is how that edit window appears now:
The very first field of this window is what QuickBooks sees as the customer name. That is Baker, Chris. Edit that to read Christine Baker. Then click okay and if you’ve spelled the new name right, you should get this warning message.
QuickBooks gives you a chance to reconsider since this is a permanent change. There’s no going back. Once you say yes to this message, QuickBooks has no way of recovering the old information.
In this case, it’s a simple change and we know we want to do it, so we’ll choose Yes. As soon as we do, our new customer list looks like this:
There is only one Chris or Christine Baker now. The two customer balances are now one. All transactions in the QuickBooks company file that used to show Baker, Chris as the customer name now show Christine Baker as the customer name.
This works with other lists as well. You can re-vamp your chart of accounts by editing and merging account names. Vendors, classes, items, etc. Just use care and think through your change before implementing it.
If there is some question about the impact on your company file, create a backup, make your change, and see how it works for you. If some surprising result pops up that makes you wish you hadn’t made the change, restore the backup and you’re back to your original company file.
Bartering in QuickBooks
What to Do When a Customer is Also a Vendor
This is a common scenario for small businesses. Another business buys product from you. They are a customer. But, they also sell to you. They are a vendor.
This is an issue in QuickBooks because a name cannot be both a customer and a vendor. And there is no way to trade services or products between customers and vendors.
At least, not in a straightforward, documented way. There is a solution.
Creating a name as both a customer and a vendor is not difficult. Change the name a little.
Let’s say we have a customer named Greg Aackerman. We want to put Greg on the vendor list as well.
In vendor setup, use the vendor name ‘Greg Aackerman (vendor)’, and fill in the “Print on Check as” field with the name only.
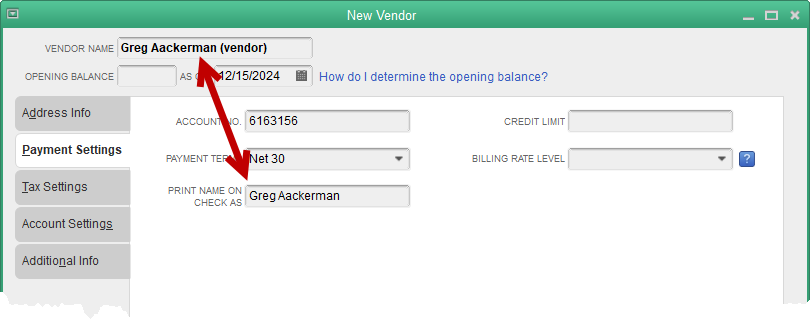
Create a new bank type of account. You’ll see why in a few paragraphs. Name the new bank type of account “Clearing Account.”
Recording transactions is simple. Use the customer, in our case Greg Aackerman, to record sales on invoices. Use the vendor, in our case Greg Aackerman (vendor), to record purchases on bills.

Saving the above transactions results in the following customer/vendor balances.

The puzzling part for most QuickBooks users comes now. How do we offset the balances?
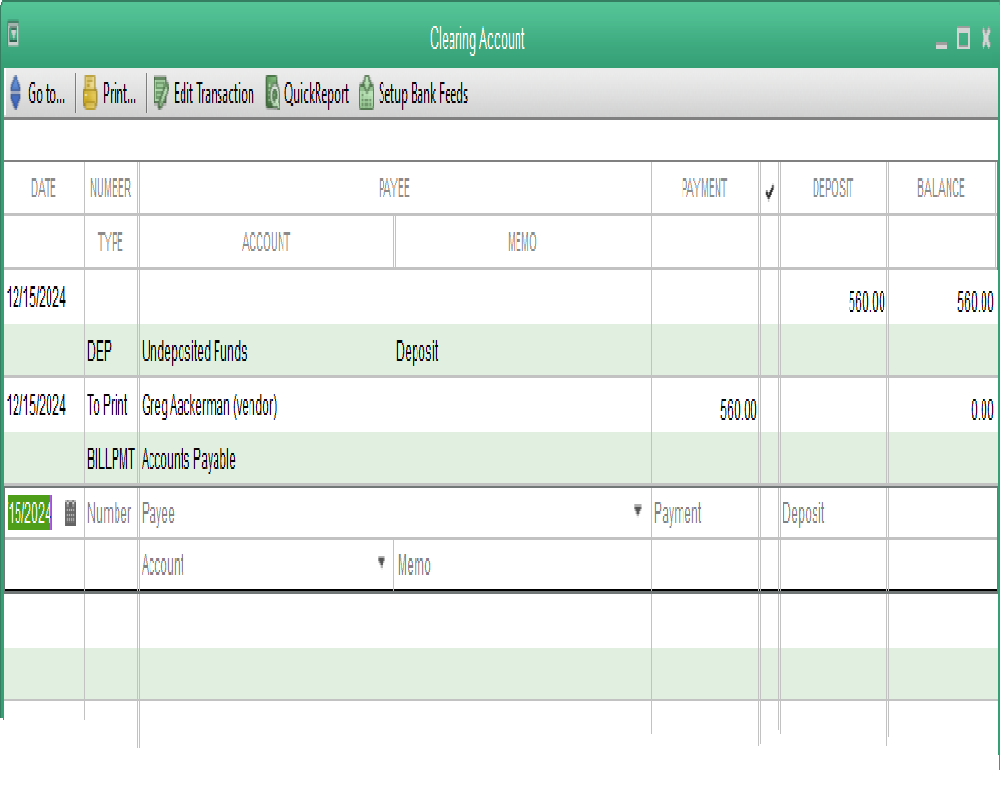
First, note the amounts. Greg owes us $1125. We owe him $560. So whatever we do, we want to end up with a zero balance due to Greg the vendor and a balance due us of $565 ($1125 - $560) from Greg the customer.
Receive a customer payment from Greg in the amount of $560.
Navigate to Pay Bills and pay the bill we owe to Greg the vendor. Use the Clearing Account as the bank account to pay from.

Record a bank deposit. Deposit only the $560 payment we received from Greg and deposit it to the Clearing Account.
The result is that we no longer have a balance due to Greg in accounts payable. We show a balance due from Greg in accounts receivable of $565.
It’s important to double check and be sure we have created the transactions correctly. If we have, there should be a zero balance in the bank type account, Clearing Account.
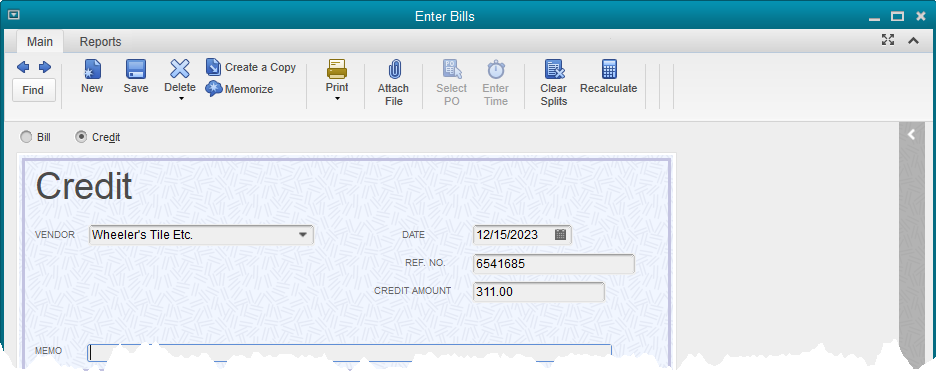
Working With Vendor Credits in QuickBooks
Creating a vendor credit is a simple transaction. Start by using the Enter Bills command, then mark the bill form as a credit. It’s an easy click of a button. See the screenshot below.
Once QuickBooks knows this is a credit, not a bill, fill in the information as normal. It’s very much like entering a bill.
Open credits that already exist in QuickBooks can be seen on the Unpaid Bills report.

An area that is a struggle for some QuickBooks users is the posting of the credits against payments to vendors.
Credits must be taken against an individual bill. That is, they cannot be used on a vendor payment check without first applying them to a bill.

The left-hand arrow indicates the bill that we wish to pay with a vendor credit. Once a bill has been selected, as it has here in the screenshot, available credits will be shown. See the area indicated by the right-hand arrow.
In this case, we have $125 in credits to be used if we choose.
Clicking the Set Credits button will bring up a list of the available credits to select from. In this example there is only one, the $125 credit we created earlier.
Select this credit and click Done, and the Pay Bills window appears as follows.

Note the change now that we have selected a vendor credit to apply to the bill.
The original amount due, still shows $1250.00. The $125 shows in the Credits Used column. It is subtracted from the original amount, resulting in $1125.00 in the Amt to Pay column.
The bill payment can now be processed as normal. Be sure the correct bank account is selected, as well as the other options chosen, and click on Pay Selected Bills. QuickBooks creates the bill payment check.
There are times when bill credits may equal the amount of a bill, causing a vendor balance of zero. If these transactions have not been applied to one another however, they still show on the Unpaid Bills Detail report.
This can be a problem for accountants. It is best to apply the transactions resulting in no entries for the vendor on the Unpaid Bills report.
Use the same procedure as above. The only difference will be that QuickBooks will not create a check since the resulting amount will be zero.
The Customer’s Check Bounced, Now What?
There is a feature, introduced in QuickBooks 2014, that will make the entries for a customer’s bounced check in QuickBooks. It uses the method we have suggested to QuickBooks users in the past, but those entries had to be created manually. Now, the software does it automatically.

Above is a screenshot showing a typical payment transaction in QuickBooks and highlighting the icon on the transaction ribbon that will activate the Bounced Check feature. Note the manner in which the payment is currently allocated.

Above is the window that opens once the Bounced Check icon is selected. Note that all the fields in this popup window are editable. You are able to choose the amount the bank has charged you for the bounced check. You are also able to set the transaction date, the expense account charged for the bank fee, class (if you use the class feature), and the fee you wish to charge your customer.
Once the information is filled in correctly, you may select the Next button at the bottom of the window.

This is an informational window, explaining what entries QuickBooks will make.
Note that in section 1, QuickBooks is explaining that the two original invoices paid by this payment, are now marked as open, or unpaid. Section 2 explains that the amount of the bad check, $7,633.28 and the service amount charged by the bank, $25.00, have both been deducted from the QuickBooks bank balance.
Section 3 informs you that a new invoice will be created for the customer, charging them and adding to their balance, the amount you, the QuickBooks user, chose to charge your customer for the returned check. We chose $35.00.
The customer name in the graphic is “Remodel Bathroom” which can seem a little confusing. This sample file is for a contractor who tracks income and expense by job. The payment was for a particular job, Remodel Bathroom. In your QuickBooks file, if you used an actual customer name on the invoice, rather than a job, that name would show here.
Old Invoices in QuickBooks? A Simple Fix
From time to time, it becomes necessary to write off a customer balance that has become uncollectable. Let’s look at how to record this transaction in QuickBooks.
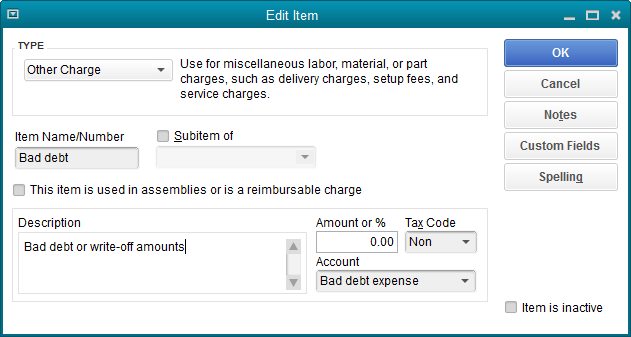
1. Add a new Item for Bad Debts
Open the Item list, click the Item button in the lower left corner, and select New.
Select ‘Other Charge’ as the item type.
Name the item ‘Bad Debt’.
Do not enter a default amount.
Make the item taxable and in the Account field, select the expense account for Bad Debt Expense. If you don’t already have an expense account for this purpose, you can create one without leaving item setup.
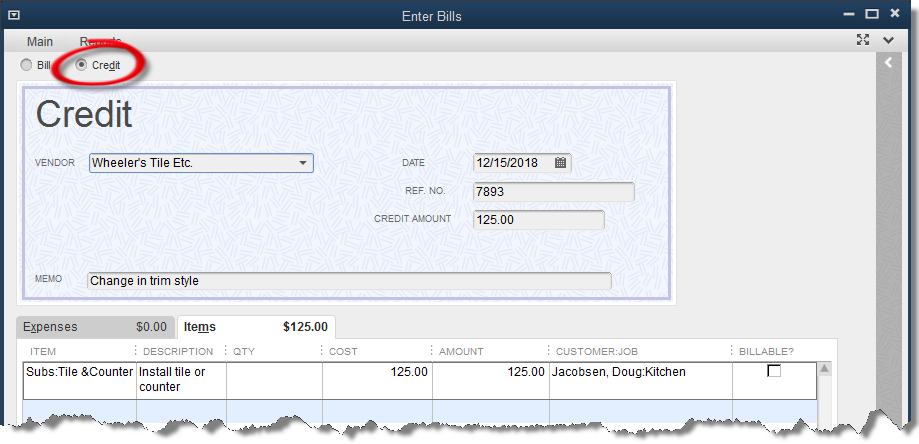
2. Issue a Credit memo
Choose the Refunds and Credits icon from the Home Page or select Create Credit Memos/Refunds from the Customer drop- down menu
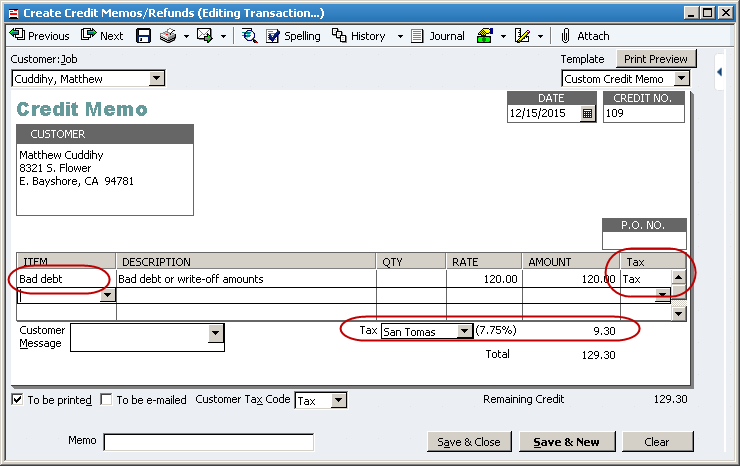
Enter the customer, a current date, etc. in the header of the credit memo.
Use the bad debt item just created as the line item in the credit memo. Enter the amount to be written off exclusive of any sales tax amounts.
Enter the appropriate Sales Tax Code. Use a non-taxable code if there is no sales tax to be written off.
If applicable, select the appropriate Sales Tax Item from the drop down list at the bottom of the Credit Memo form
Click Save and Close.
3. Apply the Credit Memo.
Choose the selection to Apply to an invoice when this popup appears.
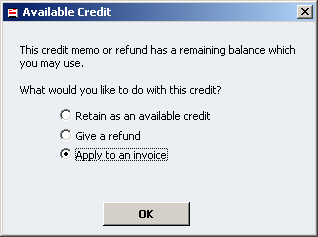
Be sure the correct invoice, if there is more than one, is selected in this window, and click Done.
That’s it. This method allows the recovery of any sales tax that may have been paid on the customer’s original invoice. As long as you use a current date for the credit memo, it preserves the account balances from previous periods. Your accountant will thank you for that.
Recording Customer Payments in QuickBooks
Receiving payments and recording deposits in QuickBooks Desktop
The process of receiving customer payments and recording bank deposits in QuickBooks may seem pretty straightforward, but there are a few lesser known situations we’ll cover in today’s post.
Posting payments to customers and jobs

When tracking jobs or projects in QuickBooks we are used to specifying not only the applicable customer in job expenses, but the particular project as well. As we have covered before, the jobs show in the Customer Center as indented entries. So, in the above screenshot, Kristy Abercrombie has three jobs in Rock Castle Construction. Family Room, Kitchen, and Bathroom Remodel.
Normally, when receiving a payment from a customer, we would receive it as a transaction specific to the project it was for. What about when a customer sends a payment that covers more than one project?

By using the customer name, not any of the individual projects (see arrow), QuickBooks will populate the Receive Payments window with all open invoices for that customer, not just the ones from a certain job. At this point, you have the option to apply the payment in any way you want regardless of project or job.
Giving customers discounts for speedy payment
Sometimes, offering a discount for early payment is a strategy you may want to use. That starts by setting the terms in the customer file and making sure the correct terms are entered on the invoice when it is created and saved.
If the customer pays within the discount period, how do you give the discount?
In this example, we’ve given Kristy a 2% discount if she will pay her invoice within 10 days. Those terms in QuickBooks would look like this: 2% 10 Net 30.
Kristy pays $1372.00 on a $1400.00 invoice. Clicking on the Discounts and Credits button opens the Discounts and Credits window seen in the lower right part of the screenshot.
QuickBooks knows the terms that are on the invoice. It does the math, both date and amount, and fills in all the pertinent information seen in the Discounts and Credits window. Two percent of $1400 is $28. If you think the amount should be slightly different, or if the customer rounded slightly differently to come up with a different amount, you can specify in this screen what the amount should be.
The Discount Account is specified by you, the QuickBooks user. Once you select the account for one discount, QuickBooks will continue to suggest that same account on future discounts. In this case, Rock Castle has a special account setup just for discount amounts.
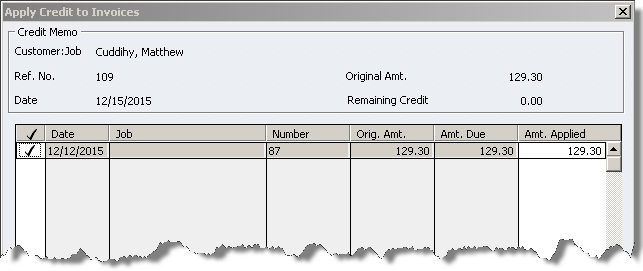
What if the customer has a credit?
Sometimes, a customer can have a credit that needs to be applied to a current invoice. This could be the result of an overpayment from the past, or a credit memo, or other similar event.

In the above screenshot, the same button, Discounts and Credits, was selected to use the customer’s credit on this invoice. This time, we are looking at the Credits side of that window.
The customer had a $1000 credit, probably from a down payment before work started, in the system. They make a $400 payment on the $1400 invoice. Now, when we accept the payment and apply the existing credit, the invoice will be paid in full.
Speaking of advance payments…
While there are different ways to account for prepayments from customers, following is by far the easiest and most common method used.
If you look close, you can see the gray text in the screenshot that reads, “There are no unpaid invoices for this customer”.
That’s okay. We can still save the payment. Just be sure the selection in the lower left (see arrow) is Leave the credit to be used later.
When receiving payment on an actual invoice, you would use the payment and the credit created by this payment transaction to pay the invoice just as we did in the last section when we had the $1000 credit.
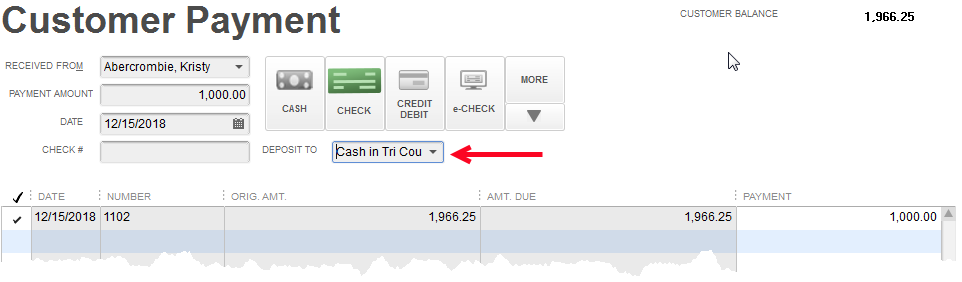
How many payments will you deposit?
By default, QuickBooks posts payments to an account called Undeposited Funds. This allows QuickBooks to accumulate the payments you record on one list. Then, when creating the deposit, you select multiple payments to create a bank deposit in QuickBooks that will match the amount of the same deposit that appears on your bank statement. It makes reconciliation much easier.
Sometimes, a QuickBooks user only receives a few payments a month and they all go directly to the bank. There’s really no need for Undeposited Funds. It only adds another step.

By unchecking the box with the label ‘Use Undeposited Funds as a default deposit to account’, you can change this behavior.

Now, with the preference changed, we can decide to deposit this payment to a bank account rather than Undeposited Funds. This means we won’t have to use a Record Deposit transaction in QuickBooks to get this into our bank balance. Once we save the payment, it’s already there.
Use QuickBooks’ Tools to Make Invoicing Easy
In a previous post, we reviewed QuickBooks’ ability to create a simple project budget based on the Estimate form. In this post we’ll focus on some additional tools in QuickBooks that can make invoicing customers easier.
Creating an estimate in QuickBooks is an optional step. An invoice can be created without having used the estimate form at all. If an open estimate exists for a certain Customer:Job, when you begin an invoice for that Customer:Job, QuickBooks will ask if you want to use the estimate as a basis to begin the invoice.

You can see the estimate listed in the popup window in the screenshot above. If more than one estimate had been created for the job/project, all the open estimates would appear here and you would be able to select which one you were using as the basis for your invoice.
Select the estimate (if there are more than one), and click OK. What happens next depends on your Preference settings.
If this is turned on in Preferences (Edit->Preferences->Jobs & Estimates->Company Preferences->Do you do progress invoicing?), once you select the estimate to use for the invoice, the following message appears.

At this point, there are more options to choose from. QuickBooks allows you to create several invoices from one estimate. So your agreement with your customer may be to invoice at certain points of the project’s completion. QuickBooks will help you keep track of that process.
Let’s review the choices. One is to create the invoice for 100% of the estimate. That’s easy and does not involve the progress invoicing ability at all.
Two, is to create an invoice for a specific percentage of the job. 25%. 50%, whatever you choose. Each line of the estimate is invoiced for that percentage.
Third, is to specifically select the items from the estimate that will be invoiced. Let’s look at that option.

Above is the table QuickBooks opens when choosing the third option described. The arrow points to the column where you would select those items to be included on the current invoice. In the example, a bathroom remodel is being done. The customer is to be invoiced for tearing out the old fixtures, new framing, and the electrical work.
Note the circled column headers. If we had created an invoice for this project before, the amounts previously invoiced would show here and would not be available to invoice again.
With the items presently selected, this will be a $1715.00 invoice.
More possibilities for invoices in QuickBooks
A feature in QuickBooks often used by companies in service-based enterprises is the ability to track time and expenses and then easily invoice those to a customer without a lot of additional manual entry. Let’s see how that works.
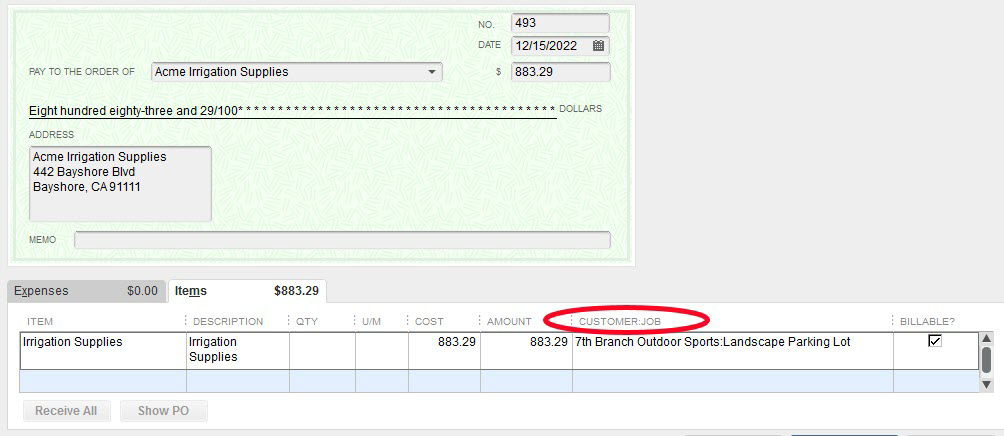
The most important part of the above check is the Customer:Job entered and the checkbox Billable with the checkmark in it. Additionally, the fact an item was used rather than Expense helps with some job reports, but that’s another topic for another day.
Before we invoice our customer, let’s add some time to the job.

Again, the most important part about this process is that a Customer:Job name is included and the Billable box is checked.
Now, let’s invoice the customer.
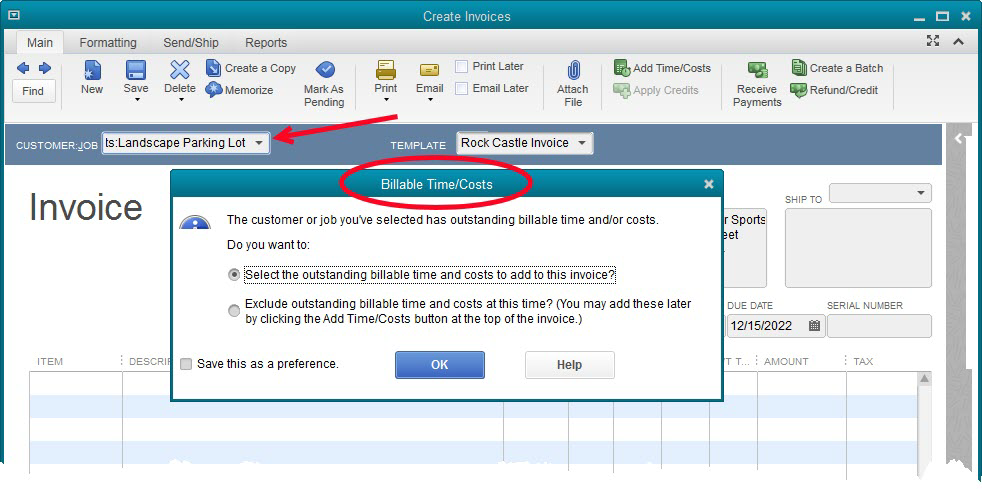
As soon as we enter a Customer:Job with outstanding billable time/costs, QuickBooks asks us if we want to invoice those items now. In this case we do.
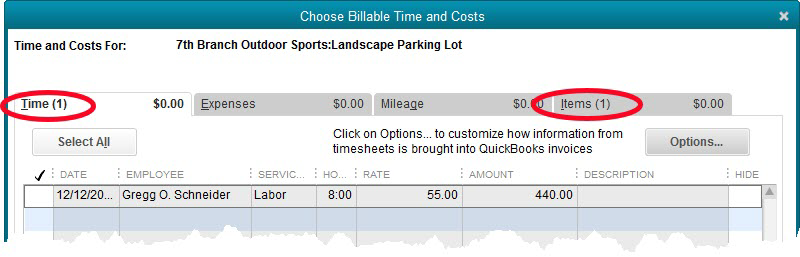
We have both time and an item to add to the invoice. These are the entries we made with the check and the timesheet. There are more options for those that use this feature. For now, we’ll select both entries and click the OK button (not shown) at the bottom of the window.
Here is the resulting invoice.
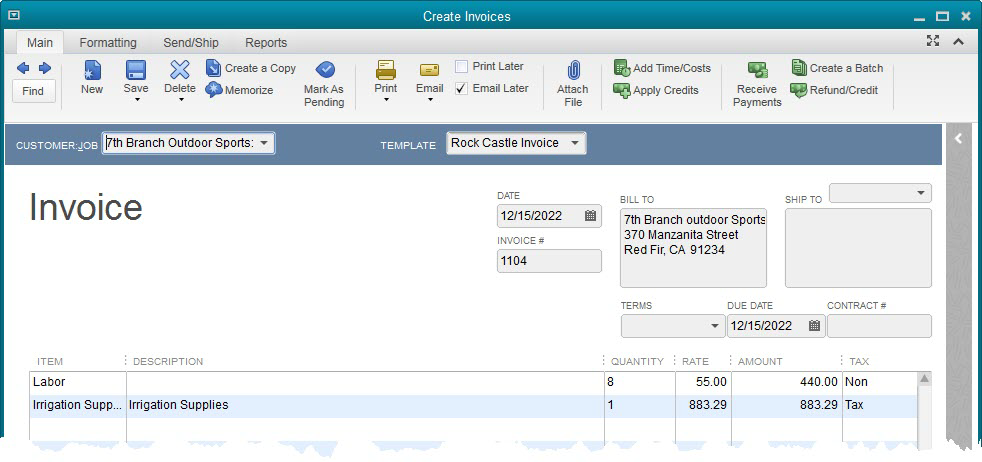
The billable items are added to the invoice. Labor is invoiced at $55 per hour because that is the sales price in the item setup. The amount for the irrigation supplies carried to the invoice at cost since there is no sales price setup for this item. In a case like this, the markup would have to be determined and the invoice amount edited to reflect that.
Two more quick invoice tools useful to service providers
Invoicing for a service provided on regular schedule, say monthly or weekly, is common. It is possible to Memorize an invoice. This memorization would include the customer name, so a memorized invoice transaction would have to be created for each customer on a repeated schedule like this.
Create the invoice as normal. Click the Memorize icon just to the right of the big Delete X icon. Choose how often you want the invoice repeated. Weekly, monthly, etc.
QuickBooks will remind you the first time you open QuickBooks on or after the date the memorized transaction should be entered. You have the opportunity to accept or reject the entry of the invoice at that point.
The other invoice tool we want to include today is Batch Invoicing. This is accessed from the Customer dropdown menu, Create Batch Invoices. This tool allows you to create a ‘batch’ of customers that should each receive basically the same invoice. You will be invoicing the same item and the same price for each customer. QuickBooks will create an individual invoice for each customer.
If there is a difference from one customer to another in, say, sales tax, or delivery method (email or printed), QuickBooks will pick up that information from the customer file and customize the invoice for that particular customer.
QuickBooks has some really great features that simplify the job of tracking project expenses and invoicing customers.
Where Was the Budget on That Project?
Estimates in QuickBooks do far more than just tell a customer how much a certain repair job will cost. They create project budgets.
Estimates are non-posting. You can create as many as you like and the accounting numbers are unaffected. They can also be edited and deleted/voided without concern for financial reports.
First, be sure the use of estimates is enabled in your QuickBooks company file.
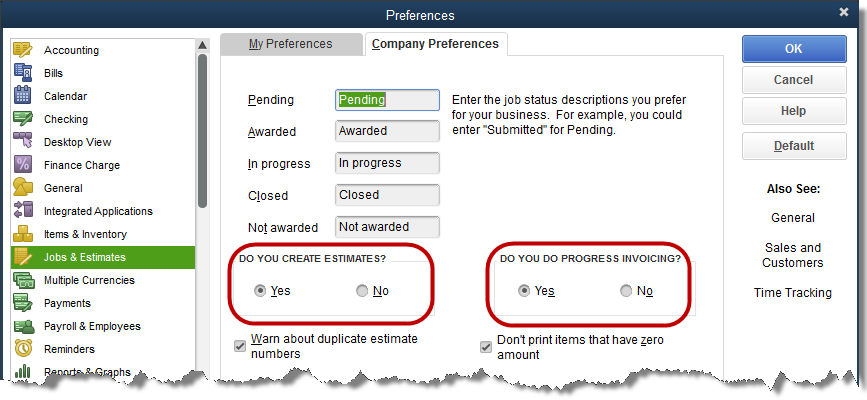
In the screenshot, you can see the setting to activate estimates. A companion setting is progress invoicing. If your company sometimes invoices more than once for a single job or project, you will want to select both of these settings.
The estimate serves as a simple project budget. That’s why it’s so important to companies tracking costs and revenues by project.
The pieces of the project that need to be tracked are done by using service type items for each piece. Be sure each of those items is setup as a two-sided item, utilizing both a purchase and a sales side to the item.
We examined two-sided items a couple of posts ago.

Remember to use an income type of account for the Income Account field, and a COGS or expense type of account for the Expense Account field. For job expenses, a COGS type account is usually the best choice.

The example estimate in the above screenshot is from one of the QuickBooks sample files. The items are two-sided as discussed. Cost as well as revenue for each item are included in the appropriate columns.
Actual income (invoice) and expense (bills & checks) are recorded in QuickBooks using items and coding to this specific job. One result is a detailed report of the ongoing performance of the project.
The following report is found in the Jobs, Time, & Mileage section of the Reports menu.

The actual amounts for cost and revenue come from actual transactions recorded in QuickBooks. The estimated numbers all come from the Estimate form created.
Do You Sell at a Profit? Are You Sure?
Items are necessary for selling to customers. We can’t create a sales receipt or an invoice without them.
In their most basic form of setup, items contain a description for the sales document, the price, taxable status, and for accounting, an income account to tell QuickBooks where to post the revenue.
Items can also be used in expense transactions. Inventory is a good example. In an inventory situation QuickBooks must record cost as well as sales information in order for the inventory system to work. Accordingly, an expense type of account is part of the required item setup for inventory.
There are other times when both expense and income needs to be tracked by item even though the QuickBooks user is not tracking inventory. In these cases a service type item is usually created.
An example of this kind of setup would be a company selling services and the user wants to track activity by job or project. Besides contractors, examples of companies using this sort of technique would include architectural firms, engineering firms, and the like.
In these cases, the QuickBooks user must instruct the software to track both sides of transactions by item.
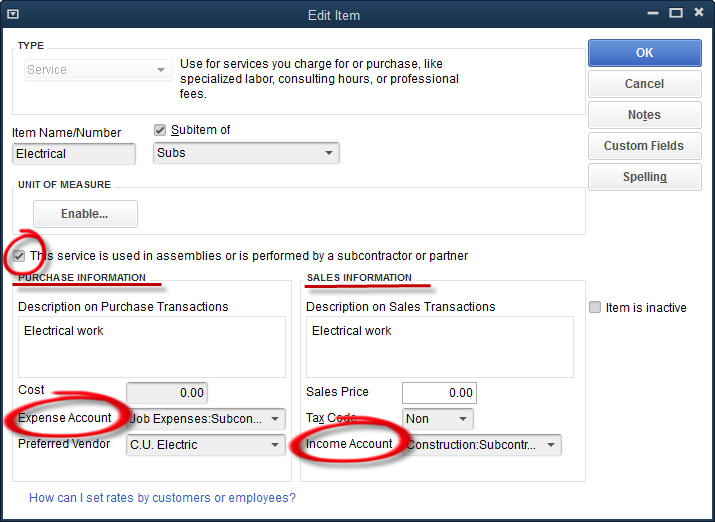
For our example, we will use the sample company Rock Castle Construction, a company specializing in remodeling projects. Above is a screenshot showing the edit window of a two-sided item. Note the checkbox in the center-left of the window.
“This service is used in assemblies or is performed by a subcontractor or partner.” This explanation can confuse some QuickBooks users, but basically the setting means there will be both a purchase side and an income side to the item setup.
You can see the lines drawn underneath the labels, purchase information and sales information. Then, even lower in the window, the circled areas denoting the appropriate accounts for each type of transaction.
With this setup, QuickBooks will know which account to use depending upon the type of form selected for a transaction. Checks and bills will cause it to use the expense account, invoices and sales receipts will post to the income account.
The reason for this setup is to allow the comparison of income and expense for a certain item. Let’s create an expense and income for a particular job, Kristy Abercrombie’s Kitchen. We’ll create an expense and then invoice the customer for the electrical work.

A bill is created using the Items tab (as shown) rather than the Expenses tab. As you can see, the Electrical item shown earlier in this article has been used to create an expense for this project in the amount of $588.75.
Let’s invoice Kristy $750.00 for the work done by C.U. Electric.

Above is an invoice for the Kristy Abercrombie Kitchen project using the same item, Electrical, that was used in the bill for C.U. Electric.
Now, let’s look at a report that will compare our expense and income for this project.
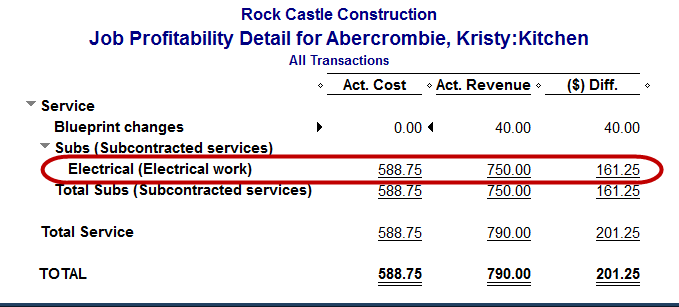
The highlighted line shows how the Job Profitability Detail report compares the revenue and the cost for one particular item for one particular project or job.
This is only possible with the use of two-sided items. Using the Expenses tab in transactions will prevent this comparison in this report. Fail to use jobs/projects in either expense transactions or invoices and this report will not work.
Used properly, two-sided transactions, in companies that sell by jobs or projects, can yield valuable information greatly affecting the company’s profitability.
How QuickBooks Can Help You Manage and Retain Customers
This is the start of a series of posts in which we look at the features in QuickBooks that would be used in a business that sells services to its customers. It may sell materials as well, but the significant portion of its business is to provide a service to the public.
These are industries that QuickBooks serves well. The software, both the desktop version and the online, is rich with features to aid business-owners that fall into this category.
We will alternate the posts. As QuickBooks Online (QBO) continues to grow in popularity in some circles, it’s important we cover the features of both.
This post examines specifically the desktop version. We’ll start at the beginning and look at customer setup and the specifics that can help you keep tabs on your service-based company.
Start with the Customer Center, Customers->Customer Center. When looking for a particular transaction, people often ask where they should go to find it. If it is a customer transaction, this is usually the best place to start.
Customer Center

The Customer Center shows our list of customers on the left, along with each customer’s balance due (1). The upper right portion of the screen gives contact information. The lower right part of the screen may be the most helpful.
Arrow 2 points to the tabs identifying different information that can be kept in QuickBooks for each customer. The Transactions tab is the most common and is the one shown here. You can also keep information for multiple contacts for individual customers (Contacts). If you use the To Do list in QuickBooks, you can create custom ‘To Do’s’ for an individual customer.
Multiple notes can be saved, again individual to each customer, on the Notes tab. Lastly, The Emails tab will maintain a record of the invoices and other forms you send to the customer by email. This is a great resource as you will have a record of these contacts listed within QuickBooks.
Notation 3 is there to point out that, in the transaction part of the window, you can filter and sort in various ways to help you find past dealings with this customer.
A Complete Customer Setup
There’s more to setting up a customer in QuickBooks. While most of the following is optional, some of these settings will be very helpful.

There are several tabs along the left edge of the customer setup window. Let’s take a brief look at them.
The first is the Address Info tab. Most of this window is self-explanatory. One capability often overlooked here is that the fields with the down-arrow symbol in the label can serve multiple uses. Click on the down arrow and the label can be changed from say CC Email, to another web site, or phone number, etc. And the label will match the data you put in the field. It’s very customizable in this regard.
Also, you can store multiple ship addresses for customers. This may not be used much in a service-based company, but it’s good to know it’s there.

The three most useful items on the Payment Settings tab, in my opinion, are the three marked in the screenshot above. Setting the payments terms here means they will populate every invoice without being specifically selected, no matter who is entering the data. The preferred send method will also fill in a new invoice with the appropriate data without anyone remembering and making the selection manually.
The credit limit is a nice feature. Once the customer reaches the limit, you can still create an additional charge for them, but QuickBooks will give a warning that you must answer, making the specific decision that, yes, you want to allow the customer to go over the limit.
Be careful keeping customer credit card information. Use independent logins and good security. You don’t want to be responsible for losing critical information like this and having to admit it to your customers.
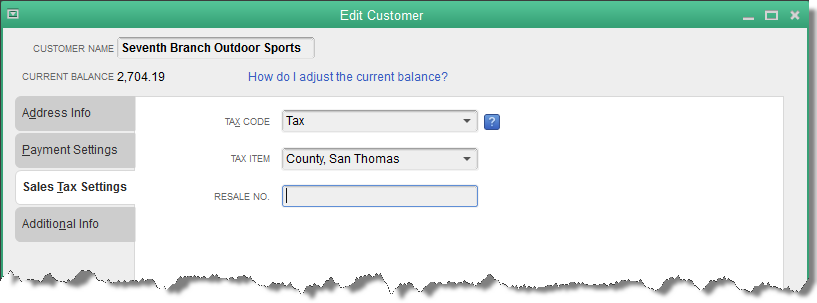
Even service companies often sell items along with the services they perform. Often these items are subject to sales tax. Since it is common for service companies to be performing work at customer locations, different sales tax rates based on location are the rule. Here is where that setting is established so no one has to decide which sales tax item should be used when an invoice is created.
What about multiple projects for one customer?
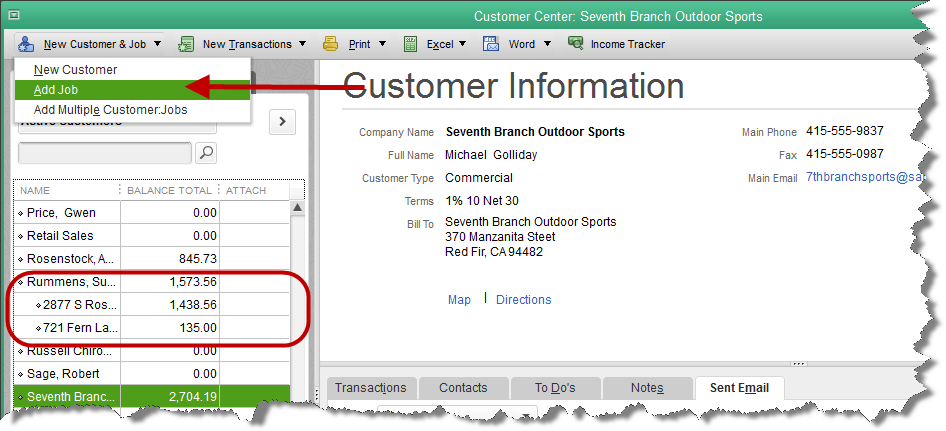
There is one last attribute in the process of managing customers we need to cover. While many service-based companies will have no need to track the income and expense of a particular job or project independent of other jobs/projects, some will.
If your projects are large enough to track independent of other jobs, this feature will help you do that. In QuickBooks we can setup multiple jobs or projects for one customer. This allows reports to be created specific to a job or project, allowing the profitability of that one job to be analyzed.
To set up a job or project for a customer, choose Add Job from the New Customer & Job menu in the Customer Center.
In the window that opens, the only required field is a name for the job or project. Often QuickBooks users will use the address of the job. Other information like start and completion dates and various labels such as Pending or In Progress can be attached to the job as well.
When complete, the job will be indented underneath the customer name.
What? W2s Aren’t Ready Yet?

There is a video version of this demo here: https://www.youtube.com/watch?v=f1qv7TMA198&t=2s
For QuickBooks users, the January task of creating W2s has only gotten easier over time. Assuming we haven’t been making errors in our paychecks over the course of the year, the creation of this year-end form is not difficult.
If you are an Enhanced payroll subscriber, you will find a list of forms in the File Forms section of the Payroll Center.
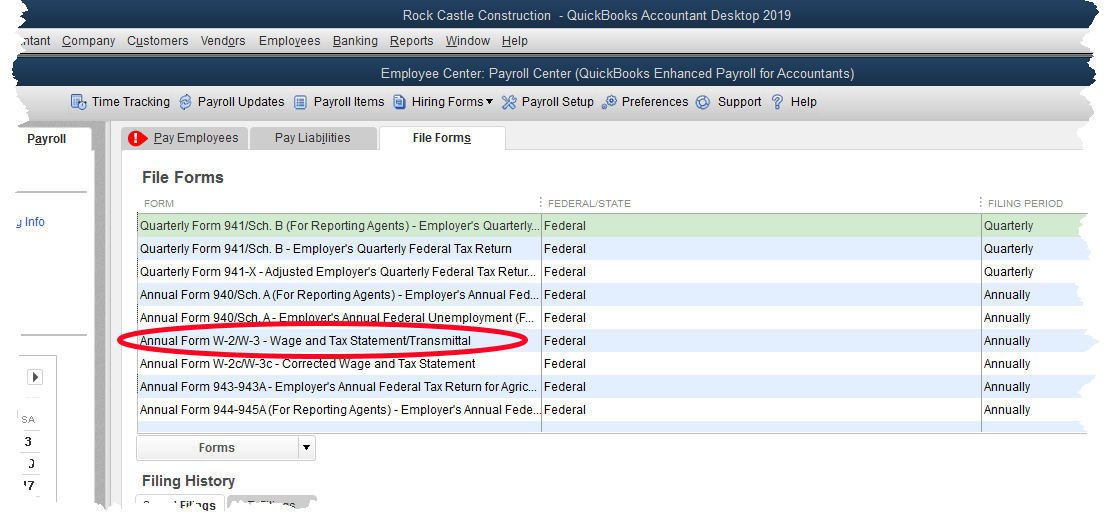
You can see the circled item in the screenshot. This is the starting point for creating W2s. Don’t mistake this for the entry just below it, W2c. The “c” stands for corrected. Try to get the form right the first time as corrected payroll forms are always painful to do.
Once we click the Create Form button (not shown in the graphic), QuickBooks presents you with a small window with two selections. One, it wants to know if you want to create W2s for all employees, or just some. We’re going to choose all, but this is handy if you need to go back and create one W2 for someone.
Two, QuickBooks wants to know what year we want to create W2s for. Once we make those selections and continue, we get the following screen.
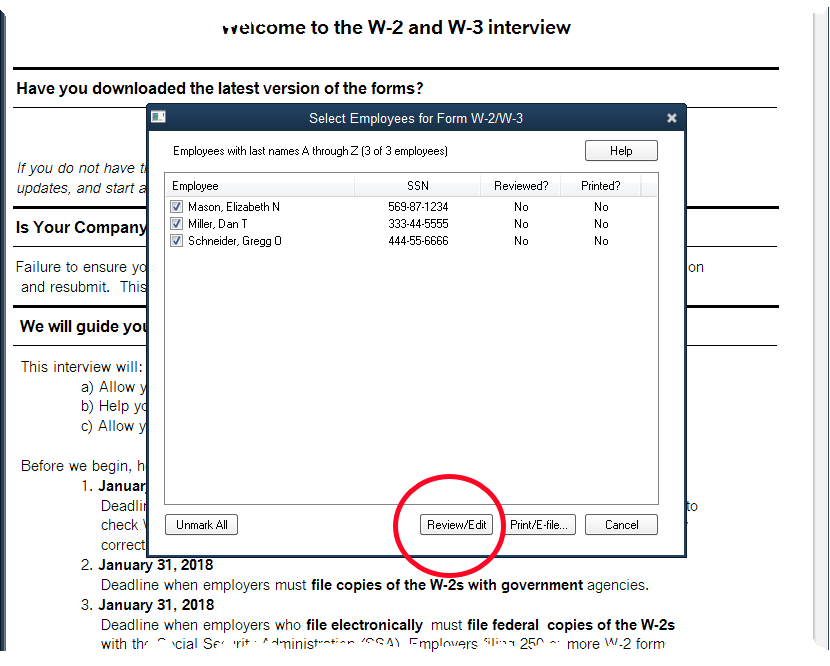
We’re not ready to print. We’ll choose the option to Review/Edit. After a page of instruction, this is the next window requiring input from us.
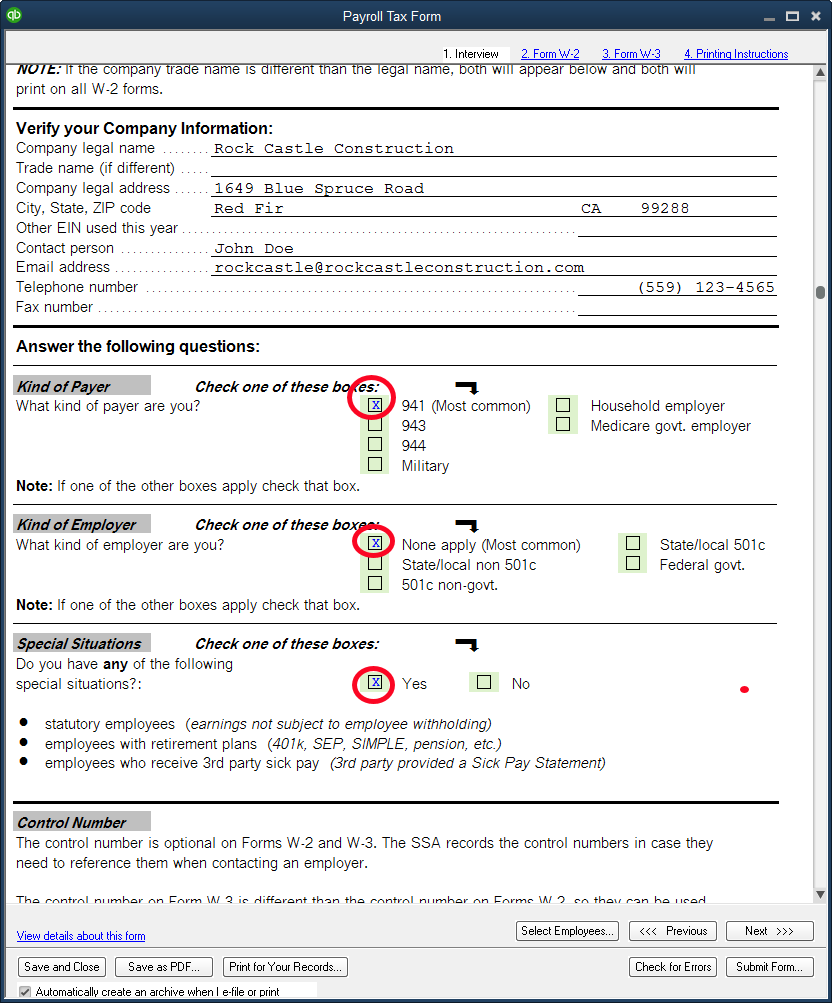
We’ve highlighted three selections in the above screenshot. Kind of Payer is selected as 941. This is the most common. This is the IRS payroll form you are required to file, reporting wages and federal taxes withheld from paychecks and deposited to the government.
The second most common selection here is 943. That is the 941 replacement form specifically for agricultural employers.
Kind of Employer is also the selection most businesses will make. Rock Castle is neither a government agency nor a 501c non-profit organization, so this is the correct selection for them.
Read the Special Situations section carefully. In Rock Castle’s case, they do have a retirement plan for their employees, so they must answer Yes in this section.
For the next several screens QuickBooks allows you to review the information entered on each W2. This is for review only. There shouldn’t be anything to change or enter. If there were, it probably means there was an error in payroll setup at some point during the year.
The last of those review screens is shown below. It is the W3, a summary of all the W2s that will be submitted.
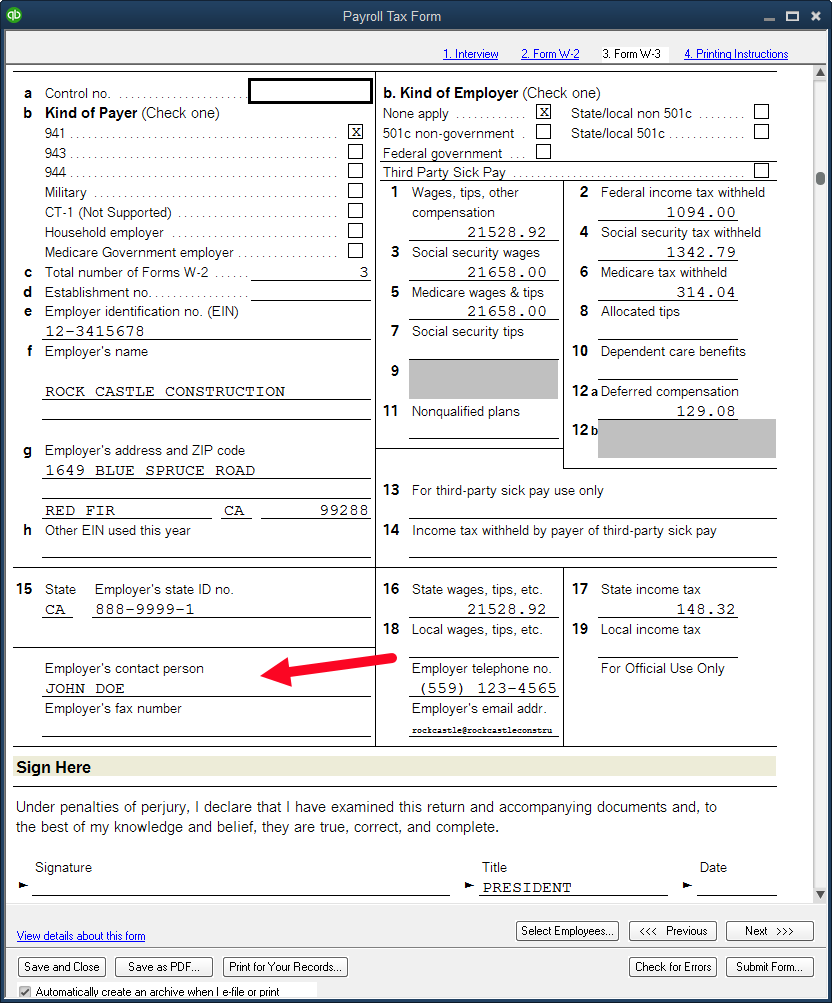
Again, there should be little to add or change on this form as QuickBooks pulls the information from the payrolls that have been processed over the course of the year. Be sure there is a name in the field for Contact Person.
Once we click the Print button, the following window gives us our final selections.
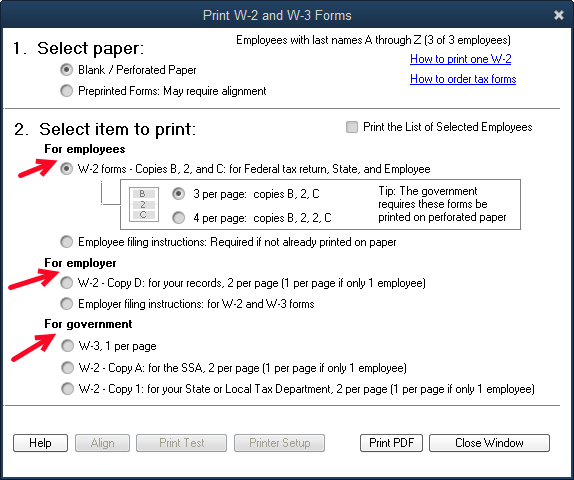
One of the things we like best about the QuickBooks process is printing on plain paper. Three print runs will be required, one each for employees, a copy for the employer, and a copy to submit to SSA.
Starting at the bottom, we can print the W2s and a W3 on the plain white paper that likely is already loaded in our printer. Once that print run is complete, we can print a copy to file for ourselves. An alternative to actual printing this file copy would be to save a pdf copy. You will have that option as you proceed to print. It saves a lot of file space if we save to a folder on our computer.
The top selection is for employees. The two choices are 3 to a page or four to a page. Each of these choices prints in a different format. You are free to print multiple times, so if you’re unsure, print some and see which format you like.
This copy is an exception to the no form needed idea. While they will print fine on plain white paper, the government does require employee copies to be printed on perforated paper that will tear off into either 3-part or 4-part forms. Most office supply stores should carry this special paper.
There it is. You’ve created your own W2s and it wasn’t even hard.
How To Find Any Accounting Document... Fast

Even if we have a great filing system, things still get lost. When it comes to accounting documents though, we have a filing system right in QuickBooks that works pretty well.
All kinds of documents can be filed this way, but for our example to day, we’re going to look specifically at documents related to employees. These same procedures and capabilities apply throughout QuickBooks.
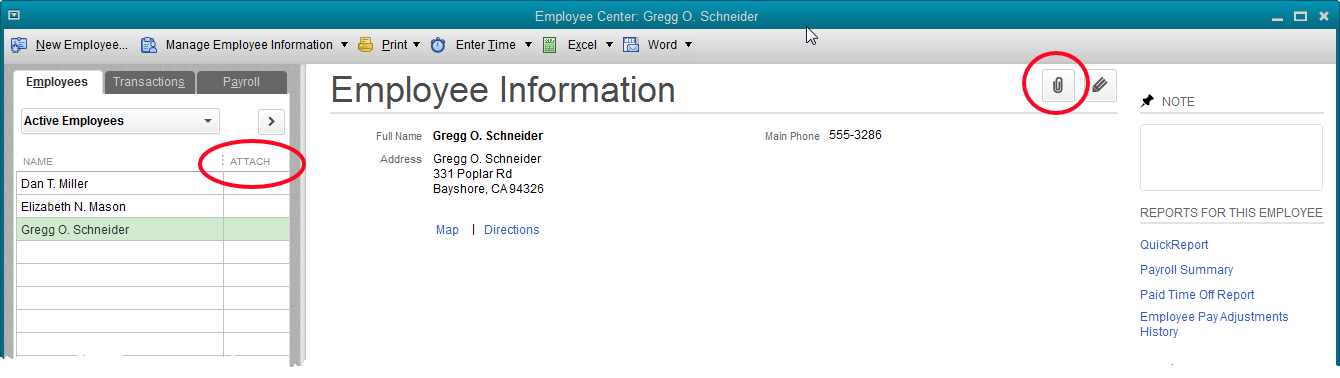
Above is a partial screenshot of the Employee Center in a QuickBooks sample file. Gregg Schneider is the employee highlighted. The empty paperclip icon on the right tells us no document is filed inside QuickBooks for Gregg. If the icon were a page with a paperclip, we would know there was at least one document attached to the employee Gregg Schneider.
The Attach column on the left of the screenshot shows which employees have attached documents. Currently there are none.
When thinking of documents we might want to save that would be specific to one employee, W4 and I9 forms are the first that come to mind. So what if we wanted to file these documents for Gregg within QuickBooks?
If we click the paperclip icon with Gregg’s name highlighted, as in the above screenshot, the following window opens:
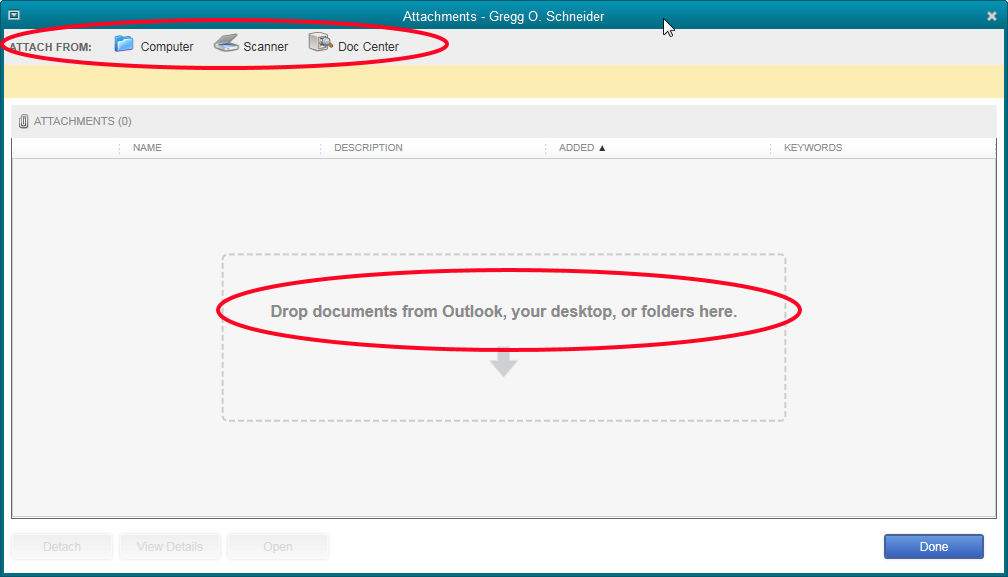
There are several ways to get a document into the QuickBooks’ Attached Documents system. You can see these circled in the screenshot. If you select Computer, a browse window, common to most Windows programs, will open so we may navigate to the location on our computer or network where the file we want to file here exists.
If we select Scanner, we can scan the document into the system. Doc Center is simply a place in QuickBooks, Company->Documents->Doc Center, where we could import or scan in several documents at once, then distribute to various transactions or list entries in our company file.
Last, as you can see in the center of the window, a file can be dragged directly into the window.
Let’s drag a couple of documents into this window.
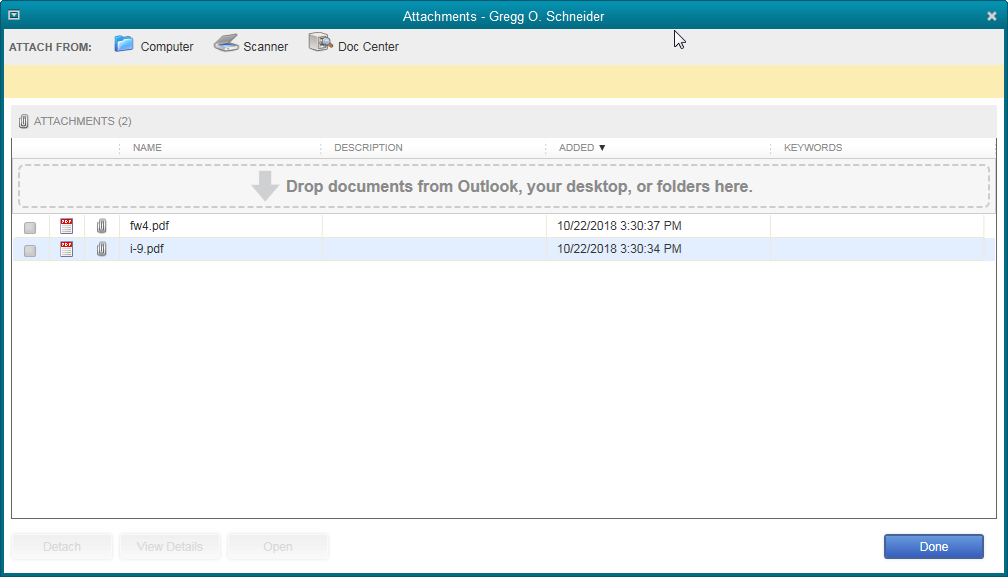
There they are. Now we just need to click Done.
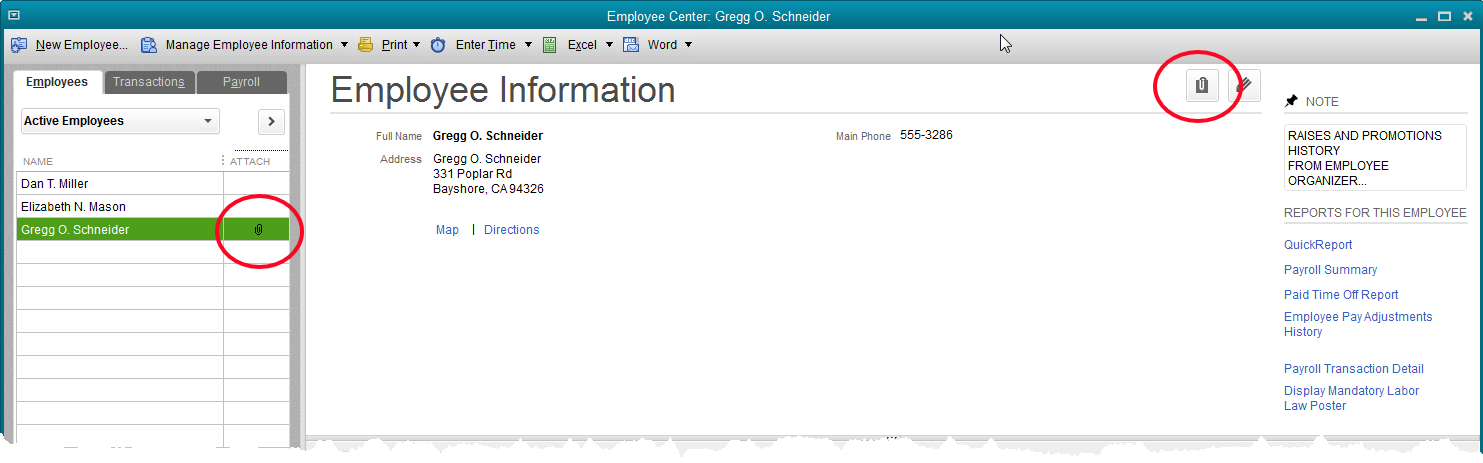
The Employee Center window has changed. Note the icon circled on the right. It may be difficult to see in the graphic, but the icon is supposed to denote a paper document held by a paper clip. On the left, you can see the paperclip icon now shows in the Attach column next to Gregg’s name.
Some additional things to know:
- A click on either icon will allow us to open the documents. They open just like any other pdf and can be printed, attached to emails, whatever we can do with a pdf file.
- Other file types, like Word docs and Excel worksheets can be saved in the same way.
- Documents can be attached to transactions too. Vendor invoices can be scanned in and attached to checks or bills.
- The attached documents are saved in a folder QuickBooks creates named Attach in the same Windows folder as your company file.
- There is no password protection on the documents if they are accessed through a Windows search.
- When a backup of QuickBooks is done, the documents do NOT backup with the QuickBooks file.
Customizing QuickBooks Using Items

Custom fields in QuickBooks also exist for items.
Select the Custom Fields button and the Custom Fields window opens. In the example above, the window adds “for Labor” onto the window title because Labor is the name of the item being edited.
Regardless, custom fields set up in any one item will be available for all items.
From the Custom Fields window, click on Define Fields. The Set up Custom Fields for Items is displayed.
In the Rock Castle Construction sample file shown above, the custom fields Color and Material already exist. There would be room for three more. You can create a total of five custom fields for items.
Using the example of a trucking company, let’s see how item custom fields can be used. Once created, they become available for templates, like invoices, just like custom fields for names.

Note the arrow near the top of the screenshot. Custom fields for items become available as columns on a custom template like an invoice. The circled area shows a number of custom fields setup for our fictional trucking company.
A completed invoice using this template would look like this:

The trucking company’s five custom fields for items are circled. BOL, Bill of Lading number, is the left most circled column.
Then we have weight ticket, payroll number, delivery date, and driver pay. The sample trucking company is using the invoice data to pay the drivers on a commission basis.
The computations are done on the invoice. These columns are simply left unchecked in the Data Customization Layout specs so they do not print.

Custom fields become searchable. As an example, a transaction using the custom field could be searched in QuickBooks using the Bill of Lading number.
Custom reports can be created to show all trucking loads hauled by a certain driver, in order of weight ticket number, in order of bill of lading number, and so forth.
Since this company is using custom fields to track driver commissions, a custom report could be created to show all a certain driver’s transactions for one certain pay period. This report could be used to create the paychecks and to give to the driver to detail how their commission was computed.
Personalizing QuickBooks With Custom Fields
Custom fields add a great deal to the usability of QuickBooks.
We lose some uniqueness when choosing off-the-shelf accounting software. But we gain much in the way of reduced price.
Custom fields bring some of that customization ability into affordable software.
The Edit window of a customer, vendor, or employee will allow access to the setup of custom fields for the Names list.
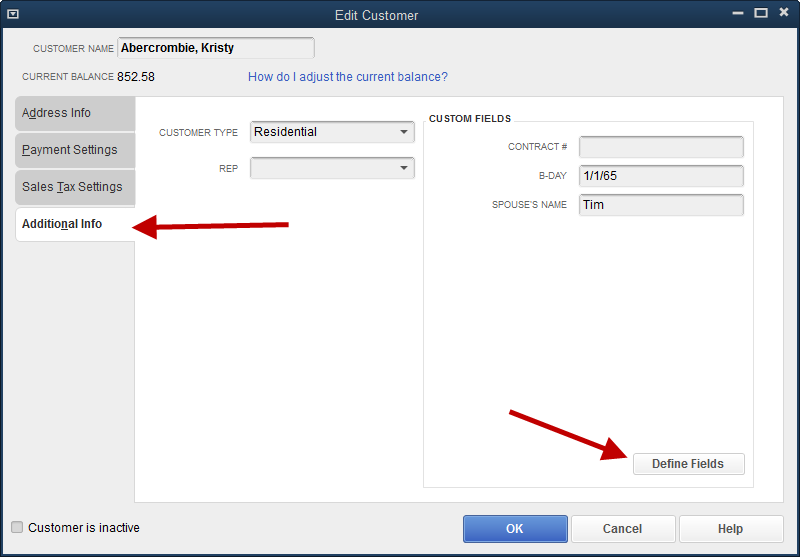
Choosing the Define Fields button on the Additional Info tab brings up the following screen.

This screen is available from the list of customers, vendors, or employees. From any one of those lists, custom fields can be created for any of the three. Just place a checkmark in the column for the appropriate name type.
Create a label (name) for the custom field. Make sure the name makes it easy to understand the purpose of the entry. You are limited to thirty-one characters, including spaces.
At this point, it may be difficult to see great value in custom fields. How useful they can be will become apparent as we use them in forms and reports.
For this exercise, we have created the two custom fields, Work Comp Exp and Genl Liab Exp. These fields are meant to track the expiration dates for these types of insurance for the subcontractors of Rock Castle Construction.
Once the fields are created, we will fill in the expiration dates in the vendor edit windows as shown below.
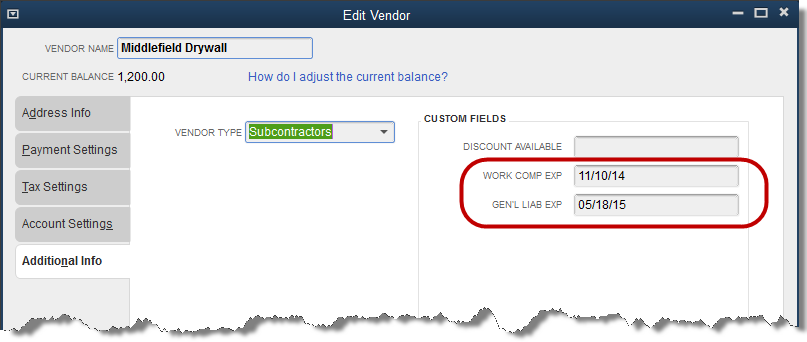
When custom fields contain data, as they do above, we have information that can be used in our reports.
In this case, we have further customized our subcontractor information by using vendor types. We have set all our subcontractors to the vendor type, Subcontractor.
Create a Vendor Phone List from the Reports drop down menu. Reports->List->Vendor Phone list.
Once that report is open, we are able to customize it by adding a column for one of custom fields. In the example below, we added Work Comp Exp.

Filter the report for Subcontractor type vendors only. Then sort the report on the Work Comp Exp column. This allows QuickBooks to show the dates that will expire the soonest.
These vendors can be called from this list to get an updated insurance certificate from them.
Customize QuickBooks Reports
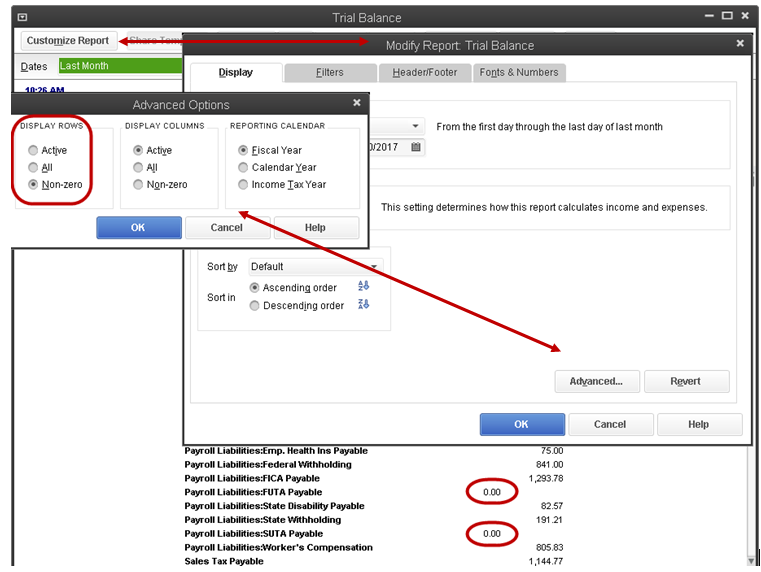
Report Customization

Every QuickBooks report allows some level of customization. Most of these options are accessed from the Customize Report button. Some versions of QuickBooks may use the terminology, Modify Report, but it is the same feature.
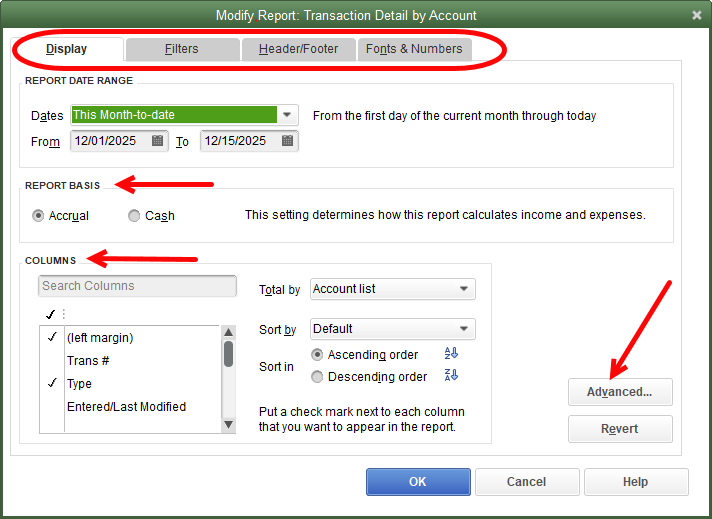
The Modify Report screen opens at the Display tab. As can be seen from the screenshot, it is possible to change the report basis to Cash. It is possible to delete some of the columns on the report and to add others not shown by default. The Advanced button will show different options depending on the report being customized.
One of these functions is to suppress zero lines and/or columns in a report.

The advanced button for an A/R Aging Report controls which date QuickBooks will use to populate the report. Report Date will include open transactions as of the date of the report. Current Date will show all transactions currently open on the report.

The Filters tab contains the most powerful settings.
In the screenshot, the filter for Accounts is selected. The setting is for All Accounts. This setting doesn’t really filter out anything. All accounts are included.
Other options would be to select only one account, certain selected accounts, or a specified group of accounts, like All Ordinary Income accounts.
There are countless examples how this might be used.
For instance, Sales Tax reports by default, include all transactions created on a sales document; an invoice, a sales receipt, or credit memo.
In some situations, a client may need to use sales documents to record other events as well. These events might impact COGS or an expense account rather than income.
Filtering the Sales Tax Liability report by “All Ordinary Income” accounts will filter out the transactions not affecting sales.
Reports can be filtered for many other statuses.
1. Create a list of bills that have been paid or not.
2. Include transactions that have been printed, or not
3. Report on transactions in a certain date range, or using certain items.
4. Payment date, name of vendor, customer, or employee, sales tax code, sales rep, and on and on.
All these can be filtered on transaction reports in QuickBooks.

The remaining two tabs have more to do with appearance.
On the Header/Footer tab, you can create your own custom report name. That name will appear at the top of the report on screen or printed.
Note all the checkboxes allowing certain information to be displayed or removed. Familiar notations like date prepared, time prepared, etc. are optional and can be removed from the final report.
There is room for a footer line to be added to the report.
The right side of this tab allows the user to specify how some of these lines should be displayed. The footer lines will appear on the report as shown here by default, the Standard setting. Or, they can be centered at the bottom of the page by changing the Alignment setting.

The final tab is again for appearance. The Change Font button allows the font used in the report to be changed. Not just the style, but the size and colors as well.
Negative numbers can be shown in parentheses by choosing the setting in the right-side section. Reports may display amounts in whole dollars only, among other things.
Choosing the option to show whole dollars only, can cause footing issues, as no rounding account will be selected and used by QuickBooks. The numbers behind the decimal point will be dropped on the printed report.
Often reports created using any number of these criteria may be needed in the future. Memorizing the report will save your customizing work. It will allow the report to be accessed time and again, without having to spend the time creating or customizing it.

Simply click on the Memorize button. Type in a report name that is descriptive enough for you to recognize. Now, access your custom report from Reports->Memorized Reports any time you need it.
Customer Orders

Sales Orders is a feature found in the Premier and Enterprise levels of QuickBooks only.
The sales order creates a non-posting transaction. Like an estimate or purchase order, you can create as many sales orders as you like. You may delete and edit them regardless of date.
Since they don’t affect any of your accounting numbers, these kinds of changes cannot do any harm.
A sales order will keep a record of an order placed by a customer that is not yet ready to invoice. In common, everyday use, they track backorders and special orders.
The first step to using sales orders is to be sure the preference is selected. This allows the feature to be turned on.

A sales order form appears much like an invoice. The popup message in QuickBooks that warns of insufficient quantities works on sales orders just as it does invoices.

The above screenshot shows the perfect scenario for using a sales order. The customer is ordering a door that is not in stock.
Selling into negative inventory, that is, selling inventory not actually on-hand, can have very adverse affects on QuickBooks.
Negative inventory causes issues with the computation of the costs of inventory items sold. It is difficult to compute an average cost when the number on hand is less than zero.
To maintain accurate accounting numbers, negative inventory should always be avoided.
But since a sales order is a non-posting document, we can sell as much non-existing inventory as we want. It’s not really a sale, it’s an order. It will be turned into a sale later when we have sufficient stock to fulfill the order.
The sales order shown in the screenshot can be completed with the quantities the customer wants to purchase. The company will ship when quantities are available.

The Inventory Stock Status report takes into account the amounts on order when computing the Available number. In this instance, the Interior Wood Door has an available quantity of negative 1.
Looking at the screenshot, you can see that QuickBooks shows the on hand quantity as zero. Are there any on sales orders?
Yes, there is one and that is subtracted. Amounts saved for builds of assembly type items are also subtracted to arrive at the available quantity. Any amounts on purchase orders are shown for informational purposes.
Reports also exist in QuickBooks to track outstanding orders, either by customer or by item.
Once Rock Castle Construction has received a shipment of the interior wood doors, we can fulfill our customer’s order.
Normally, we would view one of the sales order reports and double click on the Kristy Abercrombie order to bring up the sales order.
![]()
In the above screenshot, the sales order created earlier is shown. Highlighted on the ribbon is the icon that will allow us to create the invoice. It will be created from this document with little manual entry.
In some cases, a sales order may have multiple lines with different products on order. In such a case, it’s possible to create the invoice for only some of the products.
QuickBooks will keep track of what items have been invoiced and which have not. Multiple invoices can be created from one sales order.
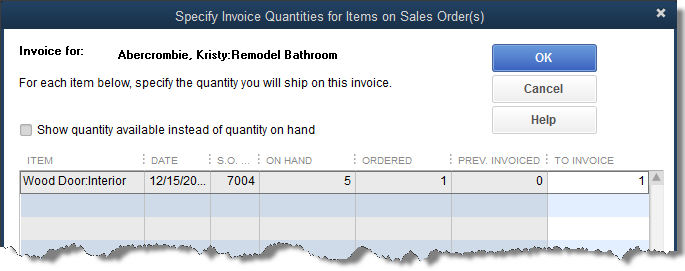
This screenshot is the message QuickBooks will display. It allows the user to select only some of the products, or less than the full quantity of a single product to invoice.
The sales order will remain open and available to be filled until all the items are invoiced.
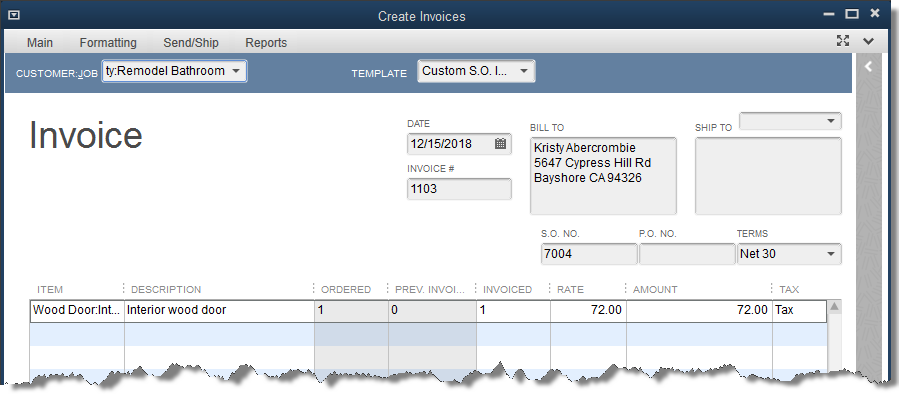
Managing Purchases

Purchase orders, like estimates and sales orders, are non-posting. The QuickBooks user is free to create as many as desired, void, delete, or alter regardless of the date on the form. None of these activities will affect the financial reports of the company.
Purchase orders are used to track commitments made for certain expenditures that are upcoming.
Traditionally, PO’s are used by businesses tracking on hand quantities of inventory. This adds one more measurement to the available to sell, or to the re-order computations.
QuickBooks knows how many of a certain product is on hand and in its reporting.
It can also advise you of how many have been ordered but not delivered to customers (sales orders) and how many have been ordered but not received (purchase orders).
Project based companies can use PO’s to good effect as well. When a contractor creates an estimate for a job, the company can also create purchase orders for work to be performed by subcontractors and/or for materials needed.
Using PO’s in this way gives added information to the manager of a job or project.
The estimate, as explained earlier, will show the actual cost vs. the estimated cost. Purchase orders can show how much is yet expected to be spent on a particular project or job. This gives managers an early warning if a project is in danger of going over budget.

Activate the Purchase Order feature by selecting it in the Items & Inventory section of Preferences.
A purchase order is very straightforward to fill out. Once the items on a purchase order are received, a bill can be created from the PO without needing to re-enter manually the items listed. If only some of the items are received, QuickBooks will allow a partial receipt, continuing to keep the purchase order open until all is received. See the above screenshot.
There is a trick for job and project managers. Purchase orders are closed by quantity. If a PO is created for a bid amount with a quantity f one, any receipt against that PO will close it.
Some subcontractors may require several payments. For instance, a plumbing contractor may plumb a house in three phases, expecting payment for each phase.
If the PO is created for one amount, the first payment will close the PO.
Instead, use the bid amount as quantity and the price as 1. That way, each of the three phases can be received against the PO, leaving the remaining work to be done on the open purchase order.

Which and how many purchase orders are open can be viewed on reports in QuickBooks. Look in either the Purchases section of the reports menu, or the Jobs, Time, and Mileage section.
Both list reports showing open purchase orders by job.
At the appropriate time, a bill is created for a vendor having outstanding purchase orders. When this happens, QuickBooks will display a message asking if you want to create the bill from an open PO.
Answering yes will bring up a list of the open PO’s for that vendor.
Simply select the appropriate purchase order from the list. The bill form will be populated with the items from that PO.
If necessary, you can change the quantities on the bill to reflect the number actually received, if received amounts are less than ordered.
Maintaining Multiple Funds in One Bank Account

Tracking balances for multiple funds is most often a request of non-profit entities. It can be used by for profit companies as well if there is a reason to track certain amounts going into one bank account that the company wants earmarked for specific purposes.
While QuickBooks does not have an easy, menu-driven solution for this, there is a simple work-around.
The solution is to create subaccounts for each fund. These must be subaccounts of the main checking or other bank account where the funds are actually located.

In the above screenshot, three subaccounts have been created for the main checking account, Checking.
The balances, 1500, 2510, and 2500, are included in the balance showing for the Checking account, $53,479.10.
The balances in the ‘fund’ accounts result from transactions using the subaccount rather than the main checking account. In the sample QuickBooks file, there is one deposit in each fund.
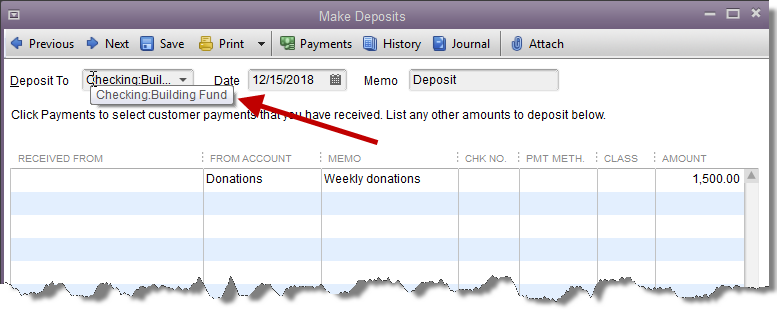
The arrow in the screenshot shows the “Deposit to” bank account. Note that the subaccount Building Fund has been selected. It is important to be sure that all funds going in and out of the ‘fund’ designate the correct bank account to use.
A check written out of the fund would need to be posted to the correct subaccount as well.

A register can be viewed of only the subaccount selected, rather than the entire bank account.

When it comes time to reconcile, simply choose the main bank account. All transactions, including those from all the subaccounts will be there.

Those transactions highlighted in the above screenshot are transactions made to the three subaccounts. Since they are shown here, they can be reconciled with all other transactions from the main account as though there were no subaccounts.
One of the disadvantages to this solution is that bank deposits can only be made to one bank account. So amounts being deposited to various will each need a separate deposit.
Making the deposits physically separate when carried to the bank will make reconciliation easier. Otherwise, the person reconciling will need to match several deposits in QuickBooks to one deposit listed on the bank statement.
Divisions and Locations in Your Business
![]()
QuickBooks has a feature called Class. It provides another “bucket” besides accounts in which to congregate transactions.
This is often used in an organization where the same or similar income and expenses need to be tracked for different departments, locations, funds, etc.
If you wished to track donations as income, but wanted to know if those donations were for general use, building fund, or other special purposes, class might be your solution.
Turn on the class feature in preferences.
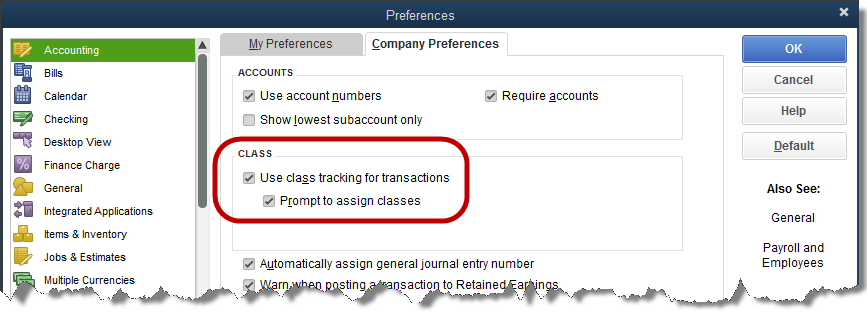
Once the option is turned on, transaction forms contain an added column for this information.
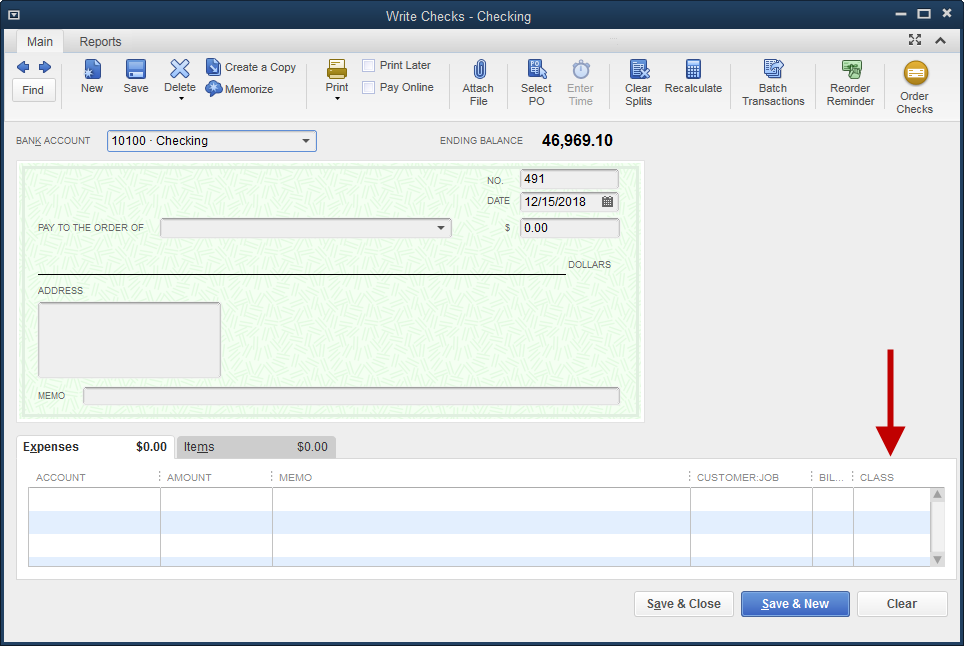
Classes can be added ‘on-the-fly’ by typing in the name in the class column and selecting Add when QuickBooks does not recognize the name. Or, you can navigate to Lists->Class List and enter your desired classes there.
Using class designations on your transactions results in a profit and loss report that can be analyzed based on whatever criteria you are tracking with the class feature.
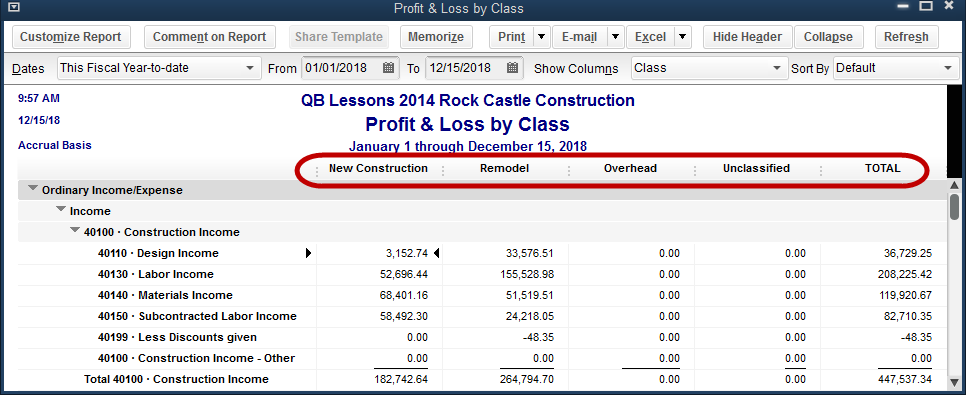
Keep the following in mind:
Use only one criteria. Using both location and department for classes will create a confusing report.
Create a general or administrative class for transactions that do not fit into any of the special class categories. That way, when unclassified transactions show up on the Profit and Loss by Class, you know they need to be corrected.
Class is for income and expense, not for assets and liabilities. While QuickBooks offers a balance sheet by class, it is cumbersome and difficult to use and requires stringent guidelines on entering transactions.
Tracking Workers’ Compensation Costs

QuickBooks has a feature that will allow the cost of workers’ compensation to be tracked in the system. This will accrue the expense so it appears in the correct period on financial reports. It also informs the owner of the amount accumulating that will be due in the next payment.
Tracking this expense as it accrues rather than when it is paid also allows it to be associated with various jobs and/or classes.
The first step to tracking workers’ compensation costs is to set the preference.

Once the preference is set, a wizard is available under the Employees dropdown menu to help you accomplish the setup. Employees->Workers’ Compensation->Manually Track Existing Workers’ Comp Policy.
The wizard will take you through a number of steps setting up the workers’ comp accrual. You will need information like:
The name of our workers’ comp insurance carrier.
Job classifications and rates.
Experience modification factor
Policy number (optional, but good to have)
You will need to assign each employee the appropriate workers’ comp code. This should be available in the information about your policy. If an employee can be classified under more than one code, because they do different jobs, use the one in this setup window that is the most common.
You will also need to enter your Experience Modification as this affects your premium.
Enter the rates for each workers comp code.
If you pay overtime wages, a screen will allow you to specify whether or not the overtime premium is included for insurance premium calculations.
Let’s say a worker earned $10 per hour for regular time and $15 per overtime hour. Excluding the overtime premium would cause QuickBooks to calculate the premium for every hour as though it were paid at $10. The additional $5 paid for overtime hours would be ignored.
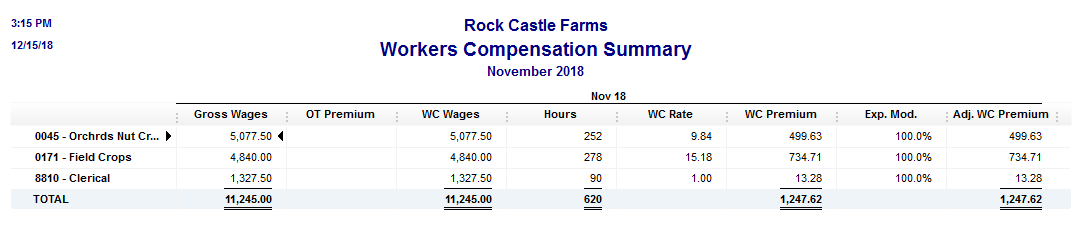
Above is a report based on the use of the Workers Compensation feature in QuickBooks. It gives us all the information we need to fill out a workers’ compensation report for our insurance carrier.
Billing Customers for Time and Materials Jobs
QuickBooks has the ability to track expense and time transactions recorded by the user and holding those so they can be used on an invoice for a customer.
This can be as simple as postage purchased for a client who will be invoiced for the cost. It can also be as complicated as a major time and materials job requiring details spanning a twenty-five-page invoice.
In either case, those amounts do not need to be kept on any list outside QuickBooks to remember to invoice the customer, QuickBooks becomes that list.

The check in the above screenshot will be available for invoice creation in QuickBooks without additional manual entry.
Note the two arrows. A Customer:Job name has been selected in the appropriate column of the stub portion of the check. Even if jobs are not used in your business, the customer name needs to be entered here in order to use this invoicing feature.
Entering the customer name allows the Billable column to be selected. Placing a checkmark here directs QuickBooks to keep track of this expense. It will be used later to create an invoice for this customer.
The line drawn around the two tabs of the check stub highlights an important method for entering these types of expenses. Note that the Items tab has been used, not the Expenses tab.
The Expense tab requires an account from the Chart of Accounts to be used to identify the expense. The Items tab requires an item.
The benefit to using an item rather than expense is superior reporting. While the item may be created to post to the very same account that might be used on the Expense tab, using the item will improve reports in QuickBooks that use these types of transactions.
Now it is time to invoice the customer for the blueprint changes and see how our job is made easier by using the above method for creating the check.

What you see when creating an invoice for this customer depends upon how the above preference is set. Should QuickBooks give you a list of available time/costs to add? Should it do nothing? Should it popup a message asking the user what should be displayed.
![]()
This screenshot shows the popup message that will ask if the user wishes to add billable costs to this invoice. Even if Exclude is selected, or the preference is set for this popup not to appear (“Don’t add any”), the option is still available. The Add Time/Costs icon on the invoice ribbon will allow using that list to create the invoice.

However you access it, this is the Choose Billable Time and Costs window. Note that the check we created using an item is listed here on the Items tab. Other tabs exist for time, expenses, and mileage.
The memo used in the on-screen check stub is shown here as the default description for the invoice. It can be overridden. Since there is no price entered on this particular service item (Blueprint Changes), the cost is suggested. A different price could be entered on the invoice.

The invoice has been created without any alterations from the check we used to pay the expense. It only took seconds.
The Value of Estimates in QuickBooks

Typically thought of as a feature for contractors, Estimates in QuickBooks are near-necessary forms for any company that is project oriented.
Estimates are non-posting, just like sales orders. The QuickBooks user can create as many as they like and the accounting numbers are unaffected. They can also be edited and deleted/voided without concern for financial reports.
Most often, estimates are thought of merely as a way for a contractor to convey the cost of a project to a customer. In QuickBooks, they are far more than that.
First, be sure the use of estimates is enabled in your QuickBooks company file.
In the screenshot, you can see the setting to activate estimates. A companion setting is progress invoicing. If your company sometimes invoices more than once for a single job or project, you will want to select both of these settings.
The estimate serves as a simple project budget. That’s what it so important to companies tracking costs and revenues by project.
The pieces of the project that need to be tracked are done by using service type items for each piece. Be sure each of those items is setup as a two-sided item, utilizing both a purchase and a sales side to the item.
Two-sided items were discussed earlier.
Remember to use an income type of account for the Income Account field, and a COGS or expense type of account for the Expense Account field. For job expenses, a COGS type account is usually the best choice.
The example estimate in the above screenshot is from one of the QuickBooks sample files. The items are two-sided as discussed. Cost as well as revenue for each item are included in the appropriate columns.
Actual income (invoice) and expense (bills & checks) are recorded in QuickBooks using items and coding to this specific job. One result is a detailed report of the ongoing performance of the job.
The following report is found in the Jobs, Time, & Mileage section of the Reports menu.

Using Items to Track Profitability

Items are necessary for selling to customers. We can’t create a sales receipt or an invoice without them.
In their most basic form of setup, items contain a description for the sales document, the price, taxable status, and for accounting, an income account to tell QuickBooks where to post the revenue.
Items can also be used in expense transactions. Inventory would be a good example where QuickBooks needs to know each item purchased and sold. In the case of inventory, QuickBooks requires the use of an expense type of account in item setup.
There are other times when both expense and income needs to be tracked by item. In these cases, either a service type or a non-inventory part type item is usually created.
Examples requiring this kind of setup would be any company that tracks activity by job or project. Besides contractors, this could include architectural firms, engineering firms, and the like.
In these cases, the QuickBooks user must instruct the software to track both sides of transactions by item.
For our example, we will use the sample company Rock Castle Construction, a building contractor. Above is a screenshot showing the edit window of a two-sided item. Note the checkbox in the center-left of the window.
“This service is used in assemblies or is performed by a subcontractor or partner.” This explanation can confuse some QuickBooks users, but basically the setting means there will be both a purchase side and an income side to the item setup.
You can see the lines drawn underneath the labels, purchase information and sales information. Then, even lower in the window, the circled areas denoting the appropriate accounts for each type of transaction.
With this setup, QuickBooks will know which account to use depending upon what type of form is selected for a transaction. Checks and bills will cause it to use the expense account, invoices and sales receipts will be posted to the income account.
The reason for this setup is to allow the comparison of income and expense for a certain item. Let’s create an expense and income for a particular job, Kristy Abercrombie’s Kitchen. We’ll create then invoice the customer for the electrical work.
A bill is created using the Items tab (as shown) rather than the Expenses tab. As you can see, the Electrical item shown before has been used to create an expense for this project in the amount of $588.75.
Let’s invoice Kristy $750.00 for the work done by C.U. Electric.
Above is an invoice for the Kristy Abercrombie Kitchen project using the same item, Electrical, that was used in the bill for C.U. Electric.
Now, let’s look at a report that will compare our expense and income for this project.
The highlighted line shows how the Job Profitability Detail report compares the revenue and the cost for one particular item for one particular project or job.
This is only possible with the use of two-sided items. Using the Expenses tab in transactions will prevent this comparison. Fail to use jobs/projects in either expense transactions or invoices and this report will not work.
Used properly, two-sided items, in companies that sell by jobs or projects, can yield valuable information greatly affecting the company’s profitability.
Automate Processing That Wage Garnishment Order

In the last post, we set a payroll item to deduct a wage garnishment for an employee in the sample QuickBooks file. The setup of the payroll item, instructed QuickBooks to deduct 25% of the net paycheck.
Now, we want to do further setup, allowing us to automate the wage garnishment process, just as the rest of the payroll process is automated.
Navigate to the Employee Center. Select the employee. In our case, the employee is Gregg Schneider.

The above screenshot shows the Payroll Info tab. The Earnings items for this employee are listed in the left-hand section. In the right-hand section are the other items we can add that will affect the employee’s paycheck.
A dropdown list in available on the rows of this section. The dropdown list will show the payroll items available. In the case of this screenshot, we selected the wage garnishment item we set up for Gregg Schneider. That process was detailed in the last post.
Once that item is added, as it is in the graphic, click OK.
When you process a payroll for an employee, it is possible to click on the employee’s name to see the detail of the paycheck being created.

You can see in the graphic the payroll item for the garnishment added and the effect that has on the net paycheck.
The amount withheld is posted to the liability account specified when the payroll item is created. This can be setup as a scheduled liability just as tax amounts from paychecks can. You will have to complete that step yourself. There’s a link, “Manage Payment Methods” at the bottom of the Payroll Center/Pay Liabilities window.
We setup the payroll item with a vendor name and the number that identified this case to the agency. When the liability check is created, those pieces of information will be there automatically.
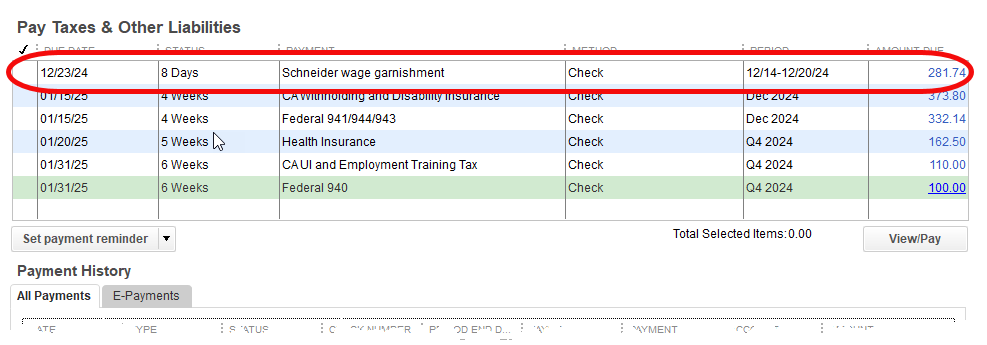
When selecting the liability by clicking on the View/Pay button, the following check appears.

All ready to go and the process is complete.
A Wage Garnishment Order. Now What?
Those who do payroll in QuickBooks will find it necessary from time to time to create a payroll item. One of the most common is when a wage garnishment order for an employee is received.
When that happens, here is how to accomplish the task.
Navigate to Lists->Payroll Item list in order to display the list of payroll items. Either select the Payroll Item button in the lower left, or right-click your mouse anywhere within the actual list itself.
From the resulting menu, pick New.

In this post, we will use the Custom Setup method. It allows us more flexibility setting up the item.

You can see the many types of payroll items that can be selected in the graphic above. While the examples for the type selected suggest union dues, retirement plans, etc., a wage garnishment is definitely a deduction. So, we will choose Deduction as the payroll item type.

The next window in the wizard wants a name for the item. If you create a wage garnishment item for each wage garnishment order received, you will be able to create the checks to disburse the withheld amounts more easily. That’s what has been done in this example. Gregg Schneider is the employee whose wages will be garnished.

This screen allows you to specify the agency for payment of the withheld funds. It also contains a field for the number that identifies your employee to the agency. This is why we created the payroll item for only one specific garnishment order. Otherwise, this information could not be filled in here.
There is also a field for the liability account QuickBooks will use when creating paychecks and withholding the specified amounts. By default, QuickBooks will suggest Payroll Liabilities. Using an account like Wage Garnishments Payable allows much better tracking of the amounts coming in and going out of the account.
![]()
The Tax Tracking Type window is critical. The selection made from the dropdown menu shown, will determine the taxability of wages, how those wages are reported on government forms, and how they affect W2’s.
There’s quite a list of available options and if setting up something other than a simple wage garnishment, you’re likely to find on the list exactly what you are looking for. For our purposes, a wage garnishment does not affect taxes. None is the correct choice.
The next window (not shown) will allow very specific setup of the effects the new payroll item will have on tax withholdings. Generally, if you feel something in that window needs to be changed, you should seek professional payroll advice from your accountant or bookkeeper. Rarely would anything in that window need to be altered.
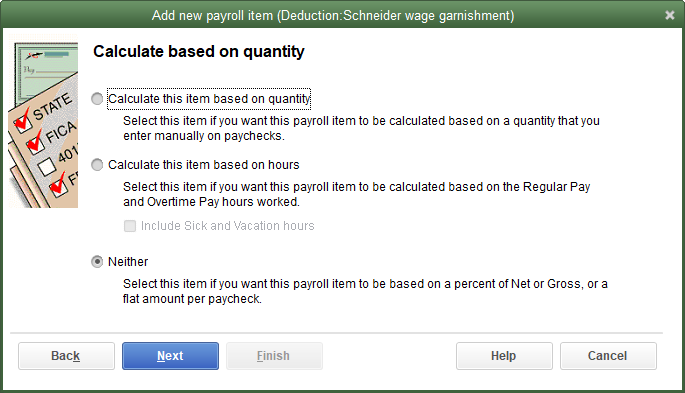
If the payroll item were to be based on quantity, like mileage, we could specify that in this window.
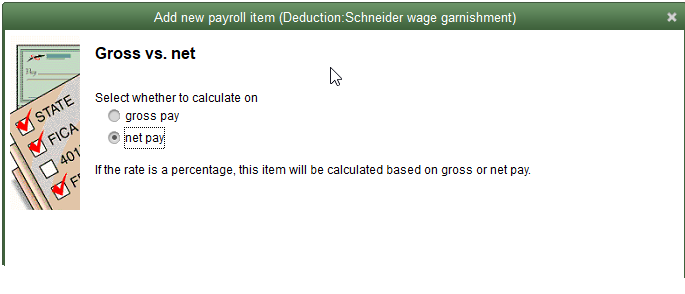
A wage garnishment will be deducted from net pay.
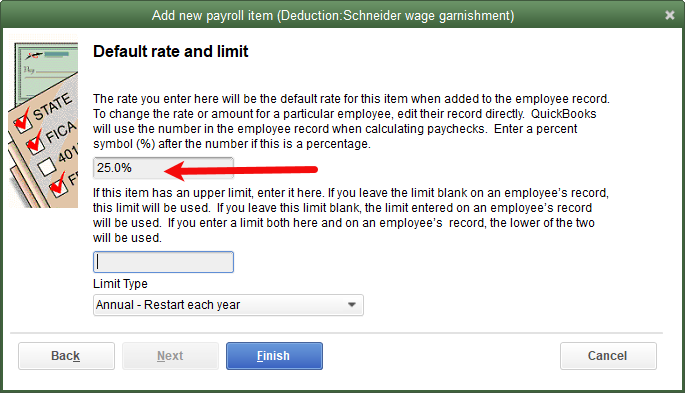
The last window in the setup process allows us to set a default rate. This can be either a dollar amount of a percentage. In the example, we have specified 25% of the employee’s net check.
If there were an annual limit, that could be set in this window as well.
In part two, we’ll detail how to set this up with an employee to automate payroll processing.
How QuickBooks can Track Long Term Loans

QuickBooks has a little-known tool known as Loan Manager. With this tool, you are able to setup and track payments on a loan. You can create amortization schedules. You can record loan payments so that the interest portion of each payment is expensed, and the principle portion reduces the amount owed in the loan’s liability account.
Setting up a Loan in Loan Manager
Once the information on a new loan is available it can be setup in QuickBooks. Create the Long Term Liability account on the chart of accounts first. Then, be sure the vendor name has been added to the vendor list and the account balance entered into the long term liability account. These actions must be done before setting up the loan in Loan Manager.
Once this information has been entered, select Loan Manager from the Banking menu. The following window appears:

Next, click the button that says “Add a Loan”. Complete the information in the various fields.
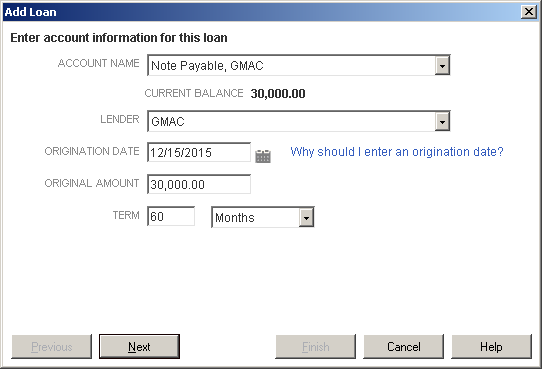
Remember that the Account name and the Lender must have been setup before opening Loan Manager and then selected from the drop-down lists available in both of those fields.
Complete the fields as shown. The Origination Date of the loan is the date the loan was created by the financial institution and funds disbursed, not the date of the first payment.
Once your information is entered, click Next.
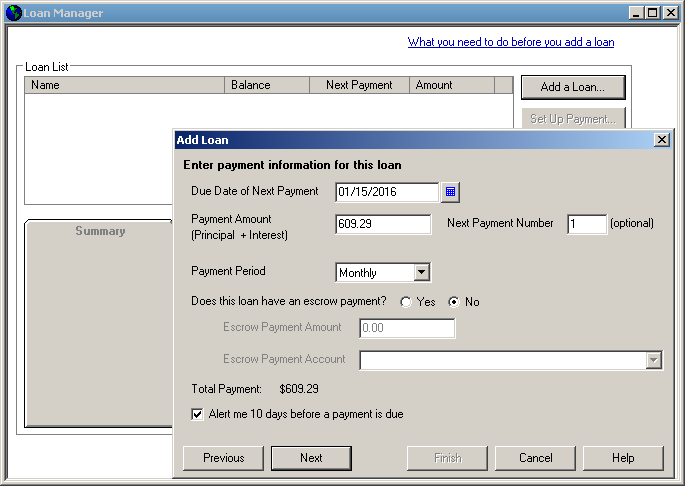
You should have a screen that looks much like the one above. Enter the payment amount and the frequency, in this case $609.29 due monthly.
An escrow payment would be an additional amount over the payment. Think of a mortgage escrow that will pay things like insurance and property taxes for the property owner. Most loans will not have an escrow account.
If you wish, you may set a reminder to trigger before a payment is due.
Once this screen is complete, click on Next and the following screen appears:
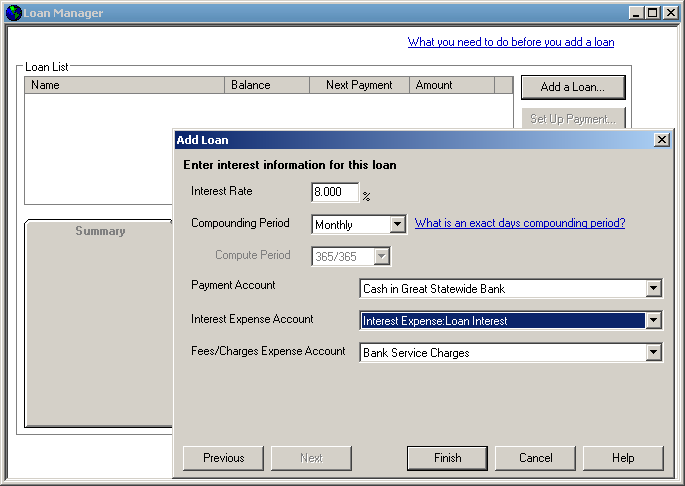
Your screen will not have the information already filled in as this one does.
Enter the interest rate and the compounding period. Enter the QuickBooks bank account from which the checks for the payments should be written.
The interest expense account will be selected from the dropdown. It will be an expense type of account on your Chart of Accounts.
Enter an account for any fees and charges if there happen to be any, and your setup is complete. When you click on finish, your screen will look similar to the one below.

The above screenshot has selected the Payment Schedule tab in the lower part of the window. This shows the amortization schedule for the loan that you just created. Your loan is now complete. Click on the Close button.
Making Loan Payments in Loan Manager
Once the loan is set up it is important to use Loan Manager when making payments.
You will see a screen like the one above. If you have more than one loan setup, you will see all of the loans listed in the Loan List window.
Select the loan for which you want to make a payment. Click the button “Set Up Payment”. You will see a window similar to the one below.

Most of the information is already on the screen. QuickBooks knows this information from the original setup of the loan. If you need to, you can edit some of the fields shown. Normally, you will want to accept what QuickBooks presents to you.
In the Payment Method portion of the screen, choose whether you want to write a check for the payment or enter a bill. If you select Write a Check as the lesson does here, you will see the following screen when you click OK.

Any details on the check can be edited, such as the date. Otherwise, the payment is ready to go. Be sure the check number is correct if writing the check by hand. If printing a check, be sure that box is checked.
You have now recorded your payment with amounts recorded to interest and to the loan balance. It will be easy for the payments to follow the amortization schedule if you always use loan manager to make payments. Also, your profit and loss reports will be more accurate since the correct amount of interest expense will be recorded.
When a Vendor Requires a Deposit or Prepayment

There are times when, in order to purchase from a supplier, a payment must be made in advance. Here we will examine the simplest solution from a QuickBooks perspective.
This solution does not meet the criteria that a CPA would need to use in order to present financial statements. They would need to make an adjustment for that purpose.
But for ordinary day-to-day functioning of the QuickBooks file and the needs of the vast majority of QuickBooks users, this solution works best.
The key is the account used in the stub portion of the check form.
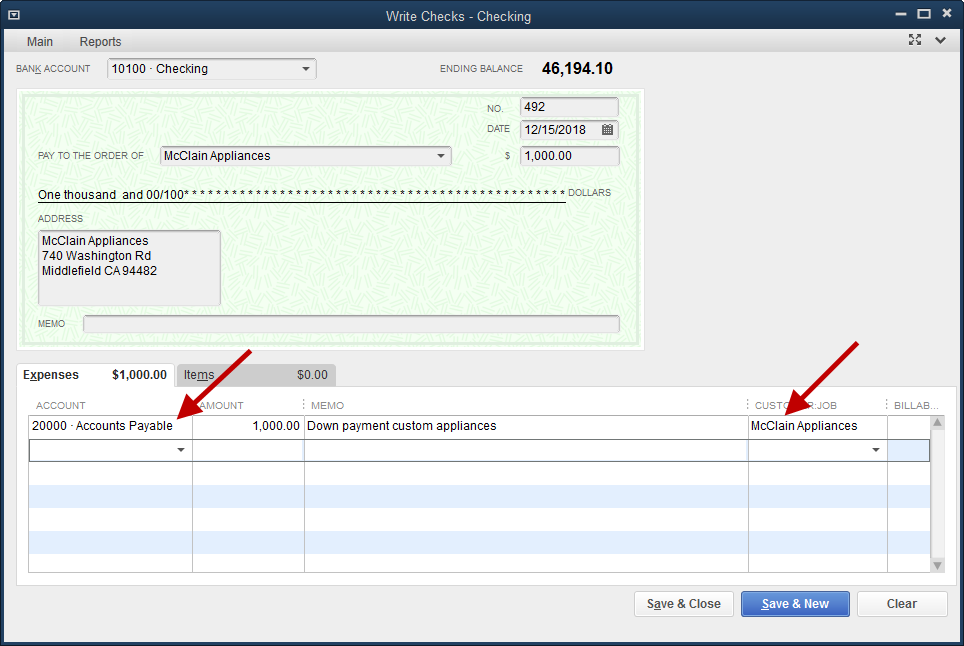
The check is made out to the appropriate vendor. The account to post to is Accounts Payable. Note also that in the Customer:Job field, the vendor name is entered here as well.
When saved, this check will create a credit in Accounts Payable for McClain Appliances. This credit can then be taken against the bill once the product or service is received and the vendor invoice entered.
For purposes of this example, let’s assume the entire purchase from McClain Appliances was $5000.
Enter the bill in QuickBooks for the entire $5000. Now, when it is time to pay that bill, we must reduce it to the $4000 we actually owe. We already made the down payment of $1000.

Above is the Pay Bills window filtered to view only the transactions for McClain Appliances. You can see the $5000 bill is listed and has been selected for payment. Once that happens, the highlighted area in the lower right appears.
There is an outstanding credit of $1000 that can be taken against this bill. Of course, that is the $1000 check we wrote earlier.
Click the Set Credits button, accept the credit to be applied by clicking Done, and the Pay Bills window will appear as below.
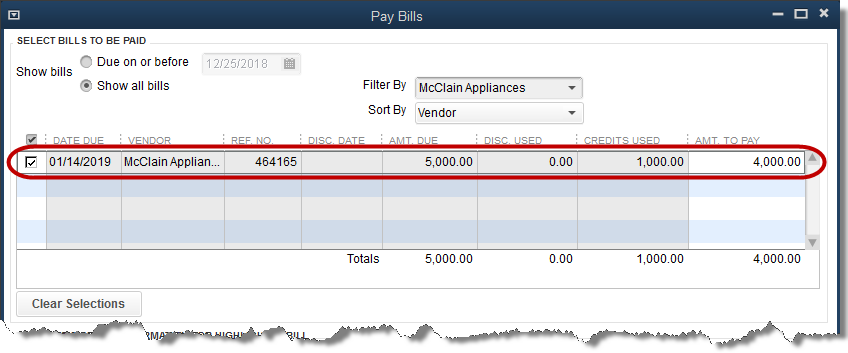
The bill payment check for McClain Appliances can now be completed as normal. The credit reduced the amount of the check to the $4000 actually owed.
The check will clear the balance in their vendor account. All the transactions will show as closed. And, the $5000 expense for the appliances has been recorded correctly and will show on reports correctly in QuickBooks.
How to Create Customer Deposits in QuickBooks

There are a number of ways to handle deposits. These would be payments a customer would make before an invoice was created. We will describe two such methods in this section.
The easiest way is to just receive the customer payment as normal. When the customer is selected in the Receive Payment window, be sure no invoice is selected.
Most of the time, there will be no open invoices for QuickBooks to list in this window. But, if there are, just make sure none of them are selected.
Save the transaction. QuickBooks make ask in a popup message if you want to apply the payment to an invoice or retain it as a customer credit. Retain as a customer credit.
At some point, an invoice is created for the customer. QuickBooks will present an option to apply existing customer credits to the invoice. If that option is selected, the invoice will be partly or completely paid.
Some businesses prefer the see the balance for customer deposits on their financial reports. Technically, this is the accepted accounting technique.
If this is the solution you refer, begin by creating an item to be used for customer deposits.

It is important that the account used in the item setup is an account used only for this purpose. Name the account in a way that makes sense to you, the QuickBooks user, but be sure it is setup as an Other Current Liability type of account in QuickBooks.
When a customer deposit is received, record it using a Sales Receipt.
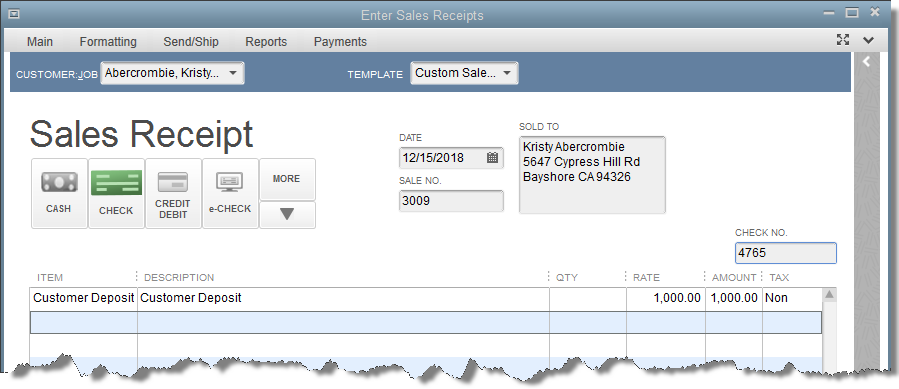
Simple. For most people, the payment associated with this sales receipt will post to Undeposited Funds and can be deposited to the bank as normal.
The customer deposit will show on the balance sheet as a liability for the company. But, and this is important, it will not show as a credit on the customer’s account.
If many deposits are taken over time, it may be difficult to distinguish which customers have outstanding deposits and how much those deposits are.
Double-click on the Customer Deposits line on the balance sheet. Change the resulting transaction report to include a greater date range, perhaps All.
The following could be the result.

Who still has an outstanding deposit in the above report? While examining the report line by line and manually calculating the amounts, there is an easier way.
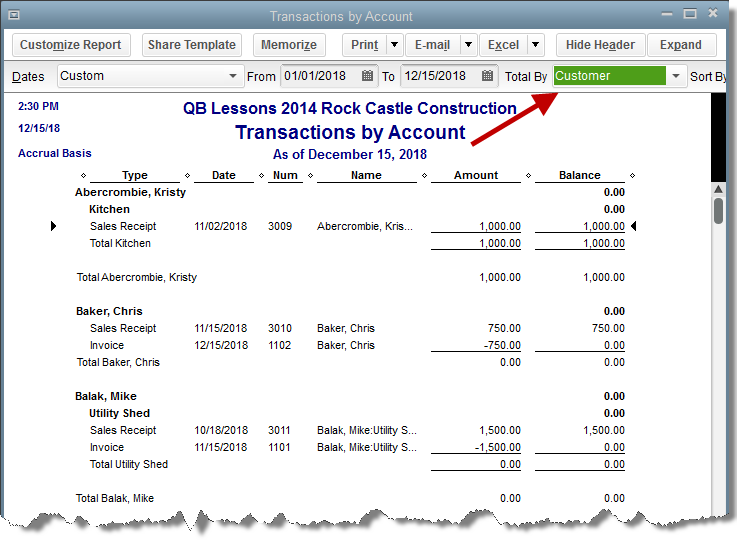
Change the Total By field from Account list to Customer. The report shows at a glance the customer deposit total for each customer.
As mentioned, these customer deposits do not show in QuickBooks as customer credits. Accordingly, another way must be used to credit them against customer invoices as the sale is made.
At the appropriate time, the invoice for the sale is created, Add a line using the customer deposit item and a negative amount to subtract the customer deposit amount from the invoice total.
As you can see from the screenshot of the filtered report earlier, Chris Baker is one of our customers. He is shown on the report with a net zero amount as a customer deposit.
The way the above invoice has been created is the reason why.
How Do You Create a Discount in QuickBooks?

Discounts are common in many businesses. Discounts for special events, special customers, or special payment terms. Just as there are a variety of reasons for granting discounts, there are various ways to create them in QuickBooks.
Let’s start with a simple method to grant a customer discount directly on an invoice. We can create a Discount type item.
A Discount item would be used for a one-time or unusual event.
Cases where a discount is always granted a certain customer, or a discount is given to reward early payment are more efficiently handled in other ways.

The above screenshot shows the setup screen for a Discount type item. The following screenshot, shows the item setup screen after all the pertinent information is entered.

You must decide if the item, by default, is taxable or not. If using the discount item to reduce the price of taxable items, and the discount item is set to a non-taxable code, sales tax will not be reduced by the amount of the discount. The taxable merchandise will compute sales tax at the before discount sales amounts.
Setting the discount item to taxable, would then cause the discounted items to accrue sales tax at the discounted price.
Another setting is the account from the chart of accounts to which the discount item will post. There are two common designs. One, the discount posts to the same income account as the items you normally sell. Or, two, you can create a special income type account to track the amount of discounts.
In the graphic of the Discount item, this latter approach was used. The discount amount will post to an income type account entitled, Discounts Given.

The graphic above shows an invoice using the new Discount item.
The use of Discount type items can often be enhanced by adding a subtotal after the discount showing the net price.


You can see that adding the subtotal line makes this appear a little better to your customer. They now can see the price of the merchandise before sales tax.
This becomes critical for more complex invoices. For example, perhaps several lines need to be discounted, several lines do not.
The discount item in QuickBooks discounts the line immediately above it. If there are three lines of merchandise and/or services, then the discount item is used on line four, the discount is computed on line three only.
In order to discount the entire amount, use a subtotal item on line four, then the discount item on line five. Now the discount will apply to the entire amount.
Add a Logo to Your QuickBooks Invoices

Forms like invoices can be customized in QuickBooks to a much greater degree than many realize. One of the many customization options available is adding a company logo.
A logo can be added to invoices, sales orders, credit memos, purchase orders, reminder statements, estimates, and sales orders.
When customizing forms in QuickBooks we are working with templates. There is a list of templates available at Lists->Templates. This list will show all the saved templates in your company file. You can edit some of them. Some, the defaults that come with QuickBooks, can be easily copied and then edited.
Another way to edit an existing template is to open it. Then, from the format tab of the ribbon, select Customize Data Layout.

After either selecting a template from the list and choosing edit, or clicking the customize icon from the form itself, a screen opens with many options. Along the bottom of the screen are several buttons. One is labeled Basic Customization. Choose this button.
You can see in the screenshot the checkbox that tells QuickBooks you want to use a logo. Once that is selected, click the Select Logo button to navigate to the location on your computer where the graphic file of the logo exists.
![]()
Once the logo is selected, QuickBooks copies it into the folder where the company file resides. The name of the graphic file now shows next to the Use logo checkbox.
QuickBooks has also placed the logo on the invoice template. You can see that in the Preview panel where the arrow is pointing.
We may not be happy with the placement. To change that, we would click on the Layout Designer button.
In Layout Designer we can drag text and data boxes to the locations we desire. We can also change the way some of the information shows.
In the end, we can create something that looks more like this:
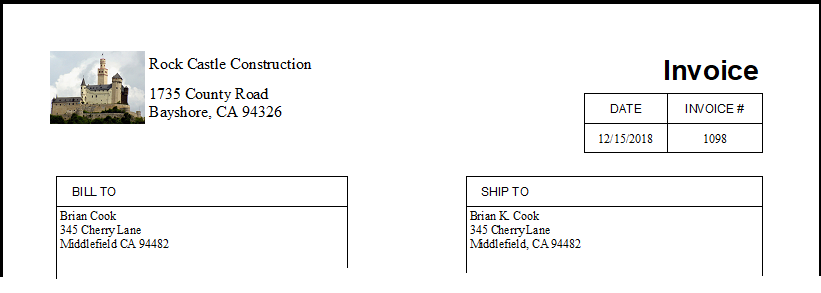
Making an Invoice of Your Own

Adding the Company Phone Number to an Invoice Template
A fact that many QuickBooks users do not know is that various forms used in QuickBooks can be customized. In today’s post, we will add a company phone number to a printed invoice template.
There are two ways to access this capability. One is from the list of templates at Lists->Templates. The other is from the window of the form itself.
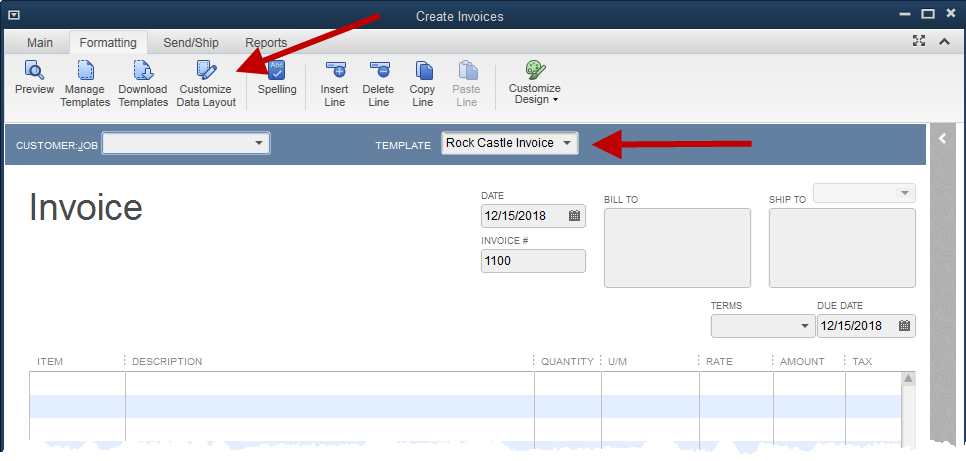
The above graphic shows the window for creating a new invoice. Look at the second arrow. It points to the field that identifies the template being used for this invoice transaction. This field will always be available on any transaction window where the form can be changed or customized.
The template can be changed at any time. It will not change the transaction. It is merely a different way of viewing the same transaction.
The top arrow points to an icon on the Formatting tab of the transaction window ribbon. This icon will open the customization options for this template.
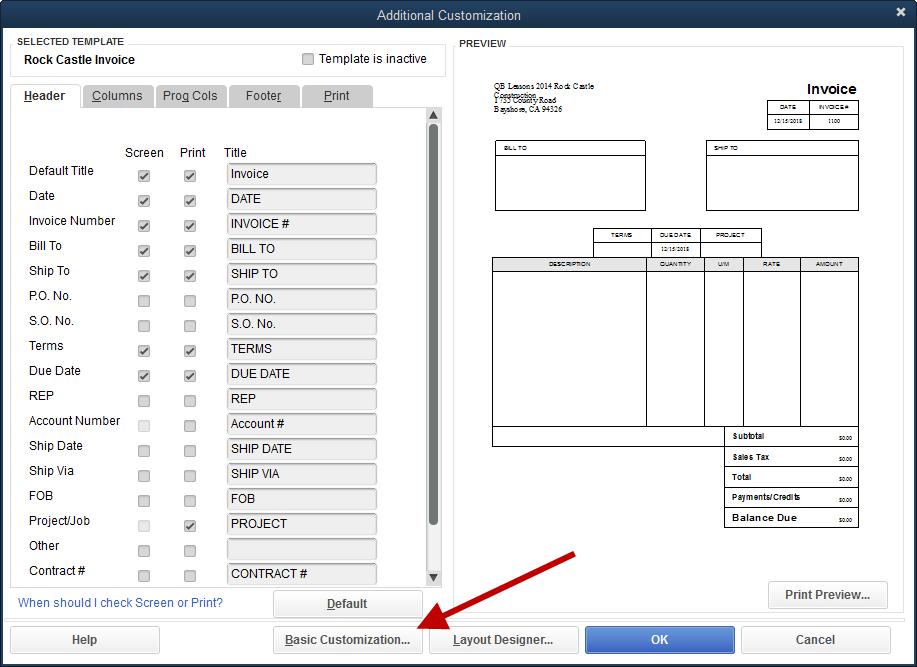
Above is the window that opens when selecting the Customize Data Layout icon. For this simple change, we will select Basic Customization.

The company phone number can be added by simply selecting the checkbox indicated.
This tells QuickBooks to add the selected information (company phone number), but it doesn’t tell it where to place that information on the printed form. For that, we will select the Layout Designer button seen at the bottom of the above screenshot.
Below is a screenshot of the layout designer, scrolled to the bottom of the invoice template, showing the new company telephone number data field.

The boxes can be selected and dragged, using the mouse, to the location desired.
In this example, we will drag the phone number boxes to appear just under the company address. Then we will delete the label field. That is the box containing the word Phone #.
The other field, the one filled in with 555-555-5555 sample data, is the data field. We will drag that into position and click on the Properties button at the top of the window.

From this window, we can create a number of changes. The font can be changed to match the address. The borders can be removed. The data can be left justified to match the margin of the address.
In the end, the address/phone number block will appear like this:
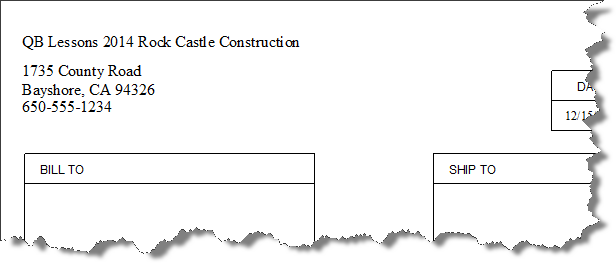
This is a small example of a simple change one can make to customize their invoice form. Using these tools, it’s possible to make extensive changes to a form in QuickBooks, like an invoice, that will give a completely individualized look to your business forms.
Is it a Check or a Bill?
This is a question that arises from time to time. Should I be entering expenses into QuickBooks as checks or as bills?
To answer that, we need a little background on what these two transactions do. When a check is created, whether by using the check form as will happen with the Write Checks icon circled in the above image, or in the Check Register, the amount will post to the account used in the Account field, and the bank balance will be lowered. That’s it. It’s a simple transaction.

You can see the two affected accounts in the above screenshot. The bank account, in which the balance will be reduced, at the top. The account that shows lower in the graphic is the expense account that will be increased by the same amount.
Now, what if you enter an expense as a Bill?
The bill form still increases expense, posting to the account you enter on the stub portion of the form as shown. It does not affect a bank account though. Instead, the other side of the accounting entry posts to Accounts Payable.
For the QuickBooks user, that means with a bill an expense is created and a debt to the selected vendor is also created. The bank account is not affected until the bill is paid.
If you refer back to the screenshot of the Home Page, the first graphic in this article, you see the Pay Bills icon to the right of the Enter Bills icon. When paying bills that have been entered, this is the choice you want to make.
So, using bills is a two-step process instead of one like Write Checks. Why use it?
The expense posts to your books as of the date on the check or bill, whichever you use. Sometimes, it’s important for an expense to show in a certain month, the month in which it was incurred. But, we plan to pay later, perhaps in thirty days. Using a bill allows you to do that.
If such control over dates is unimportant, you may be fine with Write Checks instead.
Always follow the correct procedure. Write Checks is one step. If you Enter Bills, you Pay Bills when that time comes. Remember, the bill creates the expense. If you enter a bill for something and then come back later and write a check to actually pay it, you have created that expense twice in your books.
Collecting Money

In our last post we examined sales forms in QuickBooks. A logical next step to looking at QuickBooks features is collecting money. When customers pay, what’s the process in QuickBooks?
We’ll look at alternative methods to adding to your bank balance later in this article, first let’s review the process QuickBooks normally expects you to follow.
If you invoice a customer, they will pay (hopefully) at some point in the future. When they do, choose Receive Payments from the QuickBooks home page or the Customer menu. The following screenshot is the window you will get.

Filling out the top portion of the form is pretty straightforward. In the center of the window, QuickBooks lists all the open invoices for this customer. In the case above, there’s only one.
Sometimes, there may be several open invoices. If the payment is not for all of them, be sure QuickBooks selects the correct invoice to pay. Note also that an invoice may be partially paid and QuickBooks will show that next time you receive a payment. In the example above, the original invoice was $5732.23 but has been partially paid. Only $4732.23 remains as an open balance.
By default, QuickBooks posts payments to an account called Undeposited Funds. This allows QuickBooks to accumulate the payments you record on one list. Then, when creating the deposit, you select multiple payments to create a bank deposit in QuickBooks that will match the amount of the same deposit that appears on your bank statement. It makes reconciliation much easier.
Sometimes, a QuickBooks user only receives a few payments a month and they all go directly to the bank. There’s really no need for Undeposited Funds. It only adds another step.
You can tell QuickBooks not to use the Undeposited Funds account by unchecking the checkbox in Preferences.
With the preference changed, we can decide to deposit this payment to a bank account rather than Undeposited Funds. This means we won’t have to use a Record Deposit transaction in QuickBooks to get this into our bank balance. Once we save the payment, it’s already there.
QuickBooks Own Book of Lists
An integral part of tracking hundreds of transactions within a computer program like QuickBooks, is lists. Lists of customers, of vendors. Lists of things we sell, of accounts used for creating financial reports. And on and on.
There are similarities in managing the lists in QuickBooks. This post comes from the Lists sections of the Basic QuickBooks class we offer a few times each year.
Not all, but many lists are available on the Lists menu.
Let’s start with the Chart of Accounts, one of the most basic and important lists in QuickBooks.
Once the Chart of Accounts is chosen from the Lists menu, right-click on one of the accounts and a popup menu appears.
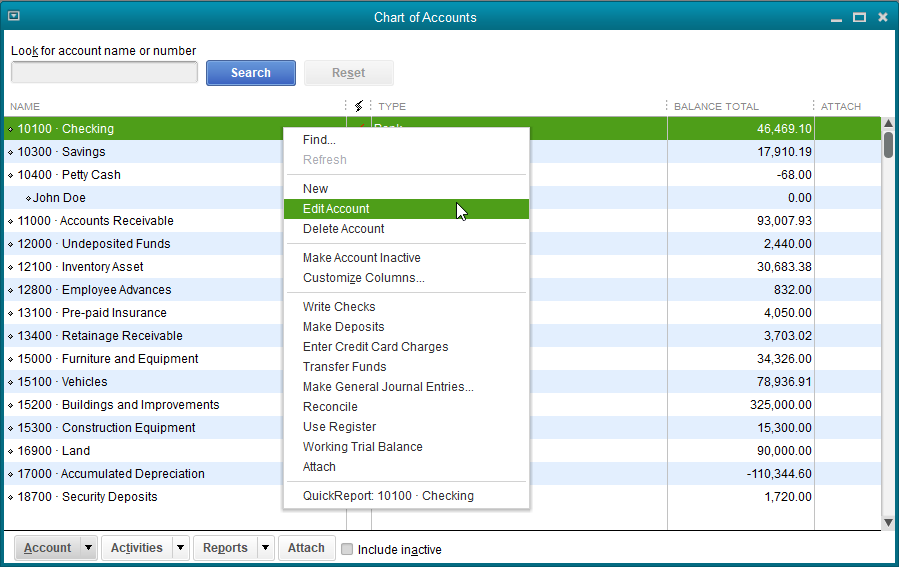
The Checking Account is selected. From the popup menu, we’ll choose Edit Account…

And change the name to Cash in Bank.
You can change account names at will and not impact any of the transactions. In other words, those transactions are all still there. The bank balance is still the same. It’s just that all past transactions now carry the new name as will future transactions.
Other lists can be edited much the same as the chart of accounts. Vendors and customers are each displayed in the Vendor Center or Customer Center. A double click on the name will open an edit window.

Much of the information in the vendor or customer names is easily entered and the procedure is pretty easy to follow. The tabs down the left side of the edit window identify different sections of data that pertain to the selected name.
One special area for vendors is Tax Settings, where information needed to create 1099s is stored. Similarly, customers also have a special tax area. In this case, it is for sales tax information that is necessary for QuickBooks to charge the correct amount of tax on an invoice.
There are two common challenges with lists in QuickBooks.
One, you no longer need a name on the list. This happens when a customer moves away, you no longer buy from a certain vendor, etc. If the name has been used in a transaction in QuickBooks (and that’s usually the case), the name can’t be deleted.
Two, you end up with duplicates. William Smith and Bill Smith as customers for instance. If there are transactions for both (and again, there usually are), you can’t delete either one of them.
Let’s make a customer inactive. We highlight the customer in the Customer Center and right click on the customer name. This brings up a popup menu where we make the appropriate selection.

The customer will no longer appear on lists in QuickBooks either in the customer center or when creating customer transactions like invoices. They should have a zero balance before you make them inactive. If they don’t, and you run a report showing customer balances, they will still be on the report since they owe you money.
You can always get these customers back if you need to.
To get rid of duplicates, we usually merge the extra name. Let’s use a vendor.
Rock Castle Construction has a vendor C.U. Electric. The owner of the vendor business is named Hughes. It seems someone was confused and created a vendor, Hughes Electric. Both vendor names in QuickBooks have transactions and both have a balance due.
The easiest way to fix this is to edit the Hughes Electric vendor to be the exact same name, including spaces and punctuation, as C.U. Electric. When we save the vendor file after editing, QuickBooks displays this warning:
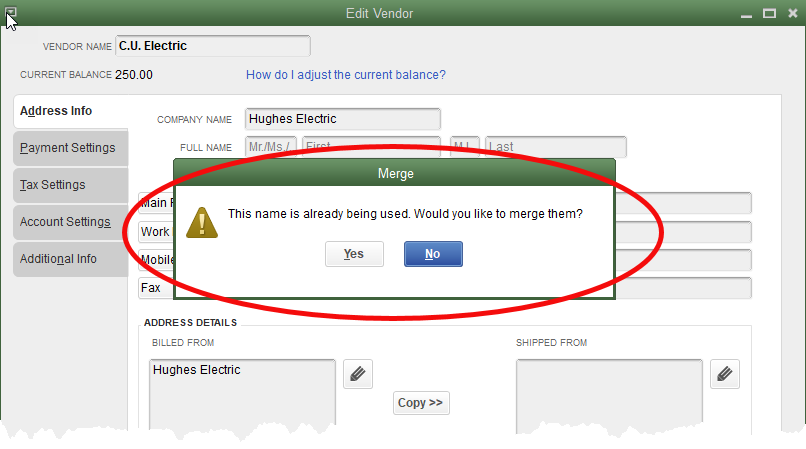
QuickBooks gives us this chance to change our mind since this is a permanent change. There’s no going back.
If you’re certain the merge is appropriate, click yes at the message and QuickBooks completes the process. All transactions in QuickBooks that used to show Hughes Electric as the vendor now show C.U. Electric.
QuickBooks Enterprise and Inventory Cost and Price Updates
A lot of the work Intuit has done in recent years to improve inventory management in QuickBooks has gone into their Enterprise software. Even without the Advanced Inventory features that are part of the highest subscription level, Enterprise has several inventory features the other versions of QuickBooks don’t have.
One of those is automatic cost and price changes.
It’s important to note a couple of things about cost information in QuickBooks. First, the value of inventory is maintained on an average cost basis. That is, if we purchase a widget at $5 and one at $10, QuickBooks tracks inventory as 2 widgets valued at $7.50 each.
The sale of one of those widgets will generate a charge to cost of goods sold of $7.50.
An item record actually has two cost fields.

The bottom circled area titled Calculated Average, is the QuickBooks generated average cost for this item. It is not an editable field.
The upper circled area is editable. You can put any number you want in that field. It affects very little. QuickBooks uses the average cost in all accounting entries.
Some of this can change with QuickBooks Enterprise. That user-entered cost field can matter very much when using the automatic cost and price updates. Let’s see how that feature works.
First, turn on the preference.

Several settings are available in the Automatic Cost & Price Updates window. The top dropdown field labeled Markup, gives the QuickBooks user two choices. Percent over cost or Amount over cost.
The middle section determines how automatic cost updates will be handled by QuickBooks. The first field is labeled “If item cost changes on a purchase.” The choices are Always update item cost, Never update item cost, or Ask about updating item cost. Selecting Always or Ask and then assuming the QuickBooks user responds positively when asked, will cause QuickBooks to update the Cost field in the item setup window.
The second field is labeled “When item cost changes.” The selections for this field are Always update sales price, Never update sales price, or Ask about updating sales price.
In the sample file is a product named Virus Vac A. The cost field is filled in with the amount 37.50. The price is set at 75.00.
If we enter a bill purchasing Virus Vac A at 30.00, the following popup appears.

The popup appears because the setting selected in preferences is “Ask about updating item cost.” Yes has been selected as the answer in the graphic, in order to show the price options. If yes is not selected, the price update options are grayed out. If you do not automatically change the cost, there is no way to automatically change the price.
So, the new cost is $30. QuickBooks will change this value in the item window when this transaction is completed. The markup on the old cost is 100%. A cost of 37.50 times 100% yields a price of 75.00.
Now, if QuickBooks updates the new cost to 30.00, in order to maintain the price markup of 100%, the price will be updated to 60.00.
Searching for Profits - Divisions and Locations

In the search to understand our business, we’re looking for ways to whittle down the mass of transactions in QuickBooks to smaller chunks we can understand and evaluate.
This post is for companies that can divide their business activity by divisions, maintenance & repair services vs. new construction, or location. To do this, we use a feature called Class.
If this might work for your business, you can turn on the feature in Preferences.

The screenshot shows where to select the option to use Classes. If you are going to make this choice, you almost certainly want the option to Prompt to assign classes as well.
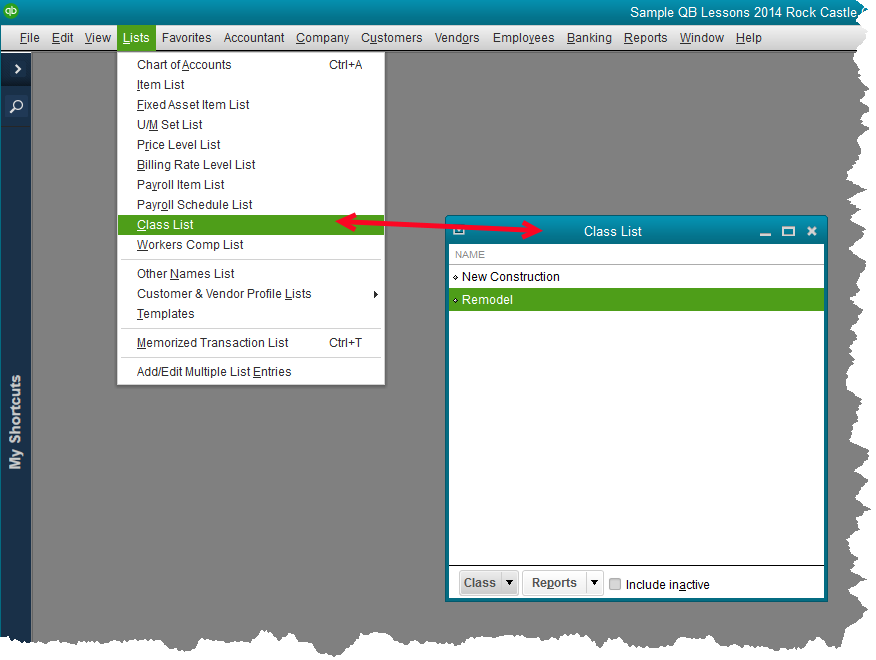
With the Preference set, you now have a new list on the Lists dropdown menu. In the QuickBooks sample file, the two classes already established are New Construction and Remodel.
Creating a new class is simple. See the screenshot below. Really, you only need a name.

You can also add a new class ‘on-the-fly’ by typing in a new name as a new transaction is entered.

The main benefit in using this feature is keeping the chart of accounts from becoming overwhelmingly large, and the ability to create reports that are far more readable than using the chart of accounts as the only set of ‘buckets’ in which to categorize income and expense.
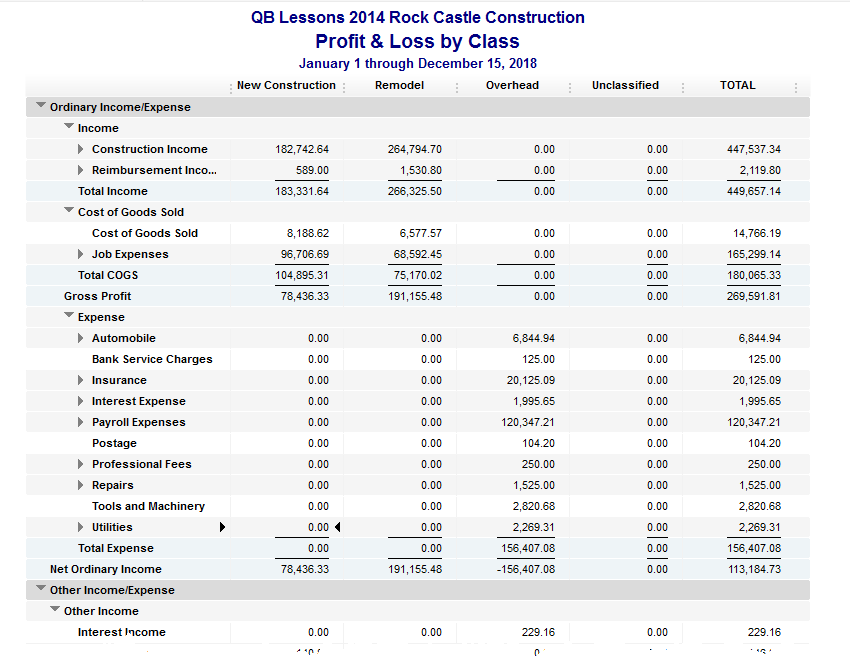
While the QuickBooks sample file gives a very limited example of how the class feature is used, it’s enough to visualize how this could benefit your organization. Instead of having expense accounts for Cost of Goods Sold, New Construction, and another expense account for Cost of Goods Sold, Remodel, there is only one Cost of Goods Sold account. Transactions posting to that account are then categorized, using the class feature, as New Construction or Remodel, and as many additional classes as you think necessary.
The reports are eminently more readable.
Some Additional Considerations
- Class should be used for only one strategy. That is, to break up business operations by location or grant. If you use class for grant, and also for location for instance, the reports fail to be very informative.
- If you opt to use class, create a class for General, or Administrative, or similar. That way, even transactions that don’t fall neatly into one of your main classes can be categorized by class. This way, when you create a Profit and Loss by Class report, and you see transactions in the Uncategorized column, you that’s an error and you can open and fix those transactions.
- Class works for income and expense accounts and creates a great profit and loss report broken down by these additional criteria. It is very complex and rarely works well with balance sheet accounts. So, it won’t help you if your organization needs separate balance sheets.
For a more visual demonstration and some more in-depth ideas on using it, see this video:
https://www.facebook.com/mgreenandcompany/videos/406010763431187/
Searching for Profits - Direct Costs

Searching for Profits
How can QuickBooks help you find areas of your business that can be more profitable? Watch this video for part one of a series reviewing how QuickBooks features and setup can find ways to improve your business.
https://www.facebook.com/mgreenandcompany/videos/470100467104686/
Customers Aren't Paying Fast Enough?

Statements and finance charges can help small businesses receive more timely payments from their customers.
There is a little setup in order to use finance charges in QuickBooks. Let’s look at that first.
Navigate to Preferences->Finance Charges->Company Preferences.
The first field asks for an annual percentage rate the finance charge computation should use. Keep in mind this is an annual rate. In the sample company, QuickBooks will compute what the annual amount should be, then divide to only charge for the appropriate period, usually one month.
What is the minimum amount QuickBooks should charge? This field should really be filled in. Otherwise, the amount could be very small, making it less than the cost of charging the fee.
A grace period is often a good idea. Where this is most useful is preventing a customer payment and a statement with a finance charge from crossing in the mail.
As an example, say the customer has terms allowing thirty days before payment is due. They pay on the thirtieth day. At the same time, finance charges are computed and statements sent by the business. The customer will receive notification they are late and have been charged a finance charge even though they paid on time.
Finance Charge Account allows the selection from the chart of accounts. Finance Charge income will post to this account. A best practice is to use an Other Income type of account.
Most QuickBooks users will charge from the due date as shown.
Rarely does anyone want to print an invoice for each finance charge created. Most companies will leave the final checkbox unchecked.
To calculate the finance charges, either the menu option on the Customer menu or the icon on the Home Page can be selected. The following window shows the Assess Finance Charges window from the sample company Rock Castle Construction.
Only one customer has overdue invoices as of 12/31/2018 (the date in the sample file).
The overdue balance is $3500. If we looked up the details of this balance, we would find an invoice that was due on 11/14/18. The amount is overdue by several weeks.
Ten percent (the amount of our annual rate) of $3500 is $350. At December 31 the invoice is forty-seven days late. The result of that calculation is a finance charge of $45.07.
Different states may have regulations controlling the amount that can be charged customers for late payments and when those can be assessed. Be sure when you set your preferences you are in compliance with these regulations in your state.
Do you charge your customers finance charges? Does it help you get paid faster?
What’s Billable And What’s Not?

A common QuickBooks question is, what’s that column on checks and bills that says Billable?

QuickBooks users unfamiliar with it either ignore it, or use it for another purpose, which purpose is being totally unaffected since it’s not what the column is for.
The Billable column ties in with tracking expenses by project or job. You cannot mark the Billable column unless a Customer:Job is selected in the Name column.
If a Customer:Job name is selected, marking the Billable column is optional.

The purpose of the column is to make time and expense entries in QuickBooks easily accessible when invoicing the customer for which the expense was incurred. This works best with those businesses that sell services or a combination of products and services to customers, then invoice that customer based on the time and expense of the project.
In the case of the above example, once we have saved the bill, we can invoice the customer and have a list of the time and expenses incurred working for them.

As you can see in the screenshot above, once the customer is selected to create an invoice, the bill for the window is available on the list. Since we used an item, Window, to purchase the product, we choose the Items tab in the Choose Billable Time Costs window.
Once the blue OK button is clicked, the item will transfer to the customer invoice. Since this is a somewhat generic item, that is, it is a non-inventory part type item used for any window we might purchase for a customer, there is no Price in QuickBooks for the item. Once on the invoice, we can edit the price to reflect the amount we want to charge.
If the item were more specific and had a price entered in QuickBooks, that price would be the default amount for the invoice, not the cost.
This is a terrific feature for those businesses selling even small individual projects to customers. Billable Time Costs can be configured to track additional items, including payroll. It can be quite sophisticated if needed. Even in its simplest form though, it can be quite a time saver.
Questions?
How to Manage Duplicate Names in QuickBooks

It happens. Baker, Chris has been a customer for a long time. But so has Christine Baker. And they’re the same person.
If you have used QuickBooks long enough, you know that if you try to delete one of those customers, QuickBooks won’t allow you to do it. At least, not if transactions have been recorded under both names.
You could go back and change the customer name on every transaction, leaving one of those duplicate entries with no activity in your QuickBooks company file. Then you could delete it. But there’s an easier way.
Above is our customer center. You can clearly see the duplicate customers. Both names have a balance due. Both have transactions.
To fix this, we first need to decide which version of the customer name we want to keep. Christine Baker? Okay, let’s do that.
Either click on the Baker, Chris name and choose the Edit icon, or right click on the name and choose Edit from the popup menu.
This is how that edit window appears now:
The very first field of this window is what QuickBooks sees as the customer name. That is Baker, Chris. Edit that to read Christine Baker. Then click okay and if you’ve spelled the new name right, you should get this warning message.
QuickBooks gives you a chance to reconsider since this is a permanent change. There’s no going back. Once you say yes to this message, QuickBooks has no way of recovering the old information.
In this case, it’s a simple change and we know we want to do it, so we’ll choose Yes. As soon as we do, our new customer list looks like this:
There is only one Chris or Christine Baker now. The two customer balances are now one. All transactions in the QuickBooks company file that used to show Baker, Chris as the customer name now show Christine Baker as the customer name.
This works with other lists as well. You can re-vamp your chart of accounts by editing and merging account names. Vendors, classes, items, etc. Just use care and think through your change before implementing it.
If there is some question about the impact on your company file, create a backup, make your change, and see how it works for you. If some surprising result pops up that makes you wish you hadn’t made the change, restore the backup and you’re back to your original company file.
It’s Time for a New QuickBooks Company File

In our last post we talked about shrinking your QuickBooks company file by using the Condense Data menu item. Today we’ll look at creating an entirely new QuickBooks file.
Usually, the creation of a new company file happens when the existing one becomes too large and performance, like looking up transactions or creating reports, is just too slow.
There are no hard limits to a QuickBooks company file, that is, you don’t need to worry that QuickBooks will stop working all of a sudden. This gives you time to plan. Once the decision is made, the best time for the new file is the beginning of a year.
A lot of information can come directly from the old file to the new. You can easily export/import list information like customers and their details from one company file to another.
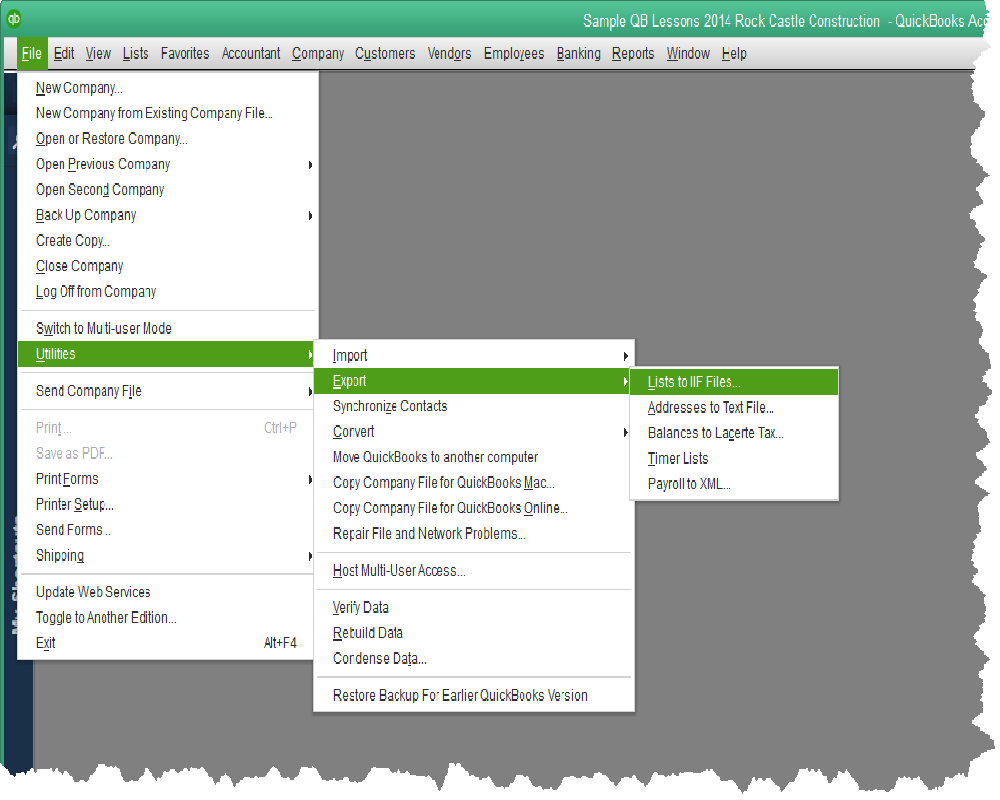
From the screenshot above, you can see the menu option to export lists. Once you make this choice, the following window opens.

You can select the lists you want to move to your new QuickBooks Company File. You can choose all of them, or only some of them. Those lists with checked boxes are the ones that we will export from our existing file and import into our new one.
Click okay in the above screen and QuickBooks will ask you for a name and a location to save the file. The export is almost instant. It takes only a second or two.
Now, open or create your new QuickBooks company file. There is an option under the File menu to create a New Company. There are a couple of different options to create a new company file, but you will be required to choose an industry type.

I like to choose Other/None as the industry type. For this type, QuickBooks will not create a suggested chart of accounts, only a couple of accounts it needs and will always create itself anyway. This way, if I’m importing my chart of accounts as one of my lists from the old company file, that’s what I’ll get. Not my accounts in addition to the suggested accounts QuickBooks created for a specific industry type.
Once you have the bare setup in the new company file, import the lists.
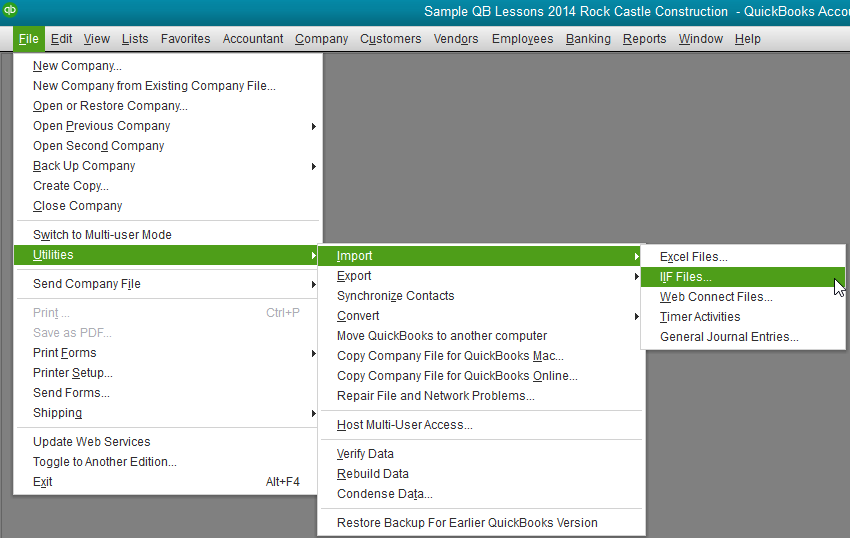
The process is very similar to exporting. You can see the menu steps in the graphic above. In the next step QuickBooks will want to know where the file you saved minutes ago is located. Navigate there, select it, and QuickBooks will import it. Just like exporting, it’s almost instantaneous.
That’s it. You have a new QuickBooks company file with no transactions, but all the same lists as you had before.
Admittedly, this is the simple part of the process. If you use accounts receivable and accounts payable, you want to enter all open invoices and bills into your new company file so you can receive payments and pay bills. If you have many of those, there are software tools that will help export/import those, so you don’t have to do all the work manually.
There are other beginning balances you will need to enter. Your bank balance, fixed assets and loan balances, for example.
If this is a solution you want to pursue and you have questions, give us a call and we can steer you in the right direction.
Is Your QuickBooks File Slow?

Let’s look at what to do when saving a transaction, or creating a report seems to take minutes instead of seconds.
Pressing the key combination CTRL-1 from within QuickBooks opens the following window.
There’s a lot of information here, but what concerns us today is the highlighted line. File size.
There’s actually 1024 kilobytes in a megabyte, but we often round that to an even thousand in order to make quick calculations. So, in this case, we could say this QuickBooks company file is about 30 MB (megabytes).
That’s a small file. It should feel pretty crisp when entering transactions or creating reports. When QuickBooks starts to feel sluggish, it’s a good idea to check this screen. If the size of the company file is 250MB to 300MB, you know the day is not far distant when you will need to do something in order to keep the file at a more usable size.
There’s nothing in QuickBooks that will prevent you from using a larger size file, but performance declines. Too large and errors are more common. You’ll find these whenever Verify Data runs as part of a QuickBooks backup. QuickBooks can almost always fix these small errors itself. Still, it’s annoying and a little scary to know damage exists fairly regularly in your company file.
There are a couple of options when your company file becomes too large. Which you choose can depend on solutions you may have used, if any, to deal with this problem in the past. Let’s start with the easiest.
Condense Data
QuickBooks has an option called Condense Data. It’s been in the program a long time, but has been improved in recent years, including a marked improvement in the 2019 version.
The screen shot above shows you how to access this option. Below is the window that will open once we select it.
What’s new in QuickBooks 2019 is the option that’s selected in the graphic, “Keep all transactions but remove audit trail info to date.”
QuickBooks has maintained an audit trail since the 2006 version. Even if deleted, a transaction’s history remains in QuickBooks. One can see what the original transaction was, what date and time it was entered, who entered it, all that same information for each time the transaction was changed and/or deleted.
That’s a lot of information. It takes a lot of space. Starting with QuickBooks 2019, one way to make the company file smaller is to remove all that detail up to a specific date selected by the user.
If you choose this option, you want to keep a copy of the existing QuickBooks company file somewhere safe. On the off-chance you would need to go back and research a particular transaction, you would have access to all the details.
Going forward, the audit trail feature still works, it’s just that the history was deleted.
The other option, “Remove transactions you select…”, is similar. It will remove all transactions before last year, as an example. The reason the new QuickBooks 2019 feature is such a great choice is that you can still have all that transaction history in your company file, but it’s faster and responds better because, without all the audit detail, the file is much smaller.
The day may come when these options are no longer sufficient. When this happens, it’s time for a new file.
There are special tools in QuickBooks to deal with that. We’ll cover that in a future post.
Reimbursing Employees for Mileage

What could go wrong? She added mileage reimbursement to her employee’s paycheck. No need to write an extra check. Why was it costing her hidden fees and why was the employee upset?
It didn’t happen exactly that way, but close. Actually, working with a client, we discovered her mileage reimbursements were being reported as wages. Subject to withholding, social security, medicare, and more. It’s actually easy to do. Here’s how to prevent that.
To reimburse an employee for mileage, I can easily add the amount to a paycheck. It’s easier and faster if done right.
The first step is to setup a payroll item. From Lists->Payroll Item List, choose the Payroll Item button, then select New.
I always choose the Custom Setup in the first window. There just isn’t enough flexibility in EZ Setup.

Once we make this selection and click Next, the following window appears.

This is an Addition, right? We are adding an amount to an employee’s paycheck.
In the next step we need to name the payroll item we’re creating. Mileage Reimbursement seems like a good name.
Following that, we’ll need to tell QuickBooks what expense account should be used when this item is added to a paycheck and QuickBooks needs to post the dollars to a specific expense account. I like to create an expense account called Mileage Reimbursement. If you like, you can make it a subaccount of Automobile Expense. See the screenshot below.

The next window is of great importance.

Tax tracking type is always the most important decision when setting up any payroll item. The selection in this window determines whether or not the amounts will be taxed, how the amounts will appear on payroll tax forms, and on W2s. It’s important.
The default when creating an Addition type item, which we are doing here, is Compensation. Compensation is taxable wages. We definitely do not want that. This is a reimbursement to an employee for miles driven for the company, it’s not taxable wages.
Change the Tax tracking type selection to None.
A few windows follow, allowing for additional information. There’s one for Taxes. I’ve never seen an instance where something needed to be changed in this window. If the tax tracking is correct, the Taxes window should already be correct without any input from us.
Our payroll item IS based on quantity, not on hours. So, make that selection. It will be based on the number of miles driven.
It is added to Net Pay, not Gross Pay.
Default rate and limit. Usually the default rate will be the current federal mileage rate. As of this writing, that’s .58 per mile.

There’s no limit, so we’ll leave that blank.
Click Finish and that’s it. Add this to an employee’s paycheck at the time of paycheck creation. Enter the number of miles and QuickBooks will do the rest.
Navigating the Warning When Restoring QuickBooks

“Are you sure you want to do this? Type Yes in the box if you do.”
That message is enough to scare anyone from completing the operation they started. We often see this when restoring a backup file over an existing file.
If we don’t replace the existing file however, we can end up with even more serious consequences. Let’s review the Restore process in QuickBooks.
Our first decision, although not presented to us as such, is what’s mentioned above. Are we creating a brand new company file on this computer, or replacing a previous version? Since it’s the more difficult procedure and generates by far a greater number of questions, we’ll assume we are replacing an older version of the company file.
So, if we’re going to restore over an existing file, where is the existing file located? There are a couple of ways QuickBooks helps us find out.
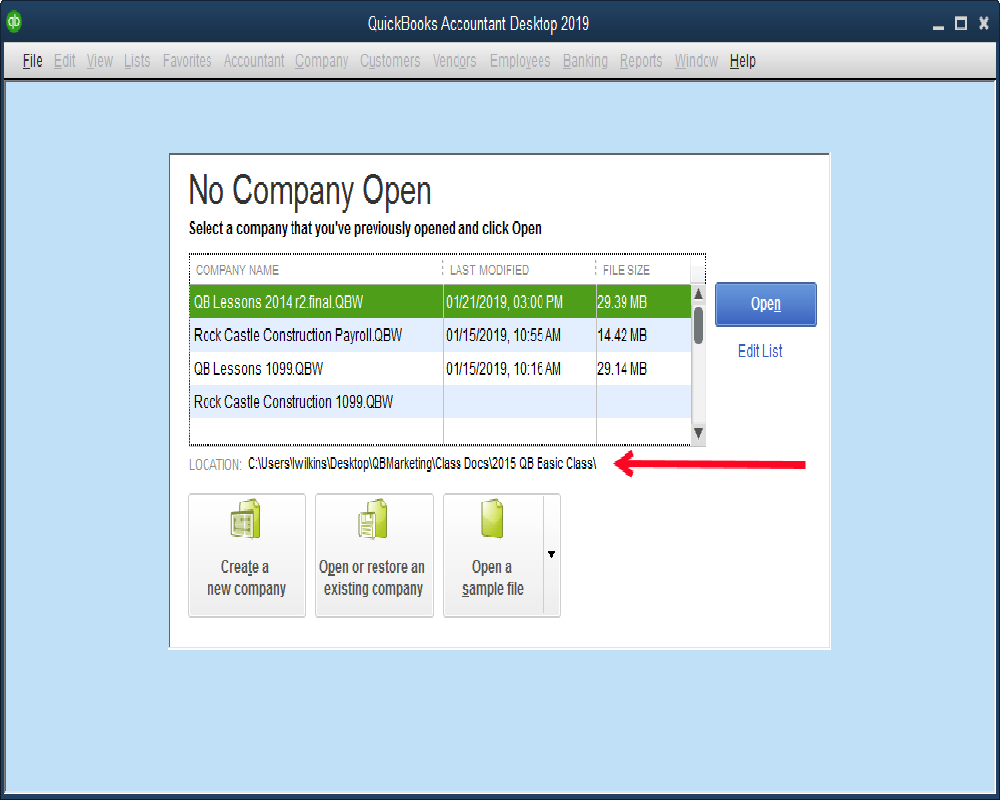
If we open QuickBooks with no company file open, the above screenshot is what we see. Note the red arrow. The company file highlighted in green is the company file we want to replace. We can see the exact location of that file on the computer by looking at the line pointed out by the red arrow.
Another way we can find this location, if we have the company file open in QuickBooks, is to use the Open Previous Company menu. The company file that is currently open, is listed first on the list.
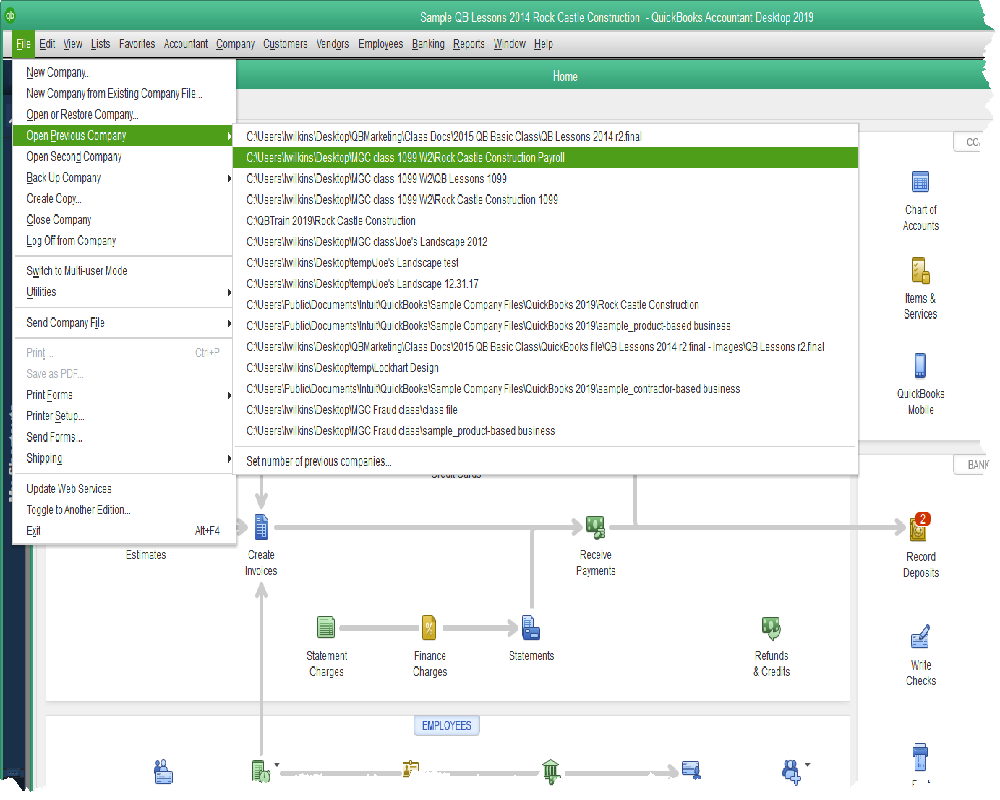
Now that we know the location of the company file we want to replace, we can begin the Restore process. Use the file options, File->Open or Restore Company->Restore a backup copy.

We’ll check a setting in the ensuing window. Yes, we are restoring a Local Backup. Well then, QuickBooks wants to know, where is the backup to be restored?

In the above screenshot, the backup file is located in a folder named QuickBooks file. If it were on a flash drive, we would click the Desktop icon in the left panel of the window and then select the drive letter for the flash drive.
Once the correct backup file is selected, QuickBooks will want to know where we want to save the restored company file. This is the step that makes some people apprehensive. That’s okay. It’s an important step that should be considered carefully.

In the above screenshot, an existing company file is selected. This file was located from the detective work we did at the beginning of this article. We found where our existing company file was on the computer and navigated there in this step of the Restore process.
By selecting the existing company file as the file name to restore, we are telling QuickBooks to write over the top of it. The original will no longer exist once we complete Restore. Only the new version as it existed in our backup will exist.
Usually we don’t want two copies of our company file. It’s too confusing. We should only use one. So, in these circumstances, despite the caution messages QuickBooks will display, it’s the right choice.
QuickBooks Invoices - Paper or Digital?

Almost anyone who creates invoices in QuickBooks knows how to print them. We’ve been doing it for years and the commands to print are straightforward and easy to follow.
What about emailing invoices? No paper. No printing. No stuffing envelopes, adding stamps, or taking to the post office. And no extra charge. Interested? Let’s look at the process.
Fist, make sure you tell QuickBooks about your email account and how you normally access email.

Outlook is an easy choice, QuickBooks integrates with the Microsoft Office program. The other options are Web Mail and QuickBooks Email. The QuickBooks choice is a subscription based add-on service. If you use a web mail account like Gmail or Yahoo, it’s easy to setup.

Simply make the Web mail choice and then tell QuickBooks your email address and the service used, like Gmail. If you use a little known email provider, the setup can be trickier. You may need to have some technical ability to manage the linkup.
The setup so far is your email address, the address that will show to the customer as the From address. Setup your customers’ email addresses in the Customer Center.
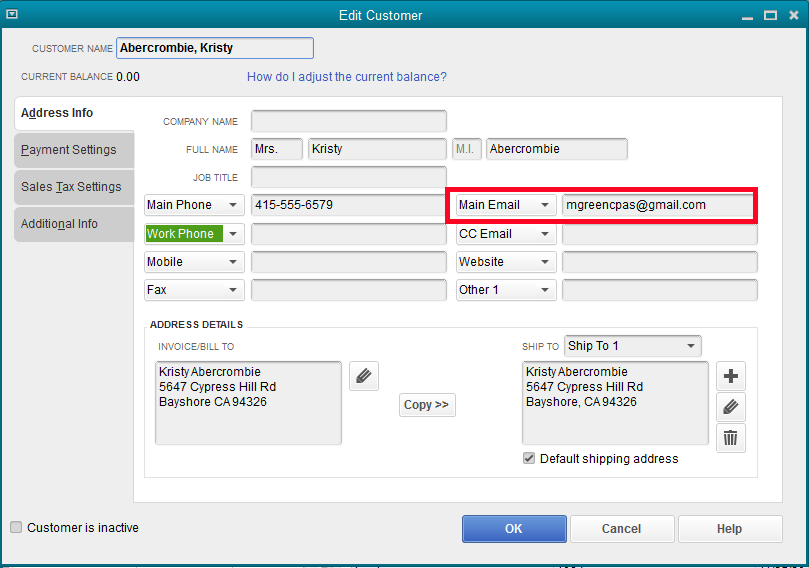
At this point, QuickBooks has the information it needs. Use the Send commands when creating an invoice rather than the print ones.

It’s possible to either email the invoice at the time of creation, or mark the Send Later box and batch Send a number of invoices at once, just like you batch print.
QuickBooks even keeps a record for you of the messages you have sent to each customer. When the question comes up, did you email that invoice, you can find the answer easily.

More and more people are turning to electronic mail for invoices right out of QuickBooks. The ease of using electronic forms rather than paper ones can be irresistible.
Check or Bill? Which Should it Be?

You need to record the expenses of your organization. You know in QuickBooks there are options. You can choose to enter a check, or you can choose to enter a bill. Which is better?
The choice is going to vary from one organization to another. Let’s look at some of the pluses and minuses of each solution.
Writing a check is simple, fast, and easy. It’s one step. The check form in QuickBooks posts the amount to the expense account you choose and subtracts it from the bank balance.

Entering a bill for an expense begins a process just a little more involved. The Bill form in QuickBooks enters the expense, but doesn’t affect the bank account. Instead, it registers the fact that you owe that particular vendor a certain amount of money to be paid in the future.

Above are the screenshots of 1), the bill, and 2), the vendor center showing the balance due the vendor for that bill.
The second step of the process is paying the bill through the Pay Bills process in QuickBooks.
So, if the Write Checks method is so much faster and easier than creating bills (using accounts payable), why would anyone want to enter bills?
There are two common reasons. One is simply a matter of convenience for some people. A bookkeeper may receive mail everyday and as that mail is processed, enter the bills that came. This allows that bookkeeper then, at some point, to create an Unpaid Bills report in QuickBooks. The business owner can look at the list and select the ones they wish to pay. The bookkeeper can then prepare those checks.
The second reason has to do with accounting and reports that enable better management of an organization. Remember, whichever is used, check or bill, the expense posts as of the transaction date.
Often, a report that shows expenses in the period in which they are incurred, no matter when they are paid, using accounts payable, or entering bills, becomes very important. Let’s say, I have a company that buys and sells widgets. I drop ship them, they are never inventory on hand. I land a large order for them, and the customer pays me up front. But, my vendor, where I buy the widgets, gives me thirty day terms.
If I use Write Checks in QuickBooks to record the expense when I pay for the widgets, I’ll have the following result. My profit and loss reports will show lots of revenue and little expense in the month I sell the widgets and little revenue but lots of expense the next month, when I pay for the widgets. It’s deceiving. Multiply that times many sales and you see the problem.
Accounts payable solves that issue. I enter the bill in the same month I create the sale. My profit and loss report shows both the income and expense of the sale in the same month, regardless of when I actually create the check for the widgets.
Better reports result in better management opportunities.
We’ve Grown! Do I Need Another QuickBooks?

So, your business or organization is growing? You need to track more than one department or location or grant?
Do you need another QuickBooks?
No, you don’t. It’s a common question, but it almost never results in purchasing another QuickBooks license. For most people then, the question comes down to: Do you need a separate QuickBooks company file?
Generally, if your new enterprise has a different tax ID number, separate asset and liability accounts like bank accounts and buildings/equipment, you may want to create a new company file. But you don’t need to buy anything to do that.
The more common scenario is an organization wants to track separate business departments or locations, or a non-profit wants to track the income/expense tied to separate grants.
QuickBooks has a feature to solve these situations.
Classes in QuickBooks
QuickBooks has a feature called Classes. If you’re going to use it, you first need to turn it on to make it available.
The screenshot shows where to select the option to use Classes. If you are going to make this choice, you almost certainly want the option to Prompt to assign classes as well.
With the Preference set, you now have a new list on the Lists dropdown menu. In the QuickBooks sample file, the two classes already established are New Construction and Remodel.
Creating a new class is simple. See the screenshot below. Really, you only need a name.
You can also add a new class ‘on-the-fly’ by typing in a new name as a new transaction is entered.
The main benefit in using this feature is keeping the chart of accounts from becoming overwhelmingly large, and the ability to create reports that are far more readable than using the chart of accounts as the only set of ‘buckets’ in which to categorize income and expense.
While the QuickBooks sample file gives a very limited example of how the class feature is used, it’s enough to visualize how this could benefit your organization. Instead of having expense accounts for Cost of Goods Sold, New Construction, and another expense account for Cost of Goods Sold, Remodel, there is only one Cost of Goods Sold account. Transactions posting to that account are then categorized, using the class feature, as New Construction or Remodel, and as many additional classes as you think necessary.
The reports are eminently more readable.
Some Additional Considerations
* Class should be used for only one strategy. That is, to break up business operations by location or grant. If you use class for grant, and also for location for instance, the reports fail to be very informative.
* If you opt to use class, create a class for General, or Administrative, or similar. That way, even transactions that don’t fall neatly into one of your main classes can be categorized by class. This way, when you create a Profit and Loss by Class report, and you see transactions in the Uncategorized column, you that’s an error and you can open and fix those transactions.
* Class works for income and expense accounts creates a great profit and loss report broken down by these additional criteria. It is very complex and rarely works well with balance sheet accounts. So, it won’t help you if your organization needs separate balance sheets.
What? W2s Aren’t Ready Yet?

For QuickBooks users, the January task of creating W2s has only gotten easier over time. Assuming we haven’t been making errors in our paychecks over the course of the year, the creation of this year-end form is not difficult.
If you are an Enhanced payroll subscriber, you will find a list of forms in the File Forms section of the Payroll Center.
You can see the circled item in the screenshot. This is the starting point for creating W2s. Don’t mistake this for the entry just below it, W2c. The “c” stands for corrected. Try to get the form right the first time as corrected payroll forms are always painful to do.
Once we click the Create Form button (not shown in the graphic), QuickBooks presents you with a small window with two selections. One, it wants to know if you want to create W2s for all employees, or just some. We’re going to choose all, but this is handy if you need to go back and create one W2 for someone.
Two, QuickBooks wants to know what year we want to create W2s for. Once we make those selections and continue, we get the following screen.
We’re not ready to print. We’ll choose the option to Review/Edit. After a page of instruction, this is the next window requiring input from us.
We’ve highlighted three selections in the above screenshot. Kind of Payer is selected as 941. This is the most common. This is the IRS payroll form you are required to file, reporting wages and federal taxes withheld from paychecks and deposited to the government.
The second most common selection here is 943. That is the 941 replacement form specifically for agricultural employers.
Kind of Employer is also the selection most businesses will make. Rock Castle is neither a government agency nor a 501c non-profit organization, so this is the correct selection for them.
Read the Special Situations section carefully. In Rock Castle’s case, they do have a retirement plan for their employees, so they must answer Yes in this section.
For the next several screens QuickBooks allows you to review the information entered on each W2. This is for review only. There shouldn’t be anything to change or enter. If there were, it probably means there was an error in payroll setup at some point during the year.
The last of those review screens is shown below. It is the W3, a summary of all the W2s that will be submitted.
Again, there should be little to add or change on this form as QuickBooks pulls the information from the payrolls that have been processed over the course of the year. Be sure there is a name in the field for Contact Person.
Once we click the Print button, the following window gives us our final selections.
One of the things we like best about the QuickBooks process is printing on plain paper. Three print runs will be required, one each for employees, a copy for the employer, and a copy to submit to SSA.
Starting at the bottom, we can print the W2s and a W3 on the plain white paper that likely is already loaded in our printer. Once that print run is complete, we can print a copy to file for ourselves. An alternative to actual printing this file copy would be to save a pdf copy. You will have that option as you proceed to print. It saves a lot of file space if we save to a folder on our computer.
The top selection is for employees. The two choices are 3 to a page or four to a page. Each of these choices prints in a different format. You are free to print multiple times, so if you’re unsure, print some and see which format you like.
This copy is an exception to the no form needed idea. While they will print fine on plain white paper, the government does require employee copies to be printed on perforated paper that will tear off into either 3-part or 4-part forms. Most office supply stores should carry this special paper.
There it is. You’ve created your own W2s and it wasn’t even hard.
Want QuickBooks to Create Your 1099s?

It’s coming. January. The start of a new year and the beginning of the filing of numerous tax forms.
W2s and 1099s are usually the first required filings we tackle. Thankfully, if we have all the information on our vendors that we should, QuickBooks can make easy work of creating 1099 forms.
First, access the 1099 wizard by navigating to Vendors->Print/E-file 1099s->1099 Wizard.

QuickBooks will open the wizard to a welcome screen. Continue to the next step and you will be presented with a list of all your vendors. Select those that qualify as a 1099 vendor. Don’t worry about how much you spent with them, QuickBooks will figure that part out.
Once you have selected those vendors that may qualify, click Continue.

This step in the process lists only those vendors that you selected in the initial vendor screen. If there is missing information for a vendor, like no tax ID number, QuickBooks will highlight the field with the missing info. The red rectangle in the graphic is QuickBooks’, it wasn’t added later to call attention to it.
Any data you enter here, like a tax ID, will update the vendor record in QuickBooks when you complete the wizard or click Save & Close.

In the next screen, QuickBooks lists the accounts used for the vendors you selected as 1099 vendors. It wants to know if there are any accounts that should not be included and what box on the 1099 should be used for each.
Basically, Rock Castle Construction, the sample company, pays independent contractors to do certain jobs. These amounts should appear in box 7 of the 1099 MISC form. Another option would be box 1. That would be for a vendor to which we paid rent, like on an office or equipment yard. Rental income is reported separate from self-employed income.
There’s a screen that enables you to view a couple of reports, then QuickBooks gives a summary of the results based on the data we’ve entered.

Searching our transactions for the past year, QuickBooks finds two vendors that need a 1099. Middlefield Drywall for $1500 and Vu Contracting for $47,425.
The very next step is to create the 1099s. QuickBooks gives two options. Sending electronically involves additional fees. Printing is free. Be sure and get the forms, either purchasing at an office supply store or free from the IRS. The free ones from the IRS are a little tougher to manage in a printer, but work well where only a few forms are needed.
Some additional points –
Credit card charges are not included in 1099 totals. This is correct by law.
Debit card payments, or any payment that goes through a third party processor (Paypal would be another example) should not be included. We often create check forms in QuickBooks for these, but by using Debit, DBT, DCard, and a number of other abbreviations in the check number field, QuickBooks will know to exclude them from the total.
Only Vendor names can be used for 1099s. Don’t create names on the Other Names List in QuickBooks. It’s a source of many errors.
Putting Out The Fire

The need for regular backups cannot be over-emphasized. Just like paper files can be lost in a fire, digital files can be lost as a result of a computer malfunction. In fact fire can do both, burn paper files and most assuredly cause computer malfunction.
Three to four times each month I still receive requests to work with a client over the phone and walk them through the steps to create a backup they can send the office. They don’t know how to do it. Does this mean they never make a backup at any other time? That’s scary.
A client had a fire a few years ago. Burned the machine shop to the ground. It was a long difficult road back even though insurance covered replacing shop building, equipment, office, etc.
What the insurance didn’t cover was any lost revenue from uncollected invoices. The invoices weren’t collected because all records had been lost in the fire. There were no copies. An estimated $20,000 to $30,000 in invoices for work that had already been done, essentially went up in flames.
That’s the part that almost closed their doors. Permanently.
Now, this same client makes backup copies. Religiously. Every day.
And they safeguard them off-site.
Let’s say they had another fire like the last one. The next morning they would buy a new computer, reinstall QuickBooks, restore the QuickBooks file and be invoicing customers within a couple of hours.
That’s why it’s important.
So, here’s how to safeguard your business against such a disaster.
First, select Create Backup from the File dropdown menu.
Accept the default selection, Local backup, in the next window.
QuickBooks will want to know where it should save your backup file. Clicking the Browse button as indicated in the above screenshot will open the smaller Browse for Folder window shown.
Select a location for the backup file. You can select one of the drives by letter. The letter designations (yours will certainly be different than this example), indicate some of your options. If you were planning to save the backup to a flash drive, your choices in the above example would be either E or F.
The next window simply asks when the file should be saved. Accept the default, Save It Now.

The final step in creating the backup confirms the location you chose earlier for saving the file. The upper arrow points to that selection. The bottom points to the file name. This is the name QuickBooks has suggested. Unless you have reason to change the name, you can accept the settings in this window by clicking on the Save button.
QuickBooks creates the backup copy.
That’s it. You’re done.
You can also view this process in a video by clicking here:
https://www.youtube.com/watch?v=XZgpruxGPAc
Using QuickBooks’ Inventory Features

Keeping track of inventory in QuickBooks generates more questions than just about any other section of the program, payroll excepted. Today, we’ll make a quick overview of using the tools QuickBooks has provided.
First, make sure the Preference to make Inventory features active is set. See the screenshot below.
Without the preference setting, you will be unable to even create an inventory type item.
The next step is to create inventory part type items for the things you want to sell.

Above is the window for creating a new inventory item. Note that the item type is set in the upper left field. If a different type of item is selected, QuickBooks will not track the quantity or value that you have on hand. You can sell as many as you want, whether you actually have the items on the shelf or not. QuickBooks won’t care.
2 This area of the setup window defines the purchase parameters for the item. In QuickBooks (as opposed to QuickBooks Enterprise), the cost field does little more than fill in a default value on forms. The real cost is the average cost which QuickBooks computes and we’ll discuss later.
The COGS Account is where QuickBooks will post the cost of reduced inventory when an item is sold. The Preferred Vendor field is optional.
3 This area holds the sales information for this item. What is the sales price? Is it taxable or not for sales tax purposes? When a sale of this item is recorded in QuickBooks, what income account should the program post to?
4 The bottom line is important. The Asset Account will be the account in which QuickBooks tracks the value of your inventory on hand. By default, QuickBooks will choose Inventory Asset for this selection. You can change that if you wish.
Reorder points can be set to aid in knowing when to re-order inventory.
Notice the numbers for On Hand and Average Cost. Nothing can be entered in these spaces. These are values QuickBooks calculates as you purchase and sell inventory.
Keeping things simple, the basic forms for purchasing inventory would be bills or checks. The part of that process that is vital is using the Items tab, not the Expense tab. See below.
In the above screenshot, Rock Castle Construction is purchasing 5 Door Frames. Because the QuickBooks user is creating the transaction with an item, and that item is setup as an inventory type item, QuickBooks will add 12 more to the on hand quantity once this bill is saved.
Selling inventory differs little from selling services or anything else. Use the correct item on the sales form you choose, and QuickBooks will take care of the rest.
As for reports, Stock Status reports and Inventory Valuation Summary are used frequently. You’ll find these in the Inventory section of the Reports menu.
How To Find Any Accounting Document... Fast

Even if we have a great filing system, things still get lost. When it comes to accounting documents though, we have a filing system right in QuickBooks that works pretty well.
All kinds of documents can be filed this way, but for our example to day, we’re going to look specifically at documents related to employees. These same procedures and capabilities apply throughout QuickBooks.
Above is a partial screenshot of the Employee Center in a QuickBooks sample file. Gregg Schneider is the employee highlighted. The empty paperclip icon on the right tells us no document is filed inside QuickBooks for Gregg. If the icon were a page with a paperclip, we would know there was at least one document attached to the employee Gregg Schneider.
The Attach column on the left of the screenshot shows which employees have attached documents. Currently there are none.
When thinking of documents we might want to save that would be specific to one employee, W4 and I9 forms are the first that come to mind. So what if we wanted to file these documents for Gregg within QuickBooks?
If we click the paperclip icon with Gregg’s name highlighted, as in the above screenshot, the following window opens:
There are several ways to get a document into the QuickBooks’ Attached Documents system. You can see these circled in the screenshot. If you select Computer, a browse window, common to most Windows programs, will open so we may navigate to the location on our computer or network where the file we want to file here exists.
If we select Scanner, we can scan the document into the system. Doc Center is simply a place in QuickBooks, Company->Documents->Doc Center, where we could import or scan in several documents at once, then distribute to various transactions or list entries in our company file.
Last, as you can see in the center of the window, a file can be dragged directly into the window.
Let’s drag a couple of documents into this window.
There they are. Now we just need to click Done.
The Employee Center window has changed. Note the icon circled on the right. It may be difficult to see in the graphic, but the icon is supposed to denote a paper document held by a paper clip. On the left, you can see the paperclip icon now shows in the Attach column next to Gregg’s name.
Some additional things to know:
A click on either icon will allow us to open the documents. They open just like any other pdf and can be printed, attached to emails, whatever we can do with a pdf file.
Other file types, like Word docs and Excel worksheets can be saved in the same way.
Documents can be attached to transactions too. Vendor invoices can be scanned in and attached to checks or bills.
The attached documents are saved in a folder QuickBooks creates named Attach in the same Windows folder as your company file.
There is no password protection on the documents if they are accessed through a Windows search.
When a backup of QuickBooks is done, the documents do NOT backup with the QuickBooks file.
QuickBooks P&L. What is Gross Profit?

If you are like most people, every time you look at a profit and loss report in QuickBooks, you probably focus on two numbers. Total Income is one. How are sales or revenue going? Above expectations? About right? Or, the worst possibility, below expectations?
The second number you are likely to examine is the bottom line. Net Profit. Are we making or losing money. If making money, how much?
The profit and loss report can tell us much more. Most of you will have a line on this report labeled Gross Profit. What is that?

As with all financial reports, the accuracy of the profit and loss report depends not only the accuracy of the transactions entered into QuickBooks, but the setup of your chart of accounts as well.
The Gross Profit line is computed by taking the total income (or revenue) for the period and subtracting the balances in all Cost of Goods Sold type of accounts. So, what are Cost of Goods Sold type of accounts?

You have to look a little to find this account type in the window QuickBooks displays for creating new accounts, but it’s there.
In QuickBooks’ design, Cost of Goods Sold type of accounts are basically direct costs. If your business bought and sold inventory, the item setup for the inventory you sell will ask for a cost of goods sold account. The amount represents the cost of product you sold for a given time period.
But, we use this same account type in other kinds of businesses as well. What are the direct costs of producing the goods or services you sell?
A machine shop would create COGS type accounts for the materials purchased to fabricate the equipment being created on the shop floor. A contractor would use COGS type accounts for materials purchased for jobs, subcontractors, etc. Any cost that can be tied directly to a certain job or project.
How is this helpful?
The use of COGS type of accounts allows small business to divide their expenses into two major categories. Direct costs of production and indirect costs, or overhead. These two types of expenses act very differently as the business ebbs and flows, another topic for another day.
Most of us want to have some idea of what it costs to produce a service or product we sell to customers. How else would we decide what to charge the customer? The Cost of Goods Sold section of the profit and loss report tells us how close we are to meeting that target.
It’s usually a real advantage to view this as a percentage. As sales go up and down, the percentage of gross profit should change little.
You can add a percentage column to your QuickBooks profit and loss report as shown below:
With the percent column added, this sample company’s profit and loss looks like this:

The gross profit (or margin) for Quality Construction so far in December is about 33%. The direct costs of the jobs they have completed then, is about 67%.
Considering Quality Construction eked out a minimal profit during this period, one consideration will be, is this a suitable margin for their business? What is the margin they aim for?
If they plan on a margin of 35% on the jobs they bid, they’ve underbid the jobs they completed in this time period. That, or some unusual event escalated costs beyond what they should have been.
If the margin is about right, then something in overhead, or indirect costs is too high for this level of sales. This possibility would require an examination of the QuickBooks Expense type of accounts and the amounts of those costs on the profit and loss report.
When the Customer Doesn’t Pay

Sometimes, despite our best efforts, we are stuck with an old invoice the customer is never going to pay. It hurts, but it’s part of business.
What do we do with those old invoices in QuickBooks? It’s tempting to just delete or void them, but that’s usually not the best solution.
Watch this video for a safer alternative.
https://www.youtube.com/channel/UCO5zEmgd6bcv3CZyfO1yt_g
Nonprofits, QuickBooks, and Fund Balances

A frequent hurdle for small nonprofits using QuickBooks is fund balance. When a small nonprofit is trying to track balances for several funds and use QuickBooks for accounting, all while maintaining only one bank account, how can it be done?
Watch this video and find the answers:
https://youtu.be/BtIrRS8bhuU
Use this link to access the channel with several QuickBooks videos:
https://www.youtube.com/channel/UCO5zEmgd6bcv3CZyfO1yt_g?sub_confirmation=1
QuickBooks 2019 is Coming Soon. What’s New?
Invoice Status Tracker
There’s a new link on the invoice form. When selected, it opens the small box shown in the screenshot above. Inside this box is a history of related events and transactions connected to this invoice.
In this case, you can see when the invoice was paid and when that payment was deposited. When using QuickBooks to email invoices, additional information is available, like when the email was sent. In some cases, even when it was viewed by the recipient.
Transfer Credits
![]()
This is an improvement we have requested for several years. For someone that creates multiple jobs or projects for their customers, it has always been frustrating that a credit on one job could not be used on an invoice for another job. Now it can.
You can see in the screenshot the wording QuickBooks 2019 uses, “Across All Jobs” as the description for the credits shown in the Receive Payments window. In this particular case, the invoices are all for Brian Cook’s Kitchen job while the credit is for Brian Cook’s 2nd Story Addition.
The credit can only be transferred from one job to another. Both jobs or projects must belong to the same customer.
Check to Pay Bills

In an effort to prevent QuickBooks users from using improper procedures, QuickBooks has long had a warning that would display when you attempted to write a check to a vendor that had open bills. The button selections have changed in 2019 to more strongly emphasize the correct steps when using the Bill feature.
The selection, Go to Pay Bills, will now take you to the Pay Bills screen with open bills filtered to show only those for the vendor selected when you began writing the check.
Inactive Items in Inventory Reports

This is another very smart improvement. We frequently compare the value of inventory on the balance sheet to that shown on inventory reports. One reason those numbers might not agree was items that had been inactivated while still having a quantity on hand.
Finding inactive inventory items with a remaining quantity could be a tedious exercise. This should make it much easier.
IIF Imports

I borrowed this graphic straight from QuickBooks, hopefully they won’t mind. This feature enhancement won’t be noticeable to many QuickBooks users. Nevertheless, it is a significant improvement.
IIF is a file type unique to QuickBooks. It allows simple imports and exports with very little error checking. Now, there is more data review by the system when these kinds of imports are done. This should result in fewer corrupt QuickBooks files resulting from errors in the import process.
QuickBooks File Management

We’ve had the ability to “condense” QuickBooks files for a while. It’s a function that has worked with varying degrees of efficiency over the years.
New with QuickBooks 2019, you can use Condense to just remove the audit trail from your QuickBooks file. It leaves all the transactions, all the history, all the lists. An archive backup copy is saved in case you ever need to go back and look for something in the audit trail.
The audit trail still works going forward, just all the history is removed. Many will see file sizes decrease 30%, 40% and more.
Oh. And it looks like QuickBooks for Mac is back. That will make some of you very happy. :)
We Got Paid!

Receiving payments and recording deposits in QuickBooks Desktop
The process of receiving customer payments and recording bank deposits in QuickBooks may seem pretty straightforward, but there are a few lesser known situations we’ll cover in today’s post. The process of receiving customer payments and recording bank deposits in QuickBooks may seem pretty straightforward, but there are a few lesser known situations we’ll cover in today’s post.
Posting payments to customers and jobs
When tracking jobs or projects in QuickBooks we are used to specifying not only the applicable customer in job expenses, but the particular project as well. As we have covered before, the jobs show in the Customer Center as indented entries. So, in the above screenshot, Kristy Abercrombie has three jobs in Rock Castle Construction. Family Room, Kitchen, and Bathroom Remodel.
Normally, when receiving a payment from a customer, we would receive it as a transaction specific to the project it was for. What about when a customer sends a payment that covers more than one project?
By using the customer name, not any of the individual projects (see arrow), QuickBooks will populate the Receive Payments window with all open invoices for that customer, not just the ones from a certain job. At this point, you have the option to apply the payment in any way you want regardless of project or job.
Giving customers discounts for speedy payment
Sometimes, offering a discount for early payment is a strategy you may want to use. That starts by setting the terms in the customer file and making sure the correct terms are entered on the invoice when it is created and saved.
If the customer pays within the discount period, how do you give the discount?
In this example, we’ve given Kristy a 2% discount if she will pay her invoice within 10 days. Those terms in QuickBooks would look like this: 2% 10 Net 30.

Kristy pays $1372.00 on a $1400.00 invoice. Clicking on the Discounts and Credits button opens the Discounts and Credits window seen in the lower right part of the screenshot.
QuickBooks knows the terms that are on the invoice. It does the math, both date and amount, and fills in all the pertinent information seen in the Discounts and Credits window. Two percent of $1400 is $28. If you think the amount should be slightly different, or if the customer rounded slightly differently to come up with a different amount, you can specify in this screen what the amount should be.
The Discount Account is specified by you, the QuickBooks user. Once you select the account for one discount, QuickBooks will continue to suggest that same account on future discounts. In this case, Rock Castle has a special account setup just for discount amounts.
What if the customer has a credit?
Sometimes, a customer can have a credit that needs to be applied to a current invoice. This could be the result of an overpayment from the past, or a credit memo, or other similar event.
In the above screenshot, the same button, Discounts and Credits, was selected to use the customer’s credit on this invoice. This time, we are looking at the Credits side of that window.
The customer had a $1000 credit, probably from a down payment before work started, in the system. They make a $400 payment on the $1400 invoice. Now, when we accept the payment and apply the existing credit, the invoice will be paid in full.
Speaking of advance payments…
While there are different ways to account for prepayments from customers, following is by far the easiest and most common method used.

If you look close, you can see the gray text in the screenshot that reads, “There are no unpaid invoices for this customer”.
That’s okay. We can still save the payment. Just be sure the selection in the lower left (see arrow) is Leave the credit to be used later.
When receiving payment on an actual invoice, you would use the payment and the credit created by this payment transaction to pay the invoice just as we did in the last section when we had the $1000 credit.
How many payments will you deposit?
By default, QuickBooks posts payments to an account called Undeposited Funds. This allows QuickBooks to accumulate the payments you record on one list. Then, when creating the deposit, you select multiple payments to create a bank deposit in QuickBooks that will match the amount of the same deposit that appears on your bank statement. It makes reconciliation much easier.
Sometimes, a QuickBooks user only receives a few payments a month and they all go directly to the bank. There’s really no need for Undeposited Funds. It only adds another step.
By unchecking the box with the label ‘Use Undeposited Funds as a default deposit to account’, you can change this behavior.
Now, with the preference changed, we can decide to deposit this payment to a bank account rather than Undeposited Funds. This means we won’t have to use a Record Deposit transaction in QuickBooks to get this into our bank balance. Once we save the payment, it’s already there.
You Create the Customer Invoice. No, You Do It

Use QuickBooks’ Tools to Make Invoicing Easy
In a previous post, we reviewed QuickBooks’ ability to create a simple project budget based on the Estimate form. In this post we’ll focus on some additional tools in QuickBooks that can make invoicing customers easier.
Creating an estimate in QuickBooks is an optional step. An invoice can be created without having used the estimate form at all. If an open estimate exists for a certain Customer:Job, when you begin an invoice for that Customer:Job, QuickBooks will ask if you want to use the estimate as a basis to begin the invoice.
You can see the estimate listed in the popup window in the screenshot above. If more than one estimate had been created for the job/project, all the open estimates would appear here and you would be able to select which one you were using as the basis for your invoice.
Select the estimate (if there are more than one), and click OK. What happens next depends on your Preference settings.
If this is turned on in Preferences (Edit->Preferences->Jobs & Estimates->Company Preferences->Do you do progress invoicing?), once you select the estimate to use for the invoice, the following message appears.
At this point, there are more options to choose from. QuickBooks allows you to create several invoices from one estimate. So your agreement with your customer may be to invoice at certain points of the project’s completion. QuickBooks will help you keep track of that process.
Let’s review the choices. One is to create the invoice for 100% of the estimate. That’s easy and does not involve the progress invoicing ability at all.
Two, is to create an invoice for a specific percentage of the job. 25%. 50%, whatever you choose. Each line of the estimate is invoiced for that percentage.
Third, is to specifically select the items from the estimate that will be invoiced. Let’s look at that option.
Above is the table QuickBooks opens when choosing the third option described. The arrow points to the column where you would select those items to be included on the current invoice. In the example, a bathroom remodel is being done. The customer is to be invoiced for tearing out the old fixtures, new framing, and the electrical work.
Note the circled column headers. If we had created an invoice for this project before, the amounts previously invoiced would show here and would not be available to invoice again.
With the items presently selected, this will be a $1715.00 invoice.
More possibilities for invoices in QuickBooks
A feature in QuickBooks often used by companies in service-based enterprises is the ability to track time and expenses and then easily invoice those to a customer without a lot of additional manual entry. Let’s see how that works.
The most important part of the above check is the Customer:Job entered and the checkbox Billable with the checkmark in it. Additionally, the fact an item was used rather than Expense helps with some job reports, but that’s another topic for another day.
Before we invoice our customer, let’s add some time to the job.
Again, the most important part about this process is that a Customer:Job name is included and the Billable box is checked.
Now, let’s invoice the customer.
As soon as we enter a Customer:Job with outstanding billable time/costs, QuickBooks asks us if we want to invoice those items now. In this case we do.
We have both time and an item to add to the invoice. These are the entries we made with the check and the timesheet. There are more options for those that use this feature. For now, we’ll select both entries and click the OK button (not shown) at the bottom of the window.
Here is the resulting invoice.
The billable items are added to the invoice. Labor is invoiced at $55 per hour because that is the sales price in the item setup. The amount for the irrigation supplies carried to the invoice at cost since there is no sales price setup for this item. In a case like this, the markup would have to be determined and the invoice amount edited to reflect that.
Two more quick invoice tools useful to service providers
Invoicing for a service provided on regular schedule, say monthly or weekly, is common. It is possible to Memorize an invoice. This memorization would include the customer name, so a memorized invoice transaction would have to be created for each customer on a repeated schedule like this.
Create the invoice as normal. Click the Memorize icon just to the right of the big Delete X icon. Choose how often you want the invoice repeated. Weekly, monthly, etc.
QuickBooks will remind you the first time you open QuickBooks on or after the date the memorized transaction should be entered. You have the opportunity to accept or reject the entry of the invoice at that point.
The other invoice tool we want to include today is Batch Invoicing. This is accessed from the Customer dropdown menu, Create Batch Invoices. This tool allows you to create a ‘batch’ of customers that should each receive basically the same invoice. You will be invoicing the same item and the same price for each customer. QuickBooks will create an individual invoice for each customer.
If there is a difference from one customer to another in, say, sales tax, or delivery method (email or printed), QuickBooks will pick up that information from the customer file and customize the invoice for that particular customer.
QuickBooks has some really great features that simplify the job of tracking project expenses and invoicing customers.
Project Planning in QBO

Both the purpose and entry of estimates in QBO are significantly different than QuickBooks desktop. The estimate form still fills some of the common purposes of this type of transaction, but the unique job costing capabilities that have been built into the estimate for desktop are not present in QBO.
If your need for estimates centers on the idea of creating a quote or bid or similar function, QBO fills those functions. As of June 2018, it will also allow the creation of multiple invoices from one estimate.
The estimate form can be accessed in QBO in more than one way. It will be available on the quick create menu (the ‘plus’ sign). It can also be started from the customer list as shown below.

The form is simple to fill out with items from the products and services list.

Once complete, estimates can be printed or emailed to the customer. Like invoices and other forms in QBO, they can be customized to have a look and feel unique to your company. Often QBO users want a different title like Bid or Quote, rather than the default Estimate. This can be accomplished in form customization.
Rather than entering the same data twice, estimates in QBO (like desktop) will convert into invoices. There is a setting for this.
Click on the gear icon and select Account and Settings. In the Advanced group, be sure the setting “Copy estimates to invoices” is set to on.

What QBO won’t do with estimates compared to QuickBooks desktop:
You cannot add a cost and a markup for each line item in QBO. As a result, QBO cannot generate the job/project reports that compare estimated costs to actual costs like QuickBooks desktop can.
The recent feature addition to create multiple invoices from one estimate requires a setting in Accounts and Settings in order to function.

Once the setting has been selected, open an estimate and you will see the button, Create Invoice, near the total estimate amount. Selecting the Create Invoice button opens a small window with several options as shown below.

As you can see, you have three selections; invoice the entire estimate total, invoice a certain percentage of the entire estimate, or select a specific amount of each line on the estimate to invoice. These choices are the same as in QuickBooks desktop.

In the above graphic, we selected the third option, a custom amount for each line. If you look over the screenshot above, you see that Rock Castle is invoicing for all the outdoor lighting fixtures and half the labor.
At some future point, the company will finish the job and come back to this estimate to invoice the remaining amounts for sod and the rest of the labor.
Where Was The Budget on That Project?

Part 3 of using QuickBooks with companies that sell services
Estimates in QuickBooks do far more than just tell a customer how much a certain repair job will cost. They create project budgets.
Estimates are non-posting. You can create as many as you like and the accounting numbers are unaffected. They can also be edited and deleted/voided without concern for financial reports.
First, be sure the use of estimates is enabled in your QuickBooks company file.
In the screenshot, you can see the setting to activate estimates. A companion setting is progress invoicing. If your company sometimes invoices more than once for a single job or project, you will want to select both of these settings.
The estimate serves as a simple project budget. That’s why it’s so important to companies tracking costs and revenues by project.
The pieces of the project that need to be tracked are done by using service type items for each piece. Be sure each of those items is setup as a two-sided item, utilizing both a purchase and a sales side to the item.
We examined two-sided items a couple of posts ago.
Remember to use an income type of account for the Income Account field, and a COGS or expense type of account for the Expense Account field. For job expenses, a COGS type account is usually the best choice.
The example estimate in the above screenshot is from one of the QuickBooks sample files. The items are two-sided as discussed. Cost as well as revenue for each item are included in the appropriate columns.
Actual income (invoice) and expense (bills & checks) are recorded in QuickBooks using items and coding to this specific job. One result is a detailed report of the ongoing performance of the project.
The following report is found in the Jobs, Time, & Mileage section of the Reports menu.
The actual amounts for cost and revenue come from actual transactions recorded in QuickBooks. The estimated numbers all come from the Estimate form created.
Profitable Projects in QuickBooks Online

While the appearance of the “item list” in QuickBooks Online is very different from QuickBooks desktop, the functionality is quite similar. Items are often referred to as Products and Services in QBO.
Here is a screenshot of the Products and Services list in the QBO sample file:

Looks different. But, if you notice the Type column, you’ll find some of the same terminology. For instance, what shows in the graphic are Service type items. There are also Non-Inventory type and Inventory type items. And the functions are basically the same. Inventory items track quantity and cost on hand. Non-Inventory type items do not.
Let’s look at the setup window for a new item.

Again, while the appearance of the setup window for a new item, or product and service, is different from desktop, the functionality is there, plus a couple of extras.
Note that in the upper right part of the window you can add a picture to your item. This is particularly useful when selling products and a double-check that the right part has been selected is needed.
The top arrow in the screenshot points to the field Category. This is unique to QBO. You can group together your items on the product and service list into categories to make them easier to find.
Sales information fields are pretty much the same as desktop. There’s also the ability to mark the item as taxable or not and the ability to add an expense account to use this item in expense transactions like bills and checks, as well as the more common usage on invoices and sales receipts for sales to customers.
Just like desktop, you can create expenses and post them to a particular customer or project (job).

The screenshot above shows a bill for some sprinkler system components that are purchased from Hicks Hardware and charged to the Side Lot landscape install project for Amy’s Bird Sanctuary.
Job cost reporting is not as strong in QBO as in desktop. But if your needs are relatively simple as far as tracking job or project costs, QBO can handle that. In the example above, an expense account is used to post the expense rather than an item. If you read the post on tracking job/project expenses in desktop, you may remember that the use of items in this type of transaction was very important. In QBO, not so much, although that is also a symptom of weaker job reporting in QBO.
Expenses recorded to a project and marked as billable are available for invoicing to that customer or project.

When an invoice is started for a customer or project that has billable time or expenses in the system, the right-hand panel you see in the screenshot above opens. Simply select the items you want on this invoice and click the add link circled in the graphic.
Simple.
One last reminder. For more complex job costing requirements, QBO alone is probably not a good solution. There are third party programs that will integrate with QBO making it a much stronger solution in these instances.
For simple tracking of time and expenses for something like a repair service, QBO probably has the features you need.
So. Do You Sell at a Profit? Are You Sure?

Part two of using QuickBooks in a company that sells services
Items are necessary for selling to customers. We can’t create a sales receipt or an invoice without them.
In their most basic form of setup, items contain a description for the sales document, the price, taxable status, and for accounting, an income account to tell QuickBooks where to post the revenue.
Items can also be used in expense transactions. Inventory is a good example. In an inventory situation QuickBooks must record cost as well as sales information in order for the inventory system to work. Accordingly, an expense type of account is part of the required item setup for inventory.
There are other times when both expense and income needs to be tracked by item even though the QuickBooks user is not tracking inventory. In these cases a service type item is usually created.
An example of this kind of setup would be a company selling services and the user wants to track activity by job or project. Besides contractors, examples of companies using this sort of technique would include architectural firms, engineering firms, and the like.
In these cases, the QuickBooks user must instruct the software to track both sides of transactions by item.
For our example, we will use the sample company Rock Castle Construction, a company specializing in remodeling projects. Above is a screenshot showing the edit window of a two-sided item. Note the checkbox in the center-left of the window.
“This service is used in assemblies or is performed by a subcontractor or partner.” This explanation can confuse some QuickBooks users, but basically the setting means there will be both a purchase side and an income side to the item setup.
You can see the lines drawn underneath the labels, purchase information and sales information. Then, even lower in the window, the circled areas denoting the appropriate accounts for each type of transaction.
With this setup, QuickBooks will know which account to use depending upon the type of form selected for a transaction. Checks and bills will cause it to use the expense account, invoices and sales receipts will post to the income account.
The reason for this setup is to allow the comparison of income and expense for a certain item. Let’s create an expense and income for a particular job, Kristy Abercrombie’s Kitchen. We’ll create an expense and then invoice the customer for the electrical work.
A bill is created using the Items tab (as shown) rather than the Expenses tab. As you can see, the Electrical item shown earlier in this article has been used to create an expense for this project in the amount of $588.75.
Let’s invoice Kristy $750.00 for the work done by C.U. Electric.
Above is an invoice for the Kristy Abercrombie Kitchen project using the same item, Electrical, that was used in the bill for C.U. Electric.
Now, let’s look at a report that will compare our expense and income for this project.
The highlighted line shows how the Job Profitability Detail report compares the revenue and the cost for one particular item for one particular project or job.
This is only possible with the use of two-sided items. Using the Expenses tab in transactions will prevent this comparison in this report. Fail to use jobs/projects in either expense transactions or invoices and this report will not work.
Used properly, two-sided transactions, in companies that sell by jobs or projects, can yield valuable information greatly affecting the company’s profitability.
How QBO Can Help You Manage and Retain Customers
This is our QuickBooks Online side of exploring the features we would use for a service-based business using QuickBooks. Last post was the desktop version.
Practically speaking, there’s little difference in the information entered, or the process of getting it into place. When people new to QBO are surprised, it’s usually because the screens appear so different.

Above is a screenshot of the new customer screen in QBO. You can see our customer, 7th Branch Outdoor Sports entered on the Company line. This screen is mostly contact information and is easily understood.
The red circle drawn around the word Address shows that we are on the Address tab. In desktop we had tabs. They ran vertically up the left side of the screen. In QBO we also have tabs. They run horizontally starting with Address as shown.
There is a tab for Notes we would like to keep for this customer. There is also a tab for Tax info. Let’s see that in more detail.

Above you can see the New Customer window with the Tax info tab selected. Like desktop, this is where we would enter the sales tax information for this customer. In desktop we specify a sales tax item and a sales tax code. The sales tax code in desktop determines whether a customer is taxable or not and the item tells QuickBooks desktop the rate to use.
In QBO, a checkbox determines if the customer is taxable or not. The rate assigned is called the Tax Code.

Above is the Payment and billing tab. We specify the payment terms we are granting this customer. These will populate invoices by default. Preferred delivery method is helpful. It also will populate any new invoices for this customer by default. It specifies whether this invoice should be sent (emailed) or printed.

By the time this is published, the new QBO feature called Projects should be available. Projects will be a menu selection in the left-hand panel. See the graphic above.
Projects will replicate some of the features available for jobs or projects in QuickBooks desktop. These features help the business owner to track the profitability of large projects.
To create a new project, click the green button in the upper right part of the window as shown.

The setup process is simple. Give the project a name and assign it to a customer.
When creating invoices and expense transactions, use the project name where you would normally put the customer name. This will allow QBO to pull those transactions into a single report to show the profit and/or loss on that particular project.
How QuickBooks Can Help You Manage and Retain Customers
This is the start of a series of posts in which we look at the features in QuickBooks that would be used in a business that sells services to its customers. It may sell materials as well, but the significant portion of its business is to provide a service to the public.
These are industries that QuickBooks serves well. The software, both the desktop version and the online, is rich with features to aid business-owners that fall into this category.
We will alternate the posts. As QuickBooks Online (QBO) continues to grow in popularity in some circles, it’s important we cover the features of both.
This post examines specifically the desktop version. We’ll start at the beginning and look at customer setup and the specifics that can help you keep tabs on your service-based company.
Start with the Customer Center, Customers->Customer Center. When looking for a particular transaction, people often ask where they should go to find it. If it is a customer transaction, this is usually the best place to start.
Customer Center
The Customer Center shows our list of customers on the left, along with each customer’s balance due (1). The upper right portion of the screen gives contact information. The lower right part of the screen may be the most helpful.
Arrow 2 points to the tabs identifying different information that can be kept in QuickBooks for each customer. The Transactions tab is the most common and is the one shown here. You can also keep information for multiple contacts for individual customers (Contacts). If you use the To Do list in QuickBooks, you can create custom ‘To Do’s’ for an individual customer.
Multiple notes can be saved, again individual to each customer, on the Notes tab. Lastly, The Emails tab will maintain a record of the invoices and other forms you send to the customer by email. This is a great resource as you will have a record of these contacts listed within QuickBooks.
Notation 3 is there to point out that, in the transaction part of the window, you can filter and sort in various ways to help you find past dealings with this customer.
A Complete Customer Setup
There’s more to setting up a customer in QuickBooks. While most of the following is optional, some of these settings will be very helpful.
There are several tabs along the left edge of the customer setup window. Let’s take a brief look at them.
The first is the Address Info tab. Most of this window is self-explanatory. One capability often overlooked here is that the fields with the down-arrow symbol in the label can serve multiple uses. Click on the down arrow and the label can be changed from say CC Email, to another web site, or phone number, etc. And the label will match the data you put in the field. It’s very customizable in this regard.
Also, you can store multiple ship addresses for customers. This may not be used much in a service-based company, but it’s good to know it’s there.
The three most useful items on the Payment Settings tab, in my opinion, are the three marked in the screenshot above. Setting the payments terms here means they will populate every invoice without being specifically selected, no matter who is entering the data. The preferred send method will also fill in a new invoice with the appropriate data without anyone remembering and making the selection manually.
The credit limit is a nice feature. Once the customer reaches the limit, you can still create an additional charge for them, but QuickBooks will give a warning the you have to answer, making the specific decision that, yes, you want to allow the customer to go over the limit.
Be careful keeping customer credit card information. Use independent logins and good security. You don’t want to be responsible for losing critical information like this and having to admit it to your customers.
Even service companies often sell items along with the services they perform. Often these items are subject to sales tax. Since it is common for service companies to be performing work at customer locations, different sales tax rates based on location are the rule. Here is where that setting is established so no one has to decide which sales tax item should be used when an invoice is created.
What about multiple projects for one customer?
There is one last attribute in the process of managing customers we need to cover. While many service-based companies will have no need to track the income and expense of a particular job or project independent of other jobs/projects, some will.
If your projects are large enough to track independent of other jobs, this feature will help you do that. In QuickBooks we can setup multiple jobs or projects for one customer. This allows reports to be created specific to a job or project, allowing the profitability of that one job to be analyzed.
To set up a job or project for a customer, choose Add Job from the New Customer & Job menu in the Customer Center.
In the window that opens, the only required field is a name for the job or project. Often QuickBooks users will use the address of the job. Other information like start and completion dates and various labels such as Pending or In Progress can be attached to the job as well.
When complete, the job will be indented underneath the customer name.
How Non-Profits Can Create Year-End Donor Letters in QuickBooks

A question frequently asked by small non-profits using QuickBooks is; how do we create the letter donors will use to deduct their contributions on their tax returns?
There really has never been a way to do this in QuickBooks. As a result, the letter requirement has become a real chore.
The purpose of this blog post is to introduce you to a way to accomplish the creation of these letters using QuickBooks and QuickBooks’ ability to integrate with Excel and Word. It’s a multi-step process, complicated to describe in a blog post, so we’re showing it in a video.
If it seems complicated to you, run through it again. It’s not really complicated, but utilizes a couple of QuickBooks tools that may be new to some. The link to the video is here:
Easy Customer Refunds in QuickBooks
For many businesses, customer refunds are a fact of life. Defective products, services that didn’t work, or just to pacify an unhappy customer, occasionally a refund will need to be processed.
As common as this situation is, it is surprising how few QuickBooks users are familiar with the process.
Refunds are created using credit memos. Customer -> Create Credit Memos/Refunds.
In this example, Rock Castle Construction refunds their customer, Kristy Abercrombie, for two hours of labor that resulted from the breakdown of their air compressor.
When saving the credit memo, QuickBooks uses a popup screen to ask the following question.

Selecting “Retain as available credit”, keeps the credit memo as a credit in the customer’s balance. “Apply to invoice”, allows the QuickBooks user to apply the credit against an unpaid invoice for this customer.
In this instance, let’s say the customer had already paid the invoice and we wanted to give them an actual refund check. We would select the middle option, “Give a refund”.

Once the refund option is chosen, QuickBooks displays the above screenshot with all the information filled in. You can change it if necessary.
Usually, you can select OK with the data QuickBooks has used. The refund check is created, ready to be printed.
Have you ever used this feature?
How to Reward Customers Who Pay on Time
We’ve been looking at ways to discount for customers the last couple of blog posts. Today we want to examine how QuickBooks will help you reward customers who pay early.
“Terms” refers to the terms for invoice payments you offer to customers. The most common terms used in business are already setup in QuickBooks, only a few QuickBooks users ever need to setup their own terms.
These terms set the due date of invoices we create. Some include a discount offered to the customer in exchange for quick payment. An example would be 2% 10 Net 30. The customer may take a discount of 2% if the invoice is paid within ten days. Otherwise, the amount is due within thirty days.
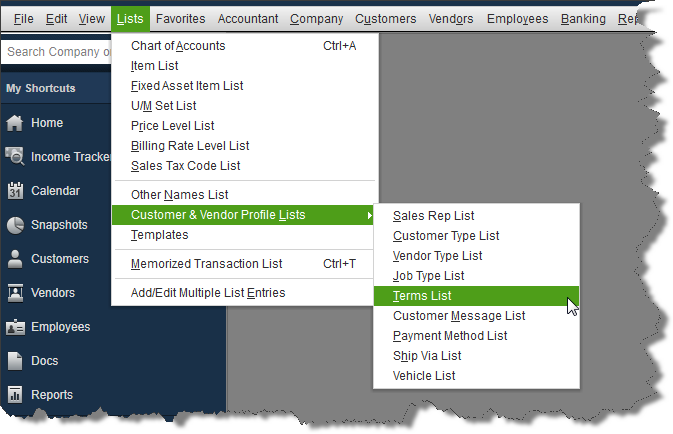
The list of available terms can be a little hard to find the first time. Look in Lists->Customer & Vendor Profile Lists->Terms list.
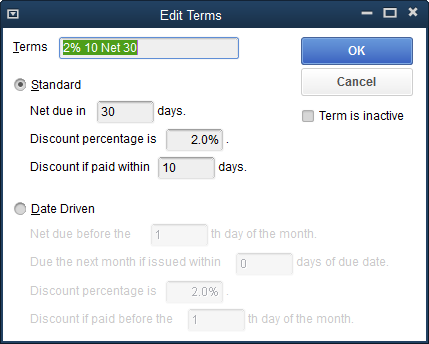
Granting the discount, when the customer pays, is part of the Receive Payment process.
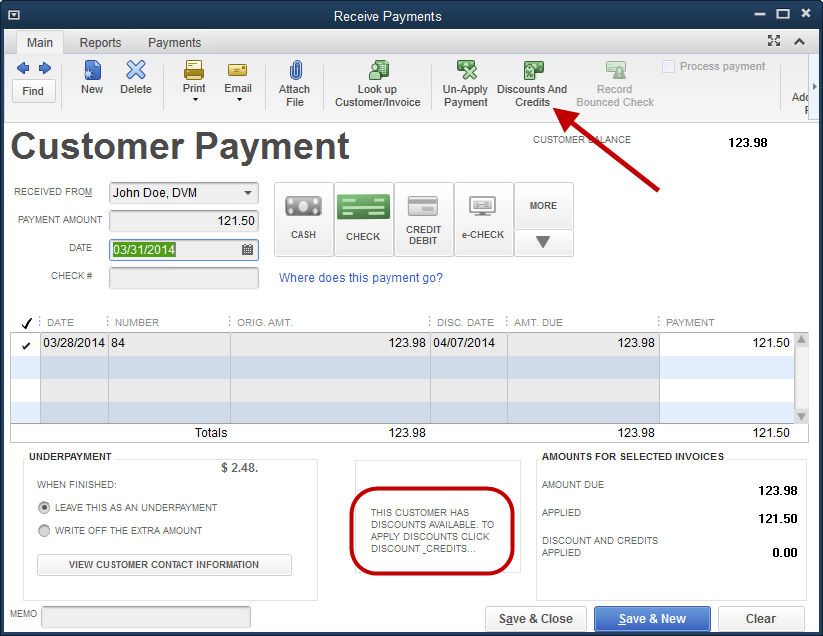
The circled message at the bottom of the Receive Payment window informs the QuickBooks user that the customer merits a discount. In this case, the customer paid the discounted amount.
To grant the discount, first select the invoice being paid in the list of open invoices shown in the Receive Payments window. Click the Discounts And Credits icon on the ribbon.
The ribbon, as shown in this screenshot, is the view that users of QuickBooks 2013 and 2014 will see. Earlier versions of QuickBooks will have a Discounts and Credits button, but it will be in the lower part of the window. This button will provide the same functions as the icon on the ribbon of 2013 and 2014 products.

QuickBooks does the math and computes the discount should be 2.48. As you can see in the screenshot, that amount can be edited. Usually the reason for editing would be a rounding error where the customer has calculated an amount a penny or two off.
Select the account to which the discount should post. Here, we have created an account for just that purpose, Discounts Given. Then click done and the discount is applied to the invoice/payment.
Create Special Prices for Special Customers - Automatically
If you discount certain items or certain customers on a regular basis, there’s an easier way than using a discount type item. Price Levels in QuickBooks will offer a better solution.
Price Levels are found on the Lists drop down menu. There is a difference between Pro and Premier as to what kind of price levels can be used.
In QuickBooks Pro, Fixed % price levels are available.
Navigate to Lists->Price Levels and select New from the menu that pops up with a right mouse click, and you will see the above window. Name the price level so it can easily be identified. Set whether the price level is an increase or a decrease over the price set in the Item List.
Then round in a way you wish prices to appear on your customer invoices.


The completed Price Level is shown in the above graphic. We’ve named our new price level “15% Discount.” The price level will decrease item prices by 15%.
The rounding has been set so that discounted prices will show as whole dollars. There are many options for rounding. Prices can be specified to end in .25, .50 and others. Many choices will allow specifying prices to end in .49, .89, .99 and so on.
A time-saving feature when using price levels is that QuickBooks can be told to always use a certain price level for certain customers without any ‘reminding.’
By editing the customer and accessing the Payment Settings tab, we can specify a certain price level to be used automatically with that customer.

Now, without the need for a discount item, the price comes up automatically for this customer with a 15% discount. How did QuickBooks compute this price of $2736?
A case of 500 ML Cattle Supplement is 24 bottles priced at $133 each. So, QuickBooks starts with $133, discounts by 15% (19.95) to arrive at a price of 113.05. Per our rounding instructions, it then sets the price at $114, rounding up to the nearest whole dollar. The last part of the calculation is to multiply the each price times 24 to reach a case price of $2736.
You could alter the pricing or units of measure to tweak the way the final price will come out on an invoice. Using different methods can yield different results.
The Premier level of QuickBooks offers an additional option to price levels. Per Item price levels.
Many of the same calculation and rounding parameters that are found in Fixed % type price levels are here as well. But, they can be applied to a single item rather than all items.
In addition, the calculation can be based on the price, as with Fixed % price levels, or cost.
Just like Fixed % price levels, the Per Item price levels can be applied to one or more specific customers.
Unfortunately, only one price level can be applied to a customer.
How to Show Discounts Given on Customer Invoices
Discounts are common in many businesses. Discounts for special events, special customers, or special payment terms. Just as there are a variety of reasons for granting discounts, there are various ways to create them in QuickBooks.
Let’s start with a simple method to give a customer a discount directly on an invoice. We can create a Discount type item.
You want to use discount items for one-time or occasional events. In cases where a discount is always granted a certain customer, or a discount given due to payment within a certain time frame are more efficiently handled in other ways.

The above screenshot shows the setup screen for a Discount type item. The following screenshot, shows the item setup screen after all the pertinent information is entered.
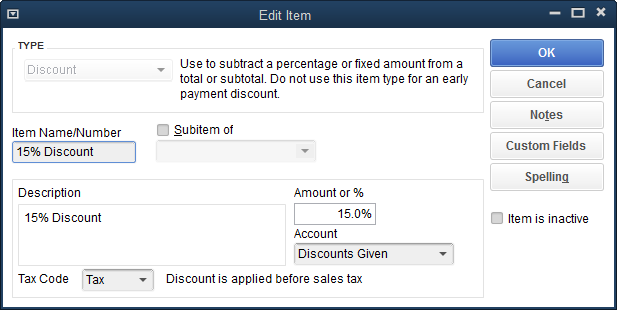
You must decide if the item, by default, is taxable or not. This is important. If you use the discount item to reduce the price of taxable items and the discount item is set to a non-taxable code, sales tax will not be reduced as a result of the discount.
No worries though, the sales tax code can be changed either way with each invoice where the discount item is used. So, just use the setting that would be appropriate most often.
Another setting is the account from the chart of accounts to which the discount item will post. This can be the same income account to which the items you normally sell post. Or, you can create a special income type account to track the amount of discounts. In the graphic of the Discount item, this latter approach was used. The discount amount will post to an income type account called, Discounts Given.
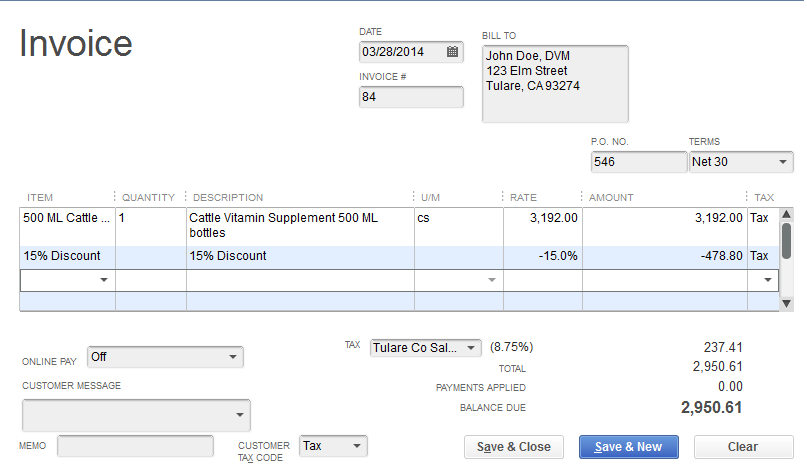
The invoice above shows an invoice using the new Discount item. A nice way to expand on its use is to add a subtotal after the discount showing the net price.
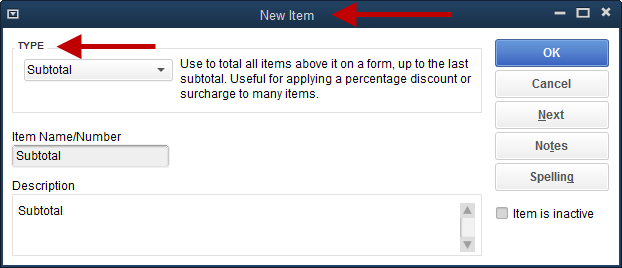

You can see that adding the subtotal line makes this appear a little better to your customer. They now can see the price of the merchandise before sales tax, but after the discount you’re giving.
The subtotal becomes critical for more complex invoices. For example, perhaps several lines need to be discounted, several lines do not.
The discount item in QuickBooks discounts the line immediately above it. If there are three lines of merchandise and/or services, then the discount item is used on line four, the discount is computed on line three only.
In order to discount the entire amount, use a subtotal item on line four, then the discount item on line five. Now the discount will apply to the entire amount.
That’s a good overview of adding a simple discount to an invoice. Next time, we’ll look at some of the other ways to create a discount for a particular purpose in QuickBooks, and do it with less manual input.
Voiding QuickBooks Checks – What About Bill Payments and Paychecks?
Voiding a bill payment check does not reduce any expense in QuickBooks. Payments to vendors are being reduced.
If a bill payment check is voided, the bill originally paid by a voided bill payment check, will now appear on the list of open payables. It is no longer a paid item.
If the bill payment was from a prior period, use the procedure outlined a couple of weeks ago for regular checks with two modifications.
The Name column in the Make Deposit window must have the vendor name the original check used. The Account column must be filled in with the account Accounts Payable.

The above transaction causes an increase in the vendor’s balance by the deposit amount.
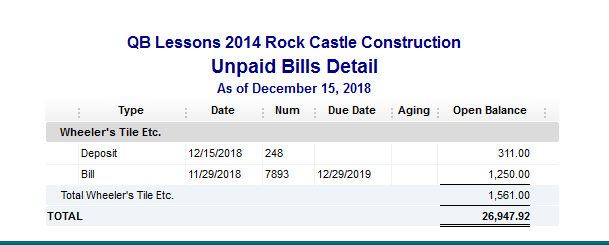
Use the Enter Bills window, but change the radial button setting in the upper left of the window to Credit rather than Bill. Create the transaction just as you would a bill, using the same expenses or items as were on the original bill.

The next step is to access the Pay Bills feature, find the bill for that vendor, and use Set Credits to apply the credit to the bill.
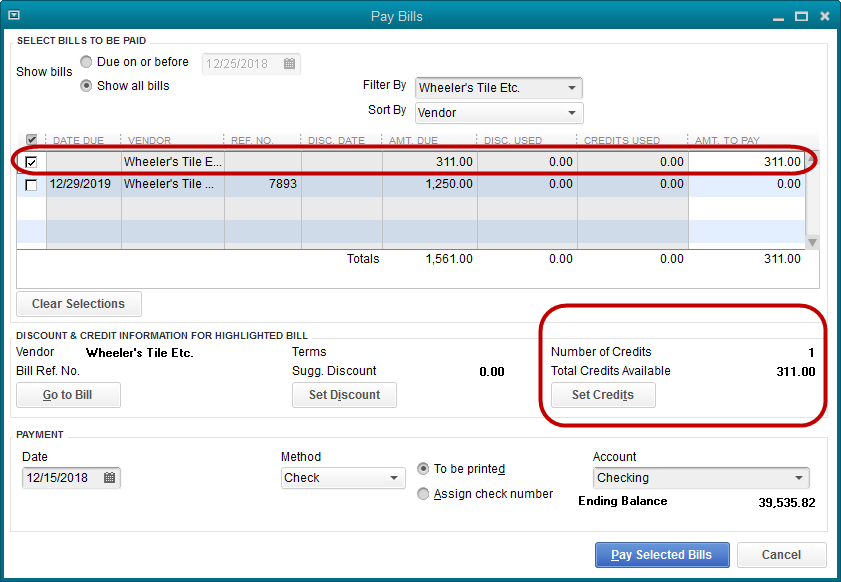
Voiding and Replacing Paychecks
Fortunately, the usual scenario in which a paycheck needs to be voided is when an employee loses a paycheck and it needs to be replaced. Here is an easy way to solve this sticky problem without affecting any other payroll transactions.
If the paycheck to be replaced were check number 287, create a regular check using the same payee (the employee), the date of the lost paycheck, and the same check number.
Use the Payroll Expenses account on the stub portion of the check but leave the amount of the check as zero. Create a memo explaining this is a voided paycheck, then save the check.
QuickBooks will display a warning message that the number already exists, but will allow the check to be saved. Now void the check using the QuickBooks Void command.
This completed step is merely to have a record in QuickBooks that the old paycheck number is a voided transaction.
Now display the original paycheck. Click on the Print icon at the top of the transaction ribbon.
Select Print. QuickBooks will suggest a new number for the check. Either accept the suggestion or type in the number of the check form that will be used, if different.
Once the check has printed, Save the paycheck with the new number.

The check register will now show the old check number as a voided check and the replacement check will, of course, have the new number as printed.
Accruing Sick and Vacation Time
Setting up paid time off, like sick and vacation, is one of the common questions QuickBooks users have. QuickBooks will track this information for you, keeping the running tally of what is available for each employee and printing amounts available and taken on paycheck stubs.
As a demo, we will setup a time off accrual in Employee Defaults, that way it will be the default setting every time we hire a new employee.
Open the Employee Center. From the Manage Employee Information dropdown menu, choose Change New Employee Default Settings. Click on the button, Sick/Vacation.
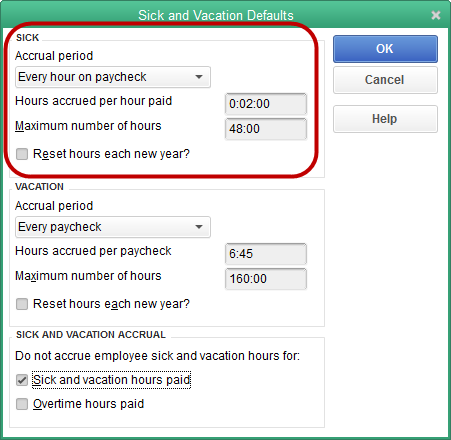
The top portion of the Sick and Vacation window is what we’ll use in this example. It measures sick time. The procedures for vacation times would be essentially the same.
In the screenshot, the accrual period is set for “Every hour on paycheck”, let’s use that.
The next field tells QuickBooks how much time to accrue for every hour worked. In the sample file for Rock Castle Construction, time is set to show in hours and minutes. This is a setting in preferences. The time could show as a decimal.
We’ll set the amount of time to accrue per paid hour as two minutes. 0:02:00. This setting will accrue sixty minutes of sick time by the time the employee has worked thirty hours.
If time showed as a decimal, this amount would show as .03333. It would be the same amount of time.
The employee will be allowed to accrue a maximum of forty-eight hours. At that point, time ceases to accrue until some hours are used, bringing the amount available below forty-eight again.
The hours will not reset each year, which is a requirement in some states.
Note the checkboxes in the bottom portion of the window. We don’t want paid sick time to accrue on sick and vacation time used, so we will make that selection here.
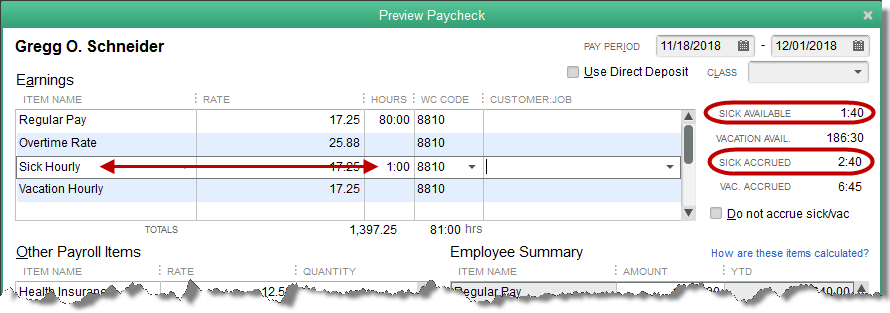
Above is a paycheck created for a Rock Castle employee. Note the circled areas on the right. The lower of the two shows that Gregg has accrued 2:40 in sick time for the hours on his check. That’s eighty hours times two minutes each, resulting in 160 minutes, or two hours and forty minutes, for this paycheck.
The double headed arrow points out that we have added one hour of sick time to be paid. This lowers the amount of sick time available to 1:40. That is the amount shown by the top circled area, Sick Available.
Everything seems to be calculating correctly.
How to Correctly Void a Check in QuickBooks
Hint: It’s not on the Edit menu
This is an area of QuickBooks that seems to generate more mistakes than almost any other.
QuickBooks provides a command, located on the Edit menu, to void a transaction. When this command is used, the transaction amount is changed to zero. A memo is added indicating the transaction has been voided.
But it is an edit. That is, the transaction retains its original date. The amount just changes to zero.
The problem with this solution is the impact on older transactions being voided.
Assume a company’s bookkeeping is complete, financial statements have been printed, perhaps given to a bank, and a tax return filed.
Then, it is decided something needs to be done about the old checks that won’t clear the bank. They are listed as outstanding on the bank reconciliations, perhaps the check dates are year or more old.
So, the checks in QuickBooks are voided. The result? Besides voiding the checks, the previously issued financial statements are incorrect and the filed tax return is now incorrect.
Voiding a check in a current period causes few issues. It can be located in the check register or on any report. Double click on the line with the check in order to view it. Then, from the edit menu or the Delete icon of the transaction ribbon, choose Void Check.
It might be a good idea to add a note of explanation in the memo field of the check. Then Save and Close to record the transaction. Since the check was originally written in the current period, prior account balances are not affected.
Voiding Checks From Prior Periods
This is the more common situation and a task that must be handled with more care. The first step is the same. Find the check to be voided either in the account register or on a QuickBooks report.
Double click on the entry to view the check. In the memo field of the check make a note that the check is being voided with a deposit entry as of a current date.
Do not void the check with the QuickBooks Void command. Only note in the memo field that the check will be voided, and on what date.

Using a current date, create a Deposit in QuickBooks. The Name column can be left blank.
In the Account column, use the same expense account as was used on the original check. In the Memo column explain that check #XXX from (original date of the check), is being voided by this deposit. In the Amount column, use the amount of the check being voided.

The next and final step will be when the bank account is next reconciled.
The old check will still be there, but so will the new deposit. Check off both even though they are not on the bank statement. They are the same amount so will net to zero and not affect your bank reconciliation.

How to Setup a Wage Garnishment Order
Those who do payroll in QuickBooks will find it necessary from time to time to create a payroll item. One of the most common is when a wage garnishment order for an employee is received.
When that happens, here is how to accomplish the task.
Navigate to Lists->Payroll Item list in order to display the list of payroll items. Either select the Payroll Item button in the lower left, or right-click your mouse anywhere within the actual list itself.
From the resulting menu, pick New.
In this post, we will use the Custom Setup method. It allows us more flexibility setting up the item.

You can see the many types of payroll items that can be selected in the graphic above. While the examples for the type selected suggest union dues, retirement plans, etc., a wage garnishment is definitely a deduction. So, we will choose Deduction as the payroll item type.

The next window in the wizard wants a name for the item. If you create a wage garnishment item for each wage garnishment order received, you will be able to create the checks to disburse the withheld amounts more easily. That’s what has been done in this example. Gregg Schneider is the employee whose wages will be garnished.

This screen allows you to specify the agency for payment of the withheld funds. It also contains a field for the number that identifies your employee to the agency. This is why we created the payroll item for only one specific garnishment order. Otherwise, this information could not be filled in here.
There is also a field for the liability account QuickBooks will use when creating paychecks and withholding the specified amounts. By default, QuickBooks will suggest Payroll Liabilities. Using an account like Wage Garnishments Payable allows much better tracking of the amounts coming in and going out of the account.
![]()
The Tax Tracking Type window is critical. The selection made from the dropdown menu shown, will determine the taxability of wages, how those wages are reported on government forms, and how they affect W2’s.
There’s quite a list of available options and if setting up something other than a simple wage garnishment, you’re likely to find on the list exactly what you are looking for. For our purposes, a wage garnishment does not affect taxes. None is the correct choice.
The next window (not shown) will allow very specific setup of the effects the new payroll item will have on tax withholdings. Generally, if you feel something in that window needs to be changed, you should seek professional payroll advice from your accountant or bookkeeper. Rarely would anything in that window need to be altered.

If the payroll item were to be based on quantity, like mileage, we could specify that in this window.

A wage garnishment will be deducted from net pay.

The last window in the setup process allows us to set a default rate. This can be either a dollar amount of a percentage. In the example, we have specified 25% of the employee’s net check.
If there were an annual limit, that could be set in this window as well.
In next week’s post, we’ll detail how to set this up with an employee to automate payroll processing.
A Simple Way to Write Off Uncollectible Invoices
From time to time, it becomes necessary to write off a customer balance that has become uncollectable. Let’s look at how to record this transaction in QuickBooks.
Step 1 - Add a new Item for Bad Debts
► Open the item list, click the Item button in the lower left corner, and select New.
► Select 'Other Charge' as the item type.
► Name the item "Bad Debt".
► Do not enter a default amount
► Make the item taxable and in the Account field, select the expense account for Bad Debt Expense. If you don’t already have an expense account for this purpose, you can create one without leaving item setup.
Step 2 - Issue a Credit Memo
► Choose the Refunds and Credits icon from the Home Page or select Create Credit Memos/Refunds from the Customer drop-down menu
► Enter the customer, a current date, etc. in the header of the credit memo.
► Use the bad debt item just created as the line item in the credit memo. Enter the amount to be written off exclusive of any sales tax amounts.
► Enter the appropriate Sales Tax Code. Use a non-taxable code if there is no sales tax to be written off.
► If applicable, select the appropriate Sales Tax Item from the drop down list at the bottom of the Credit Memo form
► Click Save and Close.

Step 3 - Apply the Credit Memo
Choose the selection to Apply to an invoice when this popup appears.

Be sure the correct invoice, if there is more than one, is selected in this window, and click Done.

That’s it. This method allows the recovery of any sales tax that may have been paid on the customer’s original invoice. As long as you use a current date for the credit memo, it preserves the account balances from previous periods. Your accountant will thank you for that.
Anyone using this method already?
Getting Paid Faster
QuickBooks’ Finance Charge Feature
Statements and finance charges can help small businesses receive more timely payments from their customers.
There is a little setup in order to use finance charges in QuickBooks. Let’s look at that first.
Navigate to Preferences->Finance Charges->Company Preferences.
The first field asks for an annual percentage rate the finance charge computation should use. Keep in mind this is an annual rate. In the sample company, QuickBooks will compute what the annual amount should be, then divide to only charge for the appropriate period, usually one month.
What is the minimum amount QuickBooks should charge. This field should really be filled in. Otherwise, the amount could be very small, making it less than the cost of charging the fee.
A grace period is often a good idea. Where this is most useful is preventing a customer payment and a statement with a finance charge from crossing in the mail.
As an example, say the customer has terms allowing thirty days before payment is due. They pay on the thirtieth day. At the same time, finance charges are computed and statements sent by the business. The customer will receive notification they are late and have been charged a finance charge even though they paid on time.
Finance Charge Account allows the selection from the chart of accounts. Finance Charge income will post to this account. A best practice is to use an Other Income type of account.
Most QuickBooks users will charge from the due date as shown.
Rarely does anyone want to print an invoice for each finance charge created. Most companies will leave the final checkbox unchecked.
To calculate the finance charges, either the menu option on the Customer menu or the icon on the Home Page can be selected. The following window shows the Assess Finance Charges window from the sample company Rock Castle Construction.
Only one customer has overdue invoices as of 12/31/2018 (the date in the sample file).
The overdue balance is $3500. If we looked up the details of this balance, we would find an invoice that was due on 11/14/18. The amount is overdue by several weeks.
Ten percent (the amount of our annual rate) of $3500 is $350. At December 31 the invoice is forty-seven days late. The result of that calculation is a finance charge of $45.07.
Different states may have regulations controlling the amount that can be charged customers for late payments and when those can be assessed. Be sure when you set your preferences you are in compliance with these regulations in your state.
Do you charge your customers finance charges? Does it help you get paid faster?
The Customer’s Check Bounced, Now What?
There is a feature, introduced in QuickBooks 2014, that will make the entries for a customer’s bounced check in QuickBooks. It uses the method we have suggested to QuickBooks users in the past, but those entries had to be created manually. Now, the software does it automatically.
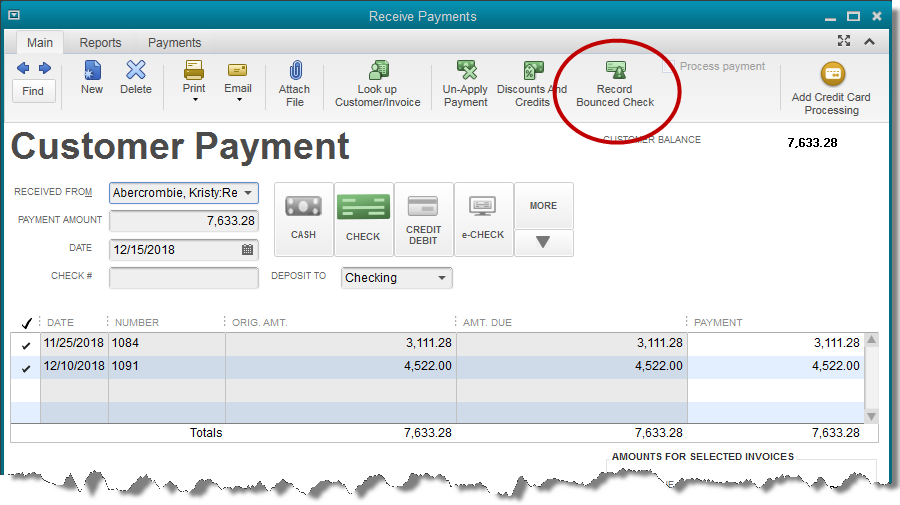
Above is a screenshot showing a typical payment transaction in QuickBooks and highlighting the icon on the transaction ribbon that will activate the Bounced Check feature. Note the manner in which the payment is currently allocated.

Above is the window that opens once the Bounced Check icon is selected. Note that all the fields in this popup window are editable. You are able to choose the amount the bank has charged you for the bounced check. You are also able to set the transaction date, the expense account charged for the bank fee, class (if you use the class feature), and the fee you wish to charge your customer.
Once the information is filled in correctly, you may select the Next button at the bottom of the window.

This is an informational window, explaining what entries QuickBooks will make.
Note that in section 1, QuickBooks is explaining that the two original invoices paid by this payment, are now marked as open, or unpaid. Section 2 explains that the amount of the bad check, $7,633.28 and the service amount charged by the bank, $25.00, have both been deducted from the QuickBooks bank balance.
Section 3 informs you that a new invoice will be created for the customer, charging them and adding to their balance, the amount you, the QuickBooks user, chose to charge your customer for the returned check. We chose $35.00.
The customer name in the graphic is “Remodel Bathroom” which can seem a little confusing. This sample file is for a contractor who tracks income and expense by job. The payment was for a particular job, Remodel Bathroom. In your QuickBooks file, if you used an actual customer name on the invoice, rather than a job, that name would show here.
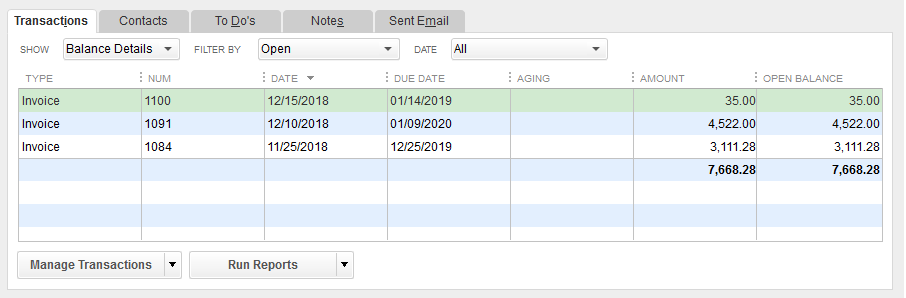
This last graphic is the portion of the Customer Center showing the customer’s transactions. It has been filtered to show only open transactions. Note that there are only three invoices open.
The bottom two are the invoices originally marked paid when the payment from the customer was first received. QuickBooks has marked these as open. This procedure allows these invoices to age properly, as of the original invoice date since, in reality, they were never really paid.
The third invoice, the one shown on line one in the graphic, is the invoice charging the customer the $35.00 fee for the dishonored check.
Recording a customer’s bounced check is as easy as a couple of mouse clicks.
Since this feature has been available since the 2014 version, have you ever used it?
When a Customer is Also a Vendor
What to Do When a Customer is Also a Vendor
This is a common scenario for small businesses. Another business buys product from you. They are a customer. But, they also sell to you. They are a vendor.
This is an issue in QuickBooks because a name cannot be both a customer and a vendor. And there is no way to trade services or products between customers and vendors.
At least, not in a straightforward, documented way. There is a solution.
Creating a name as both a customer and a vendor is not difficult. Change the name a little.
Let’s say we have a customer named Greg Aackerman. We want to put Greg on the vendor list as well.
In vendor setup, use the vendor name ‘Greg Aackerman (vendor)’, and fill in the “Print on Check as” field with the name only.

Create a new bank type of account. You’ll see why in a few paragraphs. Name the new bank type of account “Clearing Account.”
Recording transactions is simple. Use the customer, in our case Greg Aackerman, to record sales on invoices. Use the vendor, in our case Greg Aackerman (vendor), to record purchases on bills.

Saving the above transactions results in the following customer/vendor balances.

The puzzling part for most QuickBooks users comes now. How do we offset the balances?
First, note the amounts. Greg owes us $1125. We owe him $560. So whatever we do, we want to end up with a zero balance due to Greg the vendor and a balance due us of $565 ($1125 - $560) from Greg the customer.
Receive a customer payment from Greg in the amount of $560.
Navigate to Pay Bills and pay the bill we owe to Greg the vendor. Use the Clearing Account as the bank account to pay from.

Record a bank deposit. Deposit only the $560 payment we received from Greg and deposit it to the Clearing Account.
The result is that we no longer have a balance due to Greg in accounts payable. We show a balance due from Greg in accounts receivable of $565.
It’s important to double check and be sure we have created the transactions correctly. If we have, there should be a zero balance in the bank type account, Clearing Account.
![]()
QBO – Easier Time Entry for Workers
This option isn’t for everyone, but it is a unique capability of QBO. If you sell services to your customers, most likely you are purchasing those services either from contractors or employees.
If you sell those services based on time, X number of hours at X dollars each, you need a record of that time in order to invoice the customer/client.
QuickBooks Online (QBO) has some features that can help you with this process. The Plus version of QBO includes time tracking features that simplify the entry and sale of the services you provide.
The base subscription for the Plus subscription to QBO allows up to five users. In addition to those five, you can create two accountant users which do not count against the limit of five.
The unique capability we want to highlight here, is that you can add even more users without paying additional fees. Users with report viewing only rights and users with time entry rights can be added. An unlimited number at no cost.
To see how this works, we’ll setup a fictional example. We have a sample company to use, Rock Castle Construction. Rock Castle provides certain services to its customers. Some of those services are performed by employees, some by subcontractors.
All this time must be tracked so Rock Castle can pay for it and invoice its customer. To ease the burden of tracking the time, we’ll let those who provide the service track the time for us.
The first step is to set up a new user in QBO.
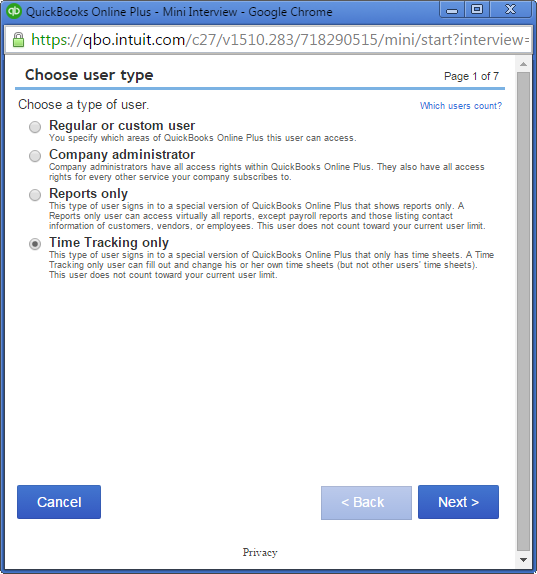
From Settings (gear icon), choose Manage Users. Then Add a new user.
Remember, selecting Time Tracking as the user type, means we can add as many as we want.
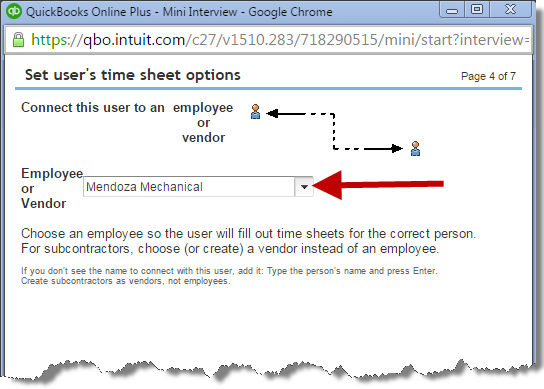
Both the list of vendors and the list of employees is available, we can choose a name from either one. In this case, we will choose a vendor, Mendoza Mechanical.
As we proceed through the setup, QBO will ask for the user’s name and email address. We enter the information and continue.
QBO will invite the user to setup an account.
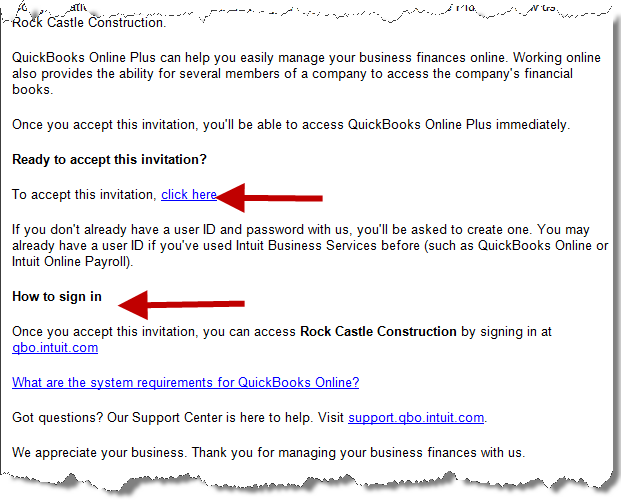
Above, you can see a portion of the email QBO sent to Mendoza Mechanical, inviting them to setup their user account in Rock Castle’s QBO subscription. A link is there allowing the recipient to accept the invitation. There are also instructions for signing in when time needs to be entered.
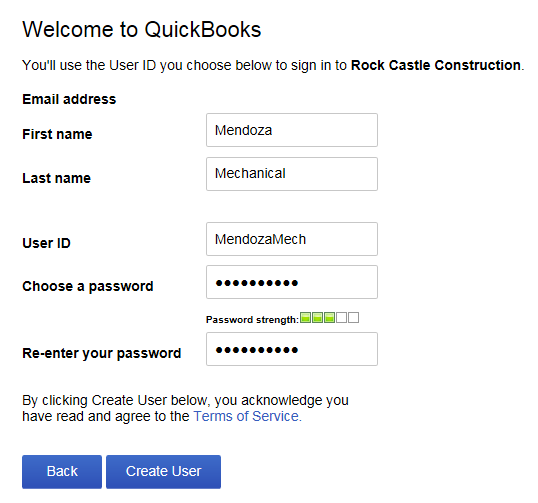
Above is the very simple screen presented to Mendoza so they can setup their user account login credentials.
After the one-step setup is completed, Mendoza can access the time activity portion of Rock Castle’s QBO subscription. Here, they can enter time.
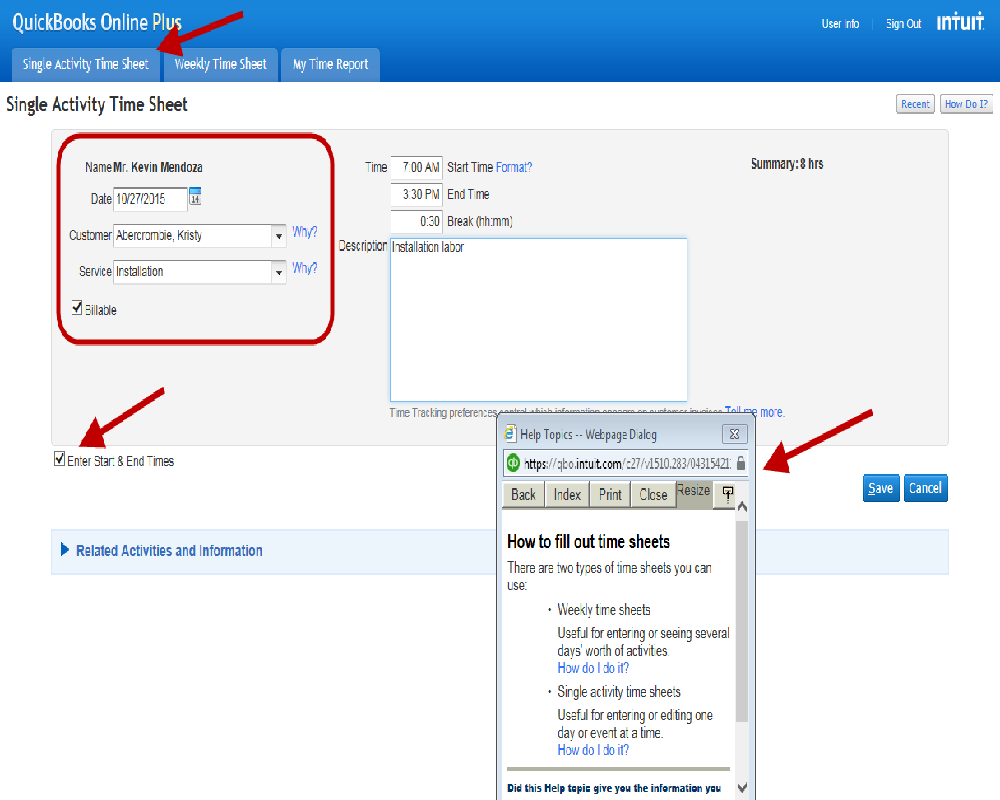
Above is a screenshot of Mendoza Mechanical’s access to Rock Castle Construction’s QBO subscription. How much of the program is accessible is always a concern. But you can see from the screenshot that the other menu items do not exist in this window. There is nowhere else in the software this user can go.
Shown is the single activity time entry screen. A weekly timesheet could also be used. Mendoza selects the customer they worked for and what service was performed. They can enter time as a total amount, or opt to include start and end times.
There is also a help popup window to answer questions they might have about this entry.
Once the time is entered, it is available in the QBO system to pay Mendoza and invoice the customer without further manual entry.
Is a feature like this something that would be useful to you?
Updating Costs and Prices Automatically
A lot of the work Intuit has done in recent years to improve inventory management in QuickBooks has gone into their Enterprise software. Even without the Advanced Inventory features that are part of the highest subscription level, Enterprise has several inventory features the other versions of QuickBooks don’t have.
One of those is automatic cost and price changes.
It’s very important to note a couple of things about cost information in QuickBooks. First, the value of inventory is maintained on an average cost basis. That is, if we purchase a widget at $5 and one at $10, QuickBooks tracks inventory as 2 widgets valued at $7.50 each.
The sale of one of those widgets will generate a charge to cost of goods sold of $7.50.
An item record actually has two cost fields.
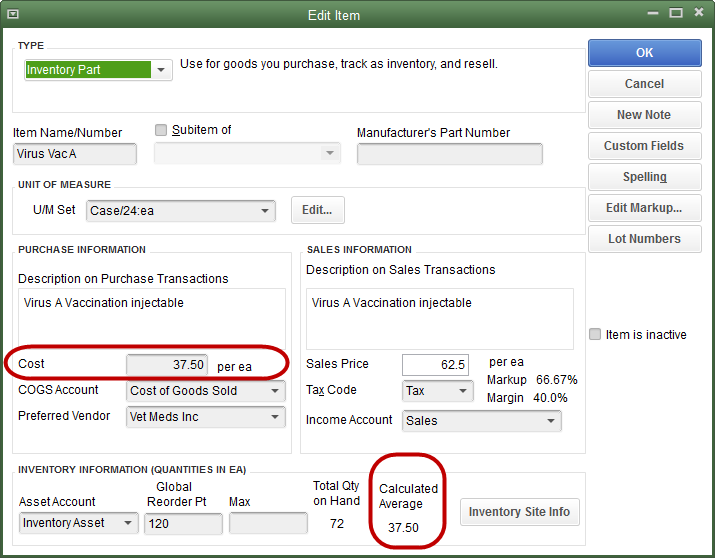
The bottom circled area titled Calculated Average, is the QuickBooks generated average cost for this item. It is not an editable field.
The upper circled area is editable. You can put any number you want in that field. It affects very little. QuickBooks uses the average cost in all accounting entries.
That can change with QuickBooks Enterprise. That user-entered cost field can matter very much when using the automatic cost and price updates. Let’s see how that feature works.
First, turn on the preference.
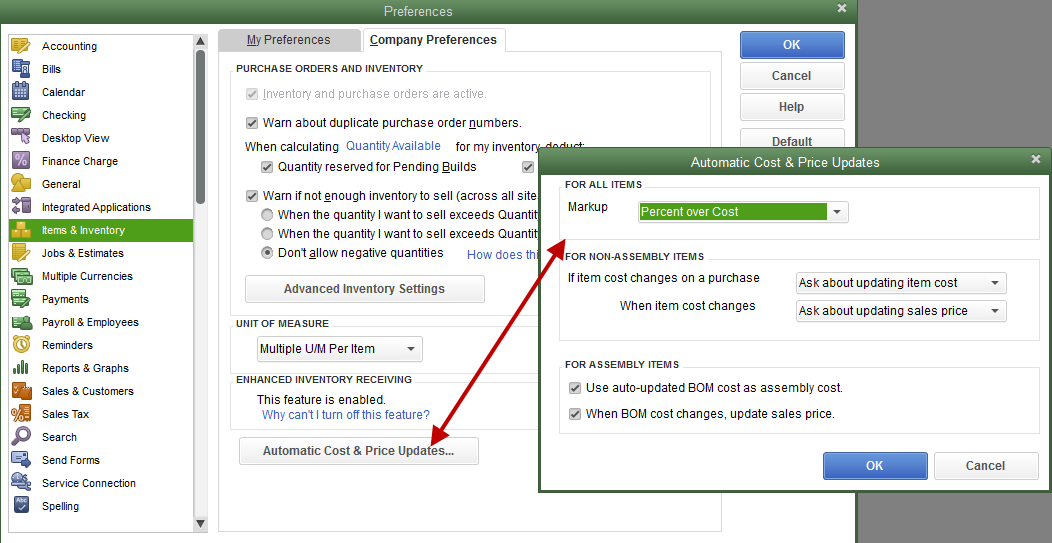
Several settings are available in the Automatic Cost & Price Updates window. The top dropdown field labeled Markup, gives the QuickBooks user two choices. Percent over cost or Amount over cost.
The middle section determines how automatic cost updates will be handled by QuickBooks. The first field is labeled “If item cost changes on a purchase. The choices are Always update item cost, Never update item cost, or Ask about updating item cost. Selecting Always or Ask and then assuming the QuickBooks user responds positively when asked, will cause QuickBooks to update the Cost filed in the item setup window.
The second field is labeled “When item cost changes.” The selections for this field are Always update sales price, Never update sales price, or Ask about updating sales price.
In the sample file is a product named Virus Vac A. The cost field is filled in with the amount 37.50. The price is set at 75.00.
If we enter a bill purchasing Virus Vac A at 30.00, the following popup appears.
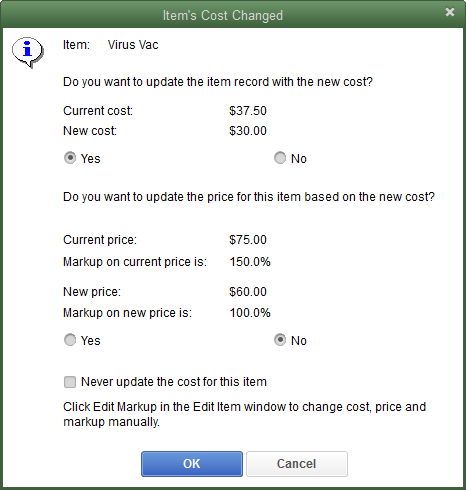
The popup appears because the setting selected in preferences is “Ask about updating item cost.” Yes has been selected as the answer in the graphic in order to show the price options. If yes is not selected, the price update options are grayed out. If you do not automatically change the cost, there is no way to automatically change the price.
So, the new cost is $30. QuickBooks will change this value in the item window when this transaction is completed. The markup on the old cost is 100%. A cost of 37.50 times 100% yields a price of 75.00.
Now, if QuickBooks updates the new cost to 30.00, in order to maintain the price markup of 100%, the price will be updated to 60.00.
Let’s go back to our Automatic Cost & Price Updates window.
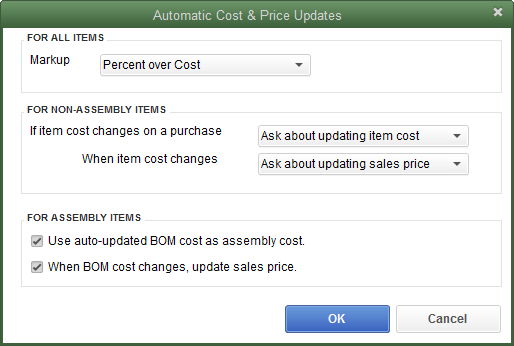
The bottom section in the preference window deals with assembly type items. If we are having QuickBooks automatically update costs for inventory items, should these new costs then add up to create a new cost for an assembly item? The checkbox indicates yes, QuickBooks should make that calculation.
If the cost of the assembly total bill of materials changes, should QuickBooks automatically update the sales price? Again, a selection in this checkbox indicates that yes, it should.
How do you maintain pricing as the costs of the products you sell changes over time?
The Chart of Accounts - What’s Different in QuickBooks Online vs. Desktop?
There are two good reasons to review the chart of accounts today. One, there is a setting when creating a new account that is unique to QBO. Two, knowing how to create accounts will make your company’s financial reports more accurate.
The account, from the chart of accounts, tells the financial software how to handle the amounts we post there when we create transactions. If the account is an asset or liability, the balance in the account is increased or decreased depending on the type of transaction we use and that balance remains, even across multiple years. It’s the account type that makes that happen.
On the other hand, with an income or expense type of account, the dollars posted there only appear on reports for certain time periods. We determine that time period when we create the report. A Profit and Loss report for June 2017 will show the expense amount of in particular account for that time period only, regardless of what may have happened in the past.
A 6/30/2017 balance sheet will show the total of all transactions in an asset or liability account since the beginning of the QuickBooks file, up through 6/30/2017.
So, it is very important to use correct account types. QBO takes another step.
You can view your chart of accounts by navigating to Transactions on the left panel and then choosing Chart of Accounts.
Above is a screenshot showing how the list appears. Note the column headers.
The first column from the left displays the name of the account. This is usually specified by the QBO user.
The second column shows the account type as explained a few paragraphs ago. In the graphic, Bank, Accounts Receivable, and Other Current Asset types of accounts appear in the list.
The third column is circled. This is the Detail Type.
Detail Type is not part of account setup in QuickBooks Desktop, so if you are new to QBO, you may not be familiar with it. It’s a way QBO gathers more information about how you intend to use this account. That information helps QBO decide where the account balance should appear on financial reports like Profit and Loss and Balance Sheet.
The fourth column shows the account balance, but only for balance sheet accounts. Those would fall into the general categories of assets, liabilities, and equity.
Scroll down this list to the income and expense accounts and you find that no balance shows. Income and expense accounts close, that is the balance is zero’d out for reporting purposes, at the end of each year. QuickBooks does not maintain an indefinite running balance for those types of accounts.
Also note that there are two account balances for the bank accounts shown. If the screenshot were long enough that you could see the credit card account type also, you would see both account balance columns filled there as well.
This tells us there is a difference between what our QuickBooks balance in this account is and the balance coming from the financial institution. There are transactions we need to match or enter from our bank feeds.
Once you are more familiar with and understand the QBO chart of accounts, it becomes easier to create new accounts correctly.
Get Creative in QuickBooks
QuickBooks Premier and Enterprise provide an item type not found in Pro. It’s the inventory assembly type item.
Assembly items are used to create, assemble or manufacture products to sell from different component items already in stock.
Let’s stick with our sample company, Rock Castle Construction. They have one assembly type item. It’s an Interior Door Kit.
Rock Castle buys and maintains in inventory things like doors, door frames, hinges, doorknobs, etc. From these inventory parts, it assembles what it calls an interior door kit. That is, a door assembled with a frame, hinges, doorknob, etc. All the purchaser has to do is slide the mounted door and frame into a wall opening.
Since the component pieces are all in inventory, let’s look at how the assembly item would be created.
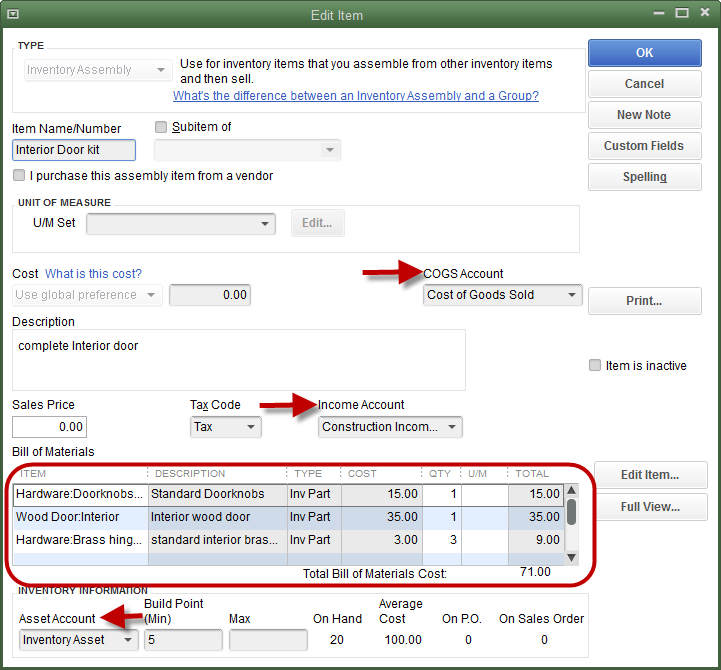
An Inventory Assembly type item is similar to an inventory part type item. You can see from the three arrows shown in the graphic, it requires the same number of accounts for posting as the item is used in various transactions. Cost of goods sold, income, and asset.
The big difference is the circled area, the bill of materials. This tells QuickBooks what items go into building this assembly item. From the screenshot, you can see that it takes one doorknob, a door, and three hinges. It also takes a door frame but you would have to scroll down that list in order to see that particular item.
What this means is that when one Interior Door kit is made, inventory of the component pieces will be reduced by the amounts required for the manufacture of the finished product.
In this case, there will be one less door, doorknob, door frame, and three fewer hinges.
QuickBooks has a process in order to create the assembly item, it’s called a Build Assemblies transaction.
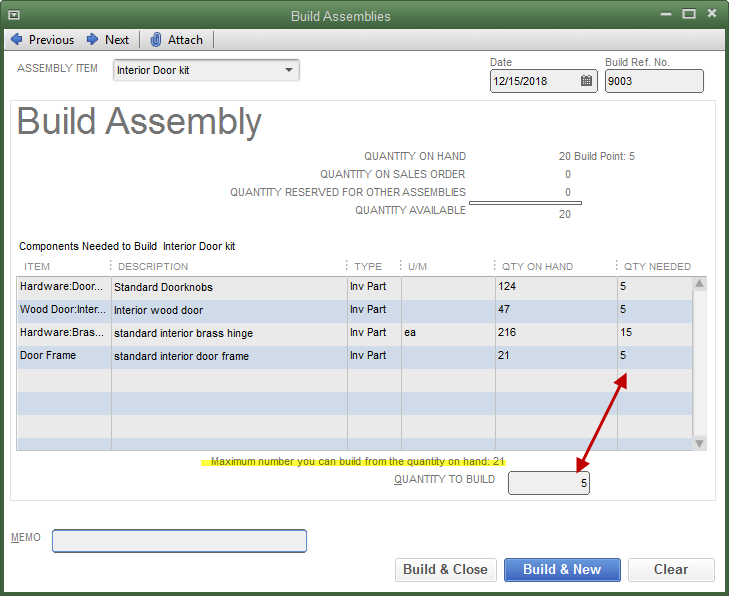
The quantity we want to build is entered in the lower right part of the window. You can see in the screenshot that we have decided to build five of this item. Making that selection fills in the right-most column. How many component parts will be used in this transaction?
The quantity on hand of those components will be reduced by the numbers shown in the “QTY NEEDED” column. The on hand quantity of the assembly item, Interior Door Kit, will go up by five.
This is a good basic overview of how the assembly type item works in QuickBooks. It is also possible to add service item(s) to the ‘recipe’ or bill of materials, thus adding the cost of things like labor and overhead to the inventory assembled.
Do you have a use for this QuickBooks feature? How do you use it?